At the beginning of each new year, Matt and I go on a date to reflect on the past year and share goals for things we want to accomplish in the coming year. Last night we went out for that date and had a blast. We talked a lot about the blog, and it had me reminiscing some of my favorite moments and posts from last year. In that spirit, I decided to repost my favorite post (with some fresh edits and condensed content) from 2012 – my DIY King Size Rag Quilt. Enjoy!

My bed needed a makeover. I really wanted a colorful, anthropology type quilt. Every quilt I looked at online (and really liked) was easily over $300. I did not want to pay that, so I shopped and shopped for fabric. I found some at Wal-Mart for like $1 or $2 a yard! They aren’t the prettiest fabrics, but once they were mixed in with the others…they looked great! The rest of the fabrics were from Jo Anne’s, Hobby Lobby, and Hancock Fabric. I couldn’t get them all in one place. I was searching! After I had all my fabrics, I let them sit on my kitchen table for about two weeks. I would walk by and see if I liked them all together or not. I rotated fabrics in and out until I settled on these. No joke!! Does anyone else do that?!

After buying the front fabrics, I realized that this project could still be a bit costly. I decided to cut up my current quilt (and another green quilt we had lying around the house) to use in it. If you have ever made a rag quilt, you know it takes three layers of fabric to sew together, before you start assembling your squares. It takes the top/decorative fabric, the stuffing insert, and the back fabric. By using my old quilts, I not only saved money by not having to buy two of the layers (it worked for my stuffing and back fabric)…I also only had to cut TWO layers of fabric rather than three! This was a huge time saver considering how big my quilt would be. We had been using a big brown blanket on our bed while this quilt was in process (as seen above). So, we are really excited when it was done!

I’m going to try to share with you how I completed this project from start to finish. I’m sorry in advance for the lengthy post, but I hope you find some of my tricks helpful! The first step was to start cutting up my fabric and old quilts.

There were a lot of nights cutting squares in front of movies.
I finally finished cutting the old quilts plus all my decorative fabrics and thought that alone was a huge accomplishment!!

Next, I sewed my decorative fabric right on top of my old quilt’s decorative side. I wanted the back/solid colors of the two old quilts to be the back side of my quilt.

I literally took one cut square of my new fabric and one old quilt square and laid them on top of one another. I then sewed from corner to corner to join them together and create an “x” across the two pieces in order to make them one. After I had done this to all my fabric, I laid them out and decided how I was going to attack it. I got more fabric of some of my favorite pieces than others, so I didn’t have equal amounts of squares to create a pattern. I decided to try to do as random as I could.

I made little piles of 10 squares each (an estimate of bed’s width) and started sewing those together to make strips. Note: Lay the two backside fabrics on top of each other to sew the squares together. You sew directly onto the pretty side of the fabric. This is backwards from most quilts. By doing this the front layers will be out and have the “rag” fringe showing out front.
I did my best to pick different fabrics to be beside each other in the different strips. At times I would lay the strips I had completed down to see if I needed to sew a “purple type material” in the middle of or at the end of a strip. I didn’t want to finish my quilt and all the purple or all the red to be at the end of the rows, if that makes sense.

Once I finished all my strips, I started laying them out one at a time to see which strip looked good next to it. I tried to prevent two of the same fabrics from being directly above/below one another.
I kept sewing the strips together. I picked up a cute little helper at times during this process.

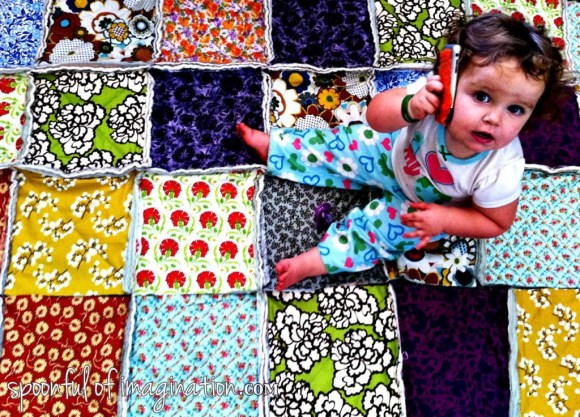
My sweet girl LOVED sitting on the quilt as I laid it out to see which strip should go next. It is quite colorful and fun. She was drawn to it, so am I!
Since I’m using my old quilts, the back looks kind of funky. It’s a mix of the two back fabrics, but I like it. No one sees the back! It just adds some character and story to this new quilt!

It got quite heavy to keep laying the quilt out and then picking it up to sew on another strip!

I finally got all my strips sewn together, and I laid it out on my bed to check the size.

I loved it, but I decided to give it a cleaner edge. I gathered all my beautiful scraps (that I couldn’t bear to throw away).

I sewed them together in one really long strip (about 3″ width), and then ironed it in half. This created a flap to lay over the edge of my quilt.


I sewed my edging strips onto the quilt. In this picture you can see one “downside” of reusing a quilt as your stuffing and backing. It will show your stuffing in the “rag” look of the quilt. I am ok with it, but I just wanted to warn you.

After I edged it, I wanted it to look more “finished”, so I went back and added another row of stitching to the edging. It was more for decorative purposes than anything else.

Our old quilt was a normal queen size quilt. It wasn’t a perfect square. After changing the sheets, we never could easily tell which way the quilt went back on so it fit the bed the way we liked it. I added a special touch to the corner of this quilt, that should be up by my husband’s head, to make that process easier from now on.
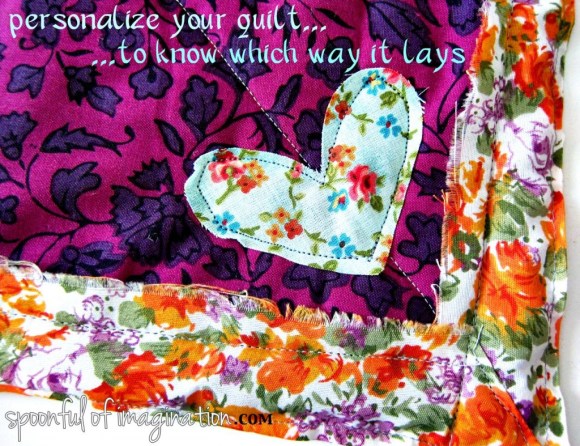
This little heart helps us easily know which way the quilt lies on our bed. I love that when you are making something, you can keep personalizing it all the way to completion!!


I love the final product, and I am so proud of it!! I hope it inspires all you non-sewing crafters to maybe want to start sewing! You can do it!!
This beautiful quilt was the start of our six month bedroom makeover. After making the quilt, I made the headboard, painted the room, redid an old auction chair, and added some fun new accessories. The space feels completely different, and it has become my favorite room in the house!
I am totally guessing on all my numbers here, but I am going to give you my best estimate of my quilt’s “facts” in case you want to try to make your own.
Materials:
- Two queen size quilts (for stuffing material and back material)
- My squares are 11″x11″
- My quilt is 10 squares down and 11 squares across in its rows
- About 15 yards of fabric. I think that’s about what I cut up. I got a yard of each fabric except my two favorites ( I got two yards of each of those)
- Although I bought 15 yards, I have lots of scraps! I edged with my scraps and I have enough to make the front of shams and probably some creative “scrap pillows”, so you could probably get away with maybe 13 yards?
- My edging is 3″ by whatever length. They aren’t the same length all the way around. The important part is the three inches, so the width is the same folded around your quilt’s edge. When they were folded in half and ironed to form a flap, that flap was 1.5″ wide.
- LOTS of thread
I hope this information is helpful for you to start your own quilt!! If you make a rag quilt, I would LOVE to see a picture! Thank you so much for stopping by!

Your quilt looks great! If only I had the patience! 🙂
I looked at your materials needed. I need material for a king to the floor. How Much more material would I need so that the quilt would go over the pillows to tuck them in and go to the floor.
Lucinda,
I am not sure. I would think a couple yards for sure! I would buy extra…and if you have scraps you can always make throw pillows! Good luck! XOXO
It is looks great! I love that you don’t need a bed skirt! Is your bed a queen or king?
Thank you Angela! It is a king size bed.
Ooh, i have a King Size bed, and your quilt looks awesome!
this is my most favorite post i have ever found off of pinterest! i WILL make one of these and i promise to show you a picture when it is done
This is my most favorite post I have ever come across on Pinterest, and believe me I’ve pinned a lot! (I just bought a house and had a baby!) I am so in love with this quilt and the beautiful fabrics and how much meaning it has in your home now! I am so so so inspired and I can’t wait to make one of my own for my family!
Rony! You made my day!! I am so sorry I am just responding to this message now! Thank you for reading my post, and I am so glad I could inspire you! Congratualtions on your new baby and house! We still have boxes from moving three months ago. Do you think it’s safe to say…what ever is in those boxes…can probably be thrown away?? I hope your adjusting well to your new life. You can totally make that quilt! Send me a pic when you do it! XO Erica
Loved your tutorial just finished a quilt for my daughters birthday, thanks!!
Lynn, That is like the best compliment ever!! Thank you so much for sharing! I am so glad my tutorial could help you! I’m sure your quilt is gorgeous and your daughter loves it! XOXO, Erica
Love love love the quilt! Im actually in the process of making a similar one now….
My machine seems to be having some difficulty going over the thickest points when putting Tue long strips all together. Did you experience this at all?
Also, has th exposed batting from the old quilts held up okay through the wash?
Thanks!
Megan, Thank you for the sweet words!! Sewing machine are so tricky…sewing is not…it’s those temperamental machines :). Yes, I know what you are talking about! I broke some needles and have to get the strongest ones possible. I think they said they were for going through jean material or something. I would just go slow and help push the quilt a little bit through, so it doesn’t get caught up. I hope this helps! I have only washed the quilt once or twice-ha! I always hang it dry. The exposed batting has held up amazingly well! I thought I would have to trim some pieces as more “fringe” happened, but I have not! I would love to see your quilt! I’m sure it is beautiful! XOXO, Erica
Such a beautiful inspiration.Thanks so very much for sharing!
Thank you for your sweet comment Jeanie!! I’m so glad my quilt could inspire you! XOXO, Erica
I love this quilt. It’s exactly what I’d like to make. This will be the first one I’ve ever made so I had a couple of questions. I like how far your quilt hangs over your bed. Is the bed a queen with a king quilt or is it a king and hangs this far over? We have a queen but I want mine to hang over like this. Thank you in advance for your time!
HI! No problem about your questions-I love to help!! My bed is a king, and it really hangs over this much. It is huge! We use to fight for the covers, and now we don’t. It is perfect! I highly recommend it! You can easily google the size of a king size quilt or check on a package in a store…just add like another two feet or so to the width to get a nice big size. This is a great quilt to do for your first one. The rag technique hides any flaws! BEst of luck and let me know if you have any more questions! XOXO, Erica
I have wanted to do this so badly, but I have a problem “quitting” projects that take more than a few days to complete. I think that you may have inspired me to actually go for it! I had an image in my head, but seeing it completed (and recently aquiring a sewing machine) really makes me feel that I could do it!! Great job and thanks for the tutorial 🙂
Britanie! Thank you so much for leaving that comment! I can relate! I have the same problem…hence why there are so many unfinished projects around my house! This quilt was worth pushing through on. My family knows that in the chance of our house going on fire…grab the quilt! (if its safe to of course :)) It’s one of my most prized possessions and the craft I am most proud of. You can do it! Best of luck! XO, Erica
I’m new to quilting, but absolutely love this. I just made my first 2 rag quilts over the past week. My question is, what kind of material did you use for the front. I have only used flannel
Shannon, two rag quilts in a week!? You are amazing!! I used regular cotton fabrics. I was just thinking the other day I should wash my quilt. I think I only have maybe three times since I made it!? It might be gross, but the fabric and bright colors have held up so much and hidden dirt! The flannel one I made my son is one of my favs too. I love how flannel sews. I bet your quilts are gorgeous! XO, Erica
Beautiful quilt, I’ve been looking for an easy rag quilt for some time, Now I’ve found it I can get sewing, Thank you for such an easy option 🙂
Aw thank you so much Vanessa! I hope your quilt turns out beautifully-I know it will! Thanks so much for taking the time to leave a comment! It made my day! XO, Erica
Love the quilt and the ideas for your room makeover, Erica, especially like the LOVE backboard! I make quilts, including rag quilts and love it. All things quilting, that’s what I like. Some of my friends call me “Patches” because scrappy patchwork quilts are my favorite. There is not such thing as “wasted fabric” around my house. I’ve been known to approach strangers on the street, staring at their clothes, and beg them to give them to me to make a quilt. Like Arnold Swartzeneger, The Terminator, “I vant your clothes!”
I think I have a solution for the problem of the stuffing showing. After you cut your old quilts up, pull a few stitches out of the quilting on all edges, no more than the depth of your seam (3/4″, 1″? how big is that seam?) That way you could trim the old batting back so that it would rest behind your seam and your edges would be free to fray without all that “stuff” coming out when you wash it.
Hahahaha Lynda, you are amazing! If you asked for my shirt, I’d give it to you (as long as I had something under it to wear! ;)) Thanks so much for your tip!!! I think you are right! If I ever get up the energy to do another one of these…I will be sure to try it! Thank you so much for sharing! XO, Erica
I think I might try this, except I would like to use denim squares from all the old jeans I have lying around for the backing. I would piece, sew and finish the quilt as you did. My Gram would use a blanket in the middle of her quilts instead of batting.
I hope it is so fun! I have used blankets for that too! Amazing way to save some money! I bet the denim will look amazing! Good luck! XO, Erica
Very pretty and I love that you upcycled your old quilt for the bating and backing! So did I notice that you didn’t cut any of the squares along the edges? Or is it just I can’t tell from the pictures? I was wondering how it works out without cutting every1/4 to 1/2 inch or so…do it eventually fray up a bit to give it a raggy look as well? =) Thanks a bunch for a fun tutorial, Tiffiny (Smilie Mommy)
Best tutorial ever!
Thank you so much! I made mine and love it! http://brenda-heartofthehome.blogspot.com/
I love your tutorial! Found it on pinterest. Going to try and make one each for my kids (twin sized) for their recent room male overs we’ve been working on. Maybe half this size I am guessing? Also one for my bed. I’d love to have a new heavy and beautiful bedspread for us
My sister-in-law. found your quilt, bought me a bunch of material and wants me to make it. I have a few questions for you… 1. what size seams did you make? 2. how did you do the seams where the 4 corners meet? 3. Did you make some kind of seam finishes or how do you keep the edges from fraying out? 4. When using an old quilt for the inside, doesn’t the color and pattern show thru your new top material? Thank you for your time. Your quilt is beautiful 🙂
Hello, I’m not sure.. are the squares 12″?
Yes, 12″ squares.