Spoonful of Imagination

Add it to a Family for Something Beautiful

  • Home
  • Our Family
    • Our Home
  • Courses
  • Shop
  • Contact

Why Should I Create with Trash?

December 5, 2022 By Erica Deuel Leave a Comment

Let’s talk about trash! There are 5 reasons why I think you should create with trash! Trash is anything you might normally throw away or recycle. It has served its purpose, but what if it could serve a second purpose!? You could get more mileage out of your goods and your money?? That is a win!

Follow along with Erica and Reagan in a new video where they teach these tips or keep reading to be inspired how you can create FREE fun at home this holiday season.

Let’s dive in and see, if I can convince you to create with trash. We go through a lot of it everyday, and I believe that we can creatively be intentional with what we re-use.

Have you ever turned a spaghetti jar into a flower vase? Or a soup can into a pencil holder? These are some quick ideas to get you thinking of how you can repurpose something to serve you again.

In this post, Reagan and I make a collage out of trash. A collage is sticking a variety of different objects together to cover a backspace. We use cardboard and a tin pan as our backdrops to hold our collages in this example.

Now, let’s talk about why creating with trash matters!

1. Trash Turns into Art

When we work with new and unusual items it taps into a different area of our brain. As a result, we are learning. We are experimenting and can enjoy the process. We are doing something we have not done or maybe seen done before. We aren’t creating towards a finished product, but we are having fun and learning in the process.

2. Trash is cheap

There are so many assumptions and stereotypes that art is expensive. It doesn’t have to be. We all have supplies (yes, like trash) that we already have paid for and can use to create. When we create, we are bringing something to life. That is art.

3. We Learn

When we work with unusual supplies, we are placed in a position to learn.

We learn about the artist. What are they making? They must care about that!

We are also figuring out how things attach, work together, and so we are being engineers. In the process, we learn about 3d creations. Paper is the cheapest form of “typical” art supplies, which is just flat. When we work with trash, we can create bigger sculpture projects.

4. We Have Fun

When we create with trash, there are no expectations of what we need to make or how something needs to turn out. What a freeing feeling to be able to take risks without judgement and just play!

5. There are no souvenirs

The clean up, when we are done creating with trash, is super easy! Just throw all the extra stuff away or take it to the recycling center. It was going there anyway! There is no need to store any extra supplies.

We can then enjoy our creations, but we can also toss them when they end up taking up too much space and need to move on. We didn’t invest a lot in them.

We had fun. We created. The supplies served their purpose and now they can move on and we can create more.

What do you think? Did I convince you that the next time you feel an itch to create something to first stop and look in your recycling items? The kids are coming home for the holidays. I promise you, if you save some trash, invest in a hot glue gun and scotch tape that you will have hours of what feels like FREE at home fun to do together. It’s such a fun way to connect and see your artists’ brain at work being an engineer and imagining the possibilities!

Are you curious at what you can do with your newly created trash collage, after you create it? Reagan and I will be showing you a second part to this idea in a new video going out in our newsletter this week. It’s a collaborative art game that is fun and teaches TEAMWORK.

If you aren’t on the list, sign up today to be sure to get it or comment below and we can get you signed up.

Share this:

  • Click to email a link to a friend (Opens in new window)
  • Click to share on Facebook (Opens in new window)
  • Click to share on Twitter (Opens in new window)
  • Click to share on Pinterest (Opens in new window)

Recycled Candlesticks From an Old Toy!

October 13, 2022 By Erica Deuel Leave a Comment

recycled candlesticks

Do you have a hard time throwing some things away? There are lots of things I don’t think twice about. Clothes, pillows, dishes are few that I don’t blink an eye at. Maybe one of those are the thing that’s hard for you? For me, I definitely have a hard time throwing wood things away.

Wood seems timeless. It can be painted, stained and built onto and is such a sustainable product. Recently, my Jeremiah was cleaning out his closet and found this wood marble run toy. He didn’t want it anymore, and I kept looking at it thinking there has gotta be something I can create with this old toy!

I looked at the size of wood. They were perfect fun, block size pieces.

I looked at the texture. They were smooth, already sanded, sturdy pieces.

As I stared at the pieces, I realized I could turn them into a recycled candlestick holder.

Recycled Candlesticks Make Fun, Quirky Decor!

I found a wood circle in our garage to be a bigger base and gave that a quick sanding. I then added a little superglue to hold the pieces together and let them dry. I had so much fun moving the pieces around to see what size and angle I wanted them to be. The candlesticks looked really pretty just left as wood, but you know me. I love color, so I added some acrylic paint to jazz them up a bit.

After the recycled candlesticks were dry, I was ready to display them and enjoy! I love mixing homemade decor into our home. These added a fun element to our kitchen table.

recycled candlesticks made from an old toy

I love how they look in my office too, so only time will tell on where they officially end up. How fun are they!? I made something new from something that was almost just trashed or donated away.

My favorite ways to get creative are often to use something that is not expected. I like to use things we wouldn’t find in a craft store.

Being creative is just a process of pairing ideas.

recycled candlesticks

The Creative Process Doesn’t Have to Be Expensive.

We all have things we can repurpose and reuse to make something new.

One way to see things in a new way is to make sure our tanks are full. We can’t be operating on fumes, lack of sleep, deprived of things that bring us joy to have eyes to see things differently. It takes space to have energy or margin to think differently than our auto pilot normal.

That is the most expensive part of the creative process. It requires us to be more whole to think creatively.

recycled candlesticks

I am so excited about my new recycled candlesticks. Now, my mind is going trying to think of other things that would make great candlesticks. Fall is a great time to light some candles to bring some warm and comfort inside as the world is getting colder on the outside.

So, do you have something you can look at with new eyes and make something different out of it? If you need help with this, join us in my 30 Day Imaginative Journey. We are practicing small, quick exercises to get us thinking and practicing growing our creative muscles! Download your free calendar here!

Check out what my Reagan made for her Halloween costume out of trash, which was from one of the imaginative prompts!

Share this:

  • Click to email a link to a friend (Opens in new window)
  • Click to share on Facebook (Opens in new window)
  • Click to share on Twitter (Opens in new window)
  • Click to share on Pinterest (Opens in new window)

Cheap lamp to Industrial Beauty

January 21, 2015 By Erica Deuel Leave a Comment

DIY_industrial_floor_lightToday, I have a funny little tale about a lamp.

Before I get to the lamp, I must say it started with an empty room. We moved into this house, and we had a blank slate. We’ve been tackling it little by little and rooms are coming together. The living room has been one of the slowest rooms since we left our old couch and loveseat in Georgia. This room needed seating.

So, a couch was added.

A gallery wall was added.

creating_a_gallery_wallYet, it was missing something.

This room needed a lamp. One that could sit on the edge of that couch.

It’s no secret one of my favorite things to do is to embroider (especially at night while talking to my boo). I needed a lamp next to the couch to make that possible. There is not much space between the couch and the doorway for a table, so it needed to be a floor lamp.

The only lamp we had on hand was a cheap plastic shade lamp, so I put it there for the time being. It got the job done, but it didn’t look right.

light_makeoverI felt like it was trying to take over my gallery wall or at least be apart of it. The big white shades were distracting. I wanted something that did the job, but maybe a little more aesthetically. This lamp had to go.

cheap_light_upgradeThen I fell in love with a lamp in a store front here in our little town. I thought it was a perfect match. After weeks of trying to get to the store, I finally got in only to find out that the lamp was not for sale. So sad.

I left determined to create my own. Why did I not think of that first? I wanted an industrial type lamp. To me, a wire shade was more subtle than a stark white. I found several shades on-line that would work, but ended up buying two from Lowes. Instead of getting rid of my current lamp, I was going to revamp it.

Processed with VSCOcam with c1 presetI came home with new shades and light bulbs excited to try the switch.

difference_in_lightingIt was that easy. They were a perfect fit. Immediately I knew it was the right lamp. I didn’t have to get rid of it after all. The recycled lamp gave off light, yet it did not look like an addition to my gallery wall, but if it did-I would be ok with that.

I like the wire look better. I think these two shades and clear light bulbs immediately turned a cheap lamp into a fun piece that will be talked about.

industrial_DIY_light

DIY_industrial_floor_lamp

Do you like metal and the industrial look too? If this idea is something you would like to try let me give two fair warnings.

1. Taking the shade off creates a light that is not softened. It may feel harsh because it is so bright. To help offset this, you could get a lower wattage bulb, a vintage yellow bulb, or only use one of the lights at a time.

2. The metal shade is a lot heavier than the plastic shade. So, the lower light kind of stays in the down “reading-light” position you see. My Caleb says it looks like a wilted flower because if you try to reposition it higher-it just falls. This was ok for me, since it is the perfect height to read a book or embroider.

If these two features don’t bother you, you will love the light as much as me!

bohemian_wall_art
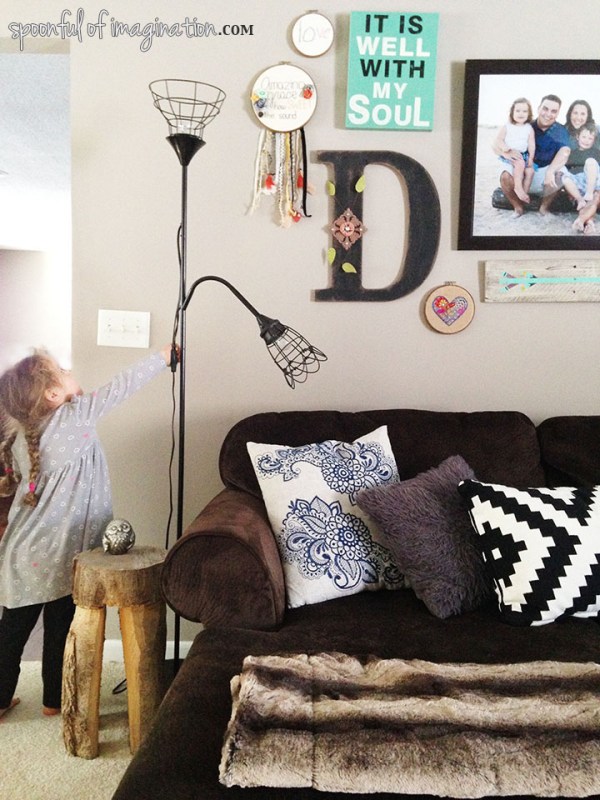
I think the handmade lamp perfectly compliments my colorful, art filled wall.

As someone who loves to create, why did I not think of making my own lamp from the very beginning? I guess sometimes the slow process allows us to experience some things along the way. I hope you get to imagine and try something new this week!

signature


Share this:

  • Click to email a link to a friend (Opens in new window)
  • Click to share on Facebook (Opens in new window)
  • Click to share on Twitter (Opens in new window)
  • Click to share on Pinterest (Opens in new window)

DIY Fabric Flower Pot

June 12, 2014 By Erica Deuel Leave a Comment

DIY_fabric_flower_potDo you know that moment when your porch turns into a kid jungle? There are kids climbing, doing chalk, looking for bugs and shoes strung all over. In these moments, you wonder if you should use another door to join them outside?

This is often my front stoop. I love it. On any given moment our front door looks like it should be a playground or at the very least, a back door. The chaos is my crazy beautiful life. Each one of those pairs of shoes belongs to a child I love. Each flower-pot was painted by one of those beautiful children (or myself).

The other day there was great excitement over a black beetle maneuvering through our flower pots. As the boys scrambled to catch him, one of my flower pots was broken.

broken_pot

These are the moments as moms we have a choice on how to react. Yes, the kids could look for bugs in better places. It doesn’t matter how many times I encourage it. They want to be where I am, so if I am sitting there…they are close by. It wont be like this always, so I am soaking it up as it is my season to enjoy their presence. After the broken pot, the kids looked at me. They were watching to see how I would respond. It was only a $0.79 pot, but they knew it was mine and that I had asked them to look for bugs in the yard. I chose to practice what I am so desperately trying to teach them…Patience and Grace. Words have power. The power to up lift or the power to bring down. So, I quickly said it was no big deal and we could fix.

This is how we did it.

I started with pulling out my superglue that I call my concrete to keep the kiddos out of it.

cracked_potI then ripped fabric like I did on my Love Sign till I had a pile of fabric scraps.

ripped_fabric

ripped_fabric_stripsI painted a little mod podge onto my pot, and stuck a fabric strip on top. I slowly did this all the way around my pot. When I did a complete circle wrapped around the pot, I slanted my strip to go a little further down the pot till the pot was completely covered.

fixing_a_broken_pot

fabric_pot

fabric_flower_potNext, I added more mod podge on the bottom of the pot and curved my fabric over the sides and let it dry completely. Once it was dry, I painted the whole thing with a coat of  mod podge, to protect the fabric. I let it dry. Put my plant back inside it, and it was done!

mod_podge_flower_pot

DIY_flower_pots

I actually love how the flower pot looks with my Hello Flower Pot even more now! The kids are actually more careful now around the pots, since I have fixed this one. I wonder if it’s how I responded or just that they finally see why I was asking them to move off the porch to continue their search.

When something breaks, it is often easier to just throw it out and get a new one. I love how in this moment I saved some money by fixing my pot and hopefully demonstrated something powerful to my kids as well. We always have a choice in choosing how we react to our circumstances… Choose love friends!

signature

Share this:

  • Click to email a link to a friend (Opens in new window)
  • Click to share on Facebook (Opens in new window)
  • Click to share on Twitter (Opens in new window)
  • Click to share on Pinterest (Opens in new window)
Next Page »
  • Email
  • Facebook
  • Instagram
  • Pinterest
  • YouTube
YouTube-Channel
Erica Deuel

Subscribe for Weekly Updates!


Most Popular Posts

Painting Flower Pot Party Tips
DIY {easy} Burlap Wreath
DIY Paper Butterflies- Spring decor for cheap
The Encanto, Madrigal's House Craft For Kids
Chiffon Flower Tutorial
School Desk Makeover
Cheap lamp to Industrial Beauty
Repurpose Old Kitchen Chairs
DIY Outdoor Table
Engraved Wood Sign Tutorial (and Dremel Micro)

Categories

  • All About the Kids
  • art journal
  • Blogging
  • Christmas
  • Craft Projects
  • Dancing Zebras
  • DIY
  • Eddy's postcards
  • Embroidery Journal
  • Family
  • Featured
  • Fireside Chat
  • Foster Care
  • Giveaways
  • Guest Posts
  • Home
  • Homeschooling
  • Kid Activities
  • Kid Craft
  • My Heart
  • Our Outings
  • Project Spotlight
  • Send Out Love
  • Shop
  • Sponsored Posts
  • Spoonful Lab
  • Spoonful Tribe
  • Tips + Tricks
  • Traveling
  • Uncategorized
  • Vlog

Favorite Categories

Subscribe for Weekly Updates!

Favorite Categories

© 2023 Spoonful of Imagination, Inc.