Spoonful of Imagination

Add it to a Family for Something Beautiful

  • Home
  • Our Family
    • Our Home
  • Courses
  • Shop
  • Contact

Easy DIY Satin Flower

February 26, 2019 By Erica Deuel 2 Comments

Satin-Flower-Featured

As I mentioned in my last post, we are READY for spring around here. Sunshine. Warmth. Color. Anything to get beyond this cold grey reality. While the weather around here isn’t totally cooperating with my desires, I’ll continue to take matters into my own hands and create something to introduce a little warmth and pop of color. Take that Old Man Winter.

If you’ve been around here for a while you know that I love to make flowers out of all kinds of materials for different projects. Burlap. Felt. Chiffon. Today I want to walk you through one of my all-time favorite projects, the Easy DIY Satin Flower.

If you like to read the step by step, carry on, my friend. However, if you’d like to get your supplies and create along with me – you can do that too! Our latest YouTube video is me walking you through this tutorial step-by-step. Enjoy!

Supplies:

  • Your favorite colors of satin fabric. (An 1/8 of a yard will go a long way. The more satin flowers you want to create and the more colors you would like to incorporate, the more satin you should purchase.)
  • Sharp scissors
  • Needle and thread (thread color doesn’t matter because it won’t be seen)
  • A multi-purpose lighter
  • Fun embellishments of your choice, i.e., buttons, beads, scrapbook charms & hardware, jewels, etc.
  • Hot glue and hot glue gun
  • Once you’ve created your flower it can be used in dozens of different projects. In the YouTube video, I use mine for hair bows and headbands. You can get a variety of those from the dollar store.
  • Alligator clips (If you’d like to have a flexible way to attach your flower without permanently connecting it to a hairband.)

Tutorial:

For this tutorial, you are going to cut your satin into 6 circles. When you branch out to make your own, feel free to adjust the number of layers for your own unique look. Before starting on your circles you may want to cut the satin into manageable squares/rectangles to making cutting the circles easier.

satin-fabric

The circles do not need to be perfectly round and you’ll see why in a moment. The first circle should be the largest. You can decide how large you’d like for your flower to be but I’d recommend 3-4″ round for the first one. Now cut 5 more circles making each one a little bit smaller.

satin-circles

satin-circles2

Now being very careful, use your lighter to singe the edges of your satin circles. As the flame is applied to the satin, the heat will cause the edges to begin to curling up. The longer the heat is applied the more the satin will curl. Test it out and find the look that you prefer. This step will also help to seal the edges of the fabric and keep it from fraying in the future. The satin flower should not catch fire. If it does, you are holding the flame to the fabric too long.

burn-satin

Once all of your satin circles have been curled with the lighter, stack them largest to smallest. Get your needle and thread and go ahead and thread your needle. I like to double thread mine to make it extra strong. Give yourself about 18-24″ of thread and double knot it at the end leaving a few inches of slack past the knot.

Now sew your needle through the bottom of your satin flower petals all the way through to the top of the smallest one. Because you are going through 6 layers of satin you may want to use a table or hard surface to help push your needle through. Be careful and watch your fingers! Don’t ask me how I know!? 😉 Pull your thread through so that the knot presses against the bottom of the satin petals. Now sew back through the top down to the bottom. Repeat this step 5 to 6 times to make sure that your satin flower petals are securely fastened. Finish by sewing through the bottom. Take the remaining thread and the slack from your first knot and tie them together with another double knot. Your flower is now secure you can cut off the slack, being careful not to cut through the knots.
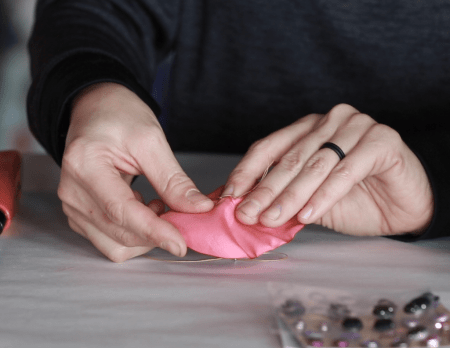
sew-satin

sew-satin2

Pick out a fun embellishment for the center of your flower. Sew or hot glue it to the center of your flower depending on what you choose.
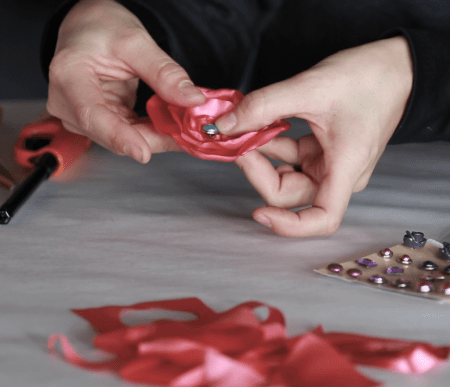
embellishment

At this point, your satin flower is done. Now the question is, what are you going to do with it?
The possibilities are endless. Make several and sew them to a pillow. Hot glue it to a frame or table display. Sew or clip it to a handbag. Or you can do like I did and incorporate it into a hair bow.

satin-flowers

If you are going to use it in a hair bow for a little one and you’d like to add some flexibility and longevity to your flower, I’d recommend hot gluing one of the alligator clips to the back. That way the flower can be attached to the perfect newborn headband for those itty-bitty newborns… but as they grow, it can be moved to a bigger hairband to grow with them!

alligator-clip

alligator-clips2

reagan-satin-flower

You can do this! This project is easy, fun, and a GREAT way to give an inexpensive but super special gift for a variety of occasions. Share your projects on social media using the #spoonfulofimagination hashtag so that we can be inspired by your creations. Keep checking out our YouTube Channel for new videos and projects. We’d appreciate it a ton if you’d subscribe and share with your followers. Have a great week that hopefully filled with lots of warmth and color!


Share this:

  • Click to email a link to a friend (Opens in new window)
  • Click to share on Facebook (Opens in new window)
  • Click to share on Twitter (Opens in new window)
  • Click to share on Pinterest (Opens in new window)

VLOG Behind the Scenes: The Ultimate Cardboard Box Fort

February 5, 2019 By Erica Deuel 1 Comment

Did you ever build forts as a kid? Do your kids build forts now? We often use blankets to create forts and we lay them over chairs and tables to create a fun hideout.

In our latest YouTube videos, we show you how our family built the ultimate cardboard fort.

In part one, we used left over boxes from the holidays and some boxes that were donated to us from a family move to create our fort. The kids actually inspired and launched this project on their own by creating individual cardboard forts. They had so much fun we decided to combine our forces to create the ultimate fort!

In part two of this project, we show you how the kids embellished their city! Although Matt and I helped a lot during the building phase, this step of the project we stepped back. The kids got to work and make it their own! It worked out that each kid had one section to stylize as their own.

At times one child would help another with something for “their” section or they would point out ideas to one another. It was so fun to see their collaboration.

If you haven’t watched the video (or maybe you have but written instructions help you!), here is a list of some basic craft items that you might need to get you started. As always though, feel free to make this project your own. You do not need all these supplies to make a box fort. We have also made box forts with just one box and a marker. That’s it. The possibilities are endless.

Supplies:

  • cardboard boxes
  • hot glue gun (with glue sticks)
  • school glue
  • packaging tape
  • box cutter
  • scissors
  • colorful paper (construction paper, scrapbook paper, etc)
  • markers
  • buttons
  • pom poms
  • regiments left over from other craft projects

Basic Steps:

  1. Use the box cutter, scissors, hot glue, and packaging tape to construct a cardboard fort. Depending on the number and size of boxes you give your child will alter the size of your fort. Moving boxes and Wardrobe work great because they are thick, sturdy cardboard. One box could be enough! Depending on the size and number of kids you can size out your fort as needed. If recycled boxes aren’t an option for you, all of the big box home improvement store carry them. One tip to keep in mind as you build your fort is cutting on the folds/flaps of the cardboard will be easier than cutting directly into the cardboard. You can strategically use that tip as you help build.
  2. Paint your cardboard house. This is fun step in getting creative. The colors of your fort can be wacky and fun. The personality of your kids will also play in to if they want traditional colors or possibly a purple house. We often use leftover latex paint from different house project. You know, those less than half-a-gallon buckets that have been sitting in the garage for a year… those work great. We also buy sample paints from the paint store for about $4. That gives you about 8oz of latex paint that should cover 20-25 sq ft.
  3. The next step is to embellish your fort. Use all the crafty bits you have around your house to cut, draw, and glue onto your fort to personalize it. This process can go on for hours, be built on for days after, or be considered done as soon as your artists are tired.
  4. The final step is to play! Play, imagine, and let those kids enjoy their fort!


We loved seeing our kids’ imaginations come alive. Everyone thinks differently and it can be seen in art. I know I would never have thought to rip up blue paper to create water, but Reagan did. Her creativity encourages me and makes me want to create.

Art can be circular and encouraging like that!

What do you think!? Would you paint in your living room too!? Or did you shudder when we did that!?

We had a blast making this fort and we hope you too can make a fort sometime! Save a few boxes for the next rainy, cold, indoor day. This project could help you! We spent two days as a family one weekend dreaming and creating together – and that to us is the biggest win!

If you give it a try, we would love to see your fort! Tag us on social media with #spoonfulofimagination so we can see your creativity at work. Oh and don’t forget to subscribe to our YouTube channel and click on the “Bell” icon so that you can the very first notification when we upload a new video.

Thanks so much friends!

Share this:

  • Click to email a link to a friend (Opens in new window)
  • Click to share on Facebook (Opens in new window)
  • Click to share on Twitter (Opens in new window)
  • Click to share on Pinterest (Opens in new window)

VLOG Behind the Scenes: Fun Family Paint Dropper Craft Tutorial

January 29, 2019 By Erica Deuel Leave a Comment

paint dropper craftDid you see our big news!?

We were so excited to share in yesterday’s post that we have started a YouTube Channel! This really is a family project. Our kids are all in. They are so excited but also learning how much work it is. Here they were, patiently waiting for us to have all the supplies and camera equipment set up.

Don’t they look thrilled!?

They did actually have a lot of fun. We all did.

If you haven’t seen this vlog episode yet, check it out now! I made a major mistake and the aftermath plays out for the whole world to see.

It was a fun project because it incorporated a lot of color, gave freedom to make it ‘yours’, and was simple with only two main steps. We got to paint with droppers and paint with brushes – all the while talking and hanging out.

We plan on growing into a regular blog recap after we release a new vlog that can show you behind the scenes pictures and moments like this. Our kids will also be editing pictures they take and writing these posts from time to time.

process art project

process art projectCaleb’s project was looking so perfect and then we came back in from playing in the snow and disaster struck! I made a huge mess and am just thankful the cameras weren’t rolling when this happened, or Matt would shown you for sure!

process art project

If you’ve followed us for a while, you know that we encourage that the creating process is the art and not the final product. This helps to break down fears and boundaries when creating and encourage a more “go for it” spirit. This mindset will also help when your project gets messed up or isn’t looking the way you wanted it too.

Mistakes open up the opportunity to problem solve and dream up a different direction. I love how our Jeremiah caught the moment that Caleb looked at his messed up painting, tried a new idea, and loved it. His facial expression shows the joy and discovery that art can be.

process art projectNot only was I off the hook for ruining his painting, but I was so proud of how he processed through a mistake and turned it into something he loves. He now has it hanging next to his bed! Pretty cool!

What did you guys think of this first project!? Do you have some old paints you can use this dropper technique on? If you try it, we would love to see! Tag your work with #spoonfulofimagination so we can join you in your creations.

Supplies for this Craft:

  • Pipette/Droppers
  • Acrylic Paint
  • Cardboard, Poster-board, or Wood

Share this:

  • Click to email a link to a friend (Opens in new window)
  • Click to share on Facebook (Opens in new window)
  • Click to share on Twitter (Opens in new window)
  • Click to share on Pinterest (Opens in new window)

Launching a New Chapter

January 28, 2019 By Erica Deuel 3 Comments

We started blogging a little over 10 years ago. I know for sure because we started when I was pregnant with Jeremiah who turned 10-years-old a few months ago. It all started as a way to stay in touch with our family and friends while we were spending a lot of time on the road. In between my family updates, I started posting Friday Project Spotlights as a way of sharing simple DIY craft projects for my friends to do with their kids. With no attempts to market these posts, somehow they picked up a groundswell of momentum. Before I knew it, hundreds of people were tuning in each week to craft with me. We rebranded from our family blog into Spoonful of Imagination and those hundreds became thousands. It’s so humbling. Truly. As someone who struggles with dyslexia and the fear of stringing words together, it never stops surprising me that people keep showing up.

This blog has stretched me to grow and try things that I would have never ever imagined. Matt and the kids have gone from cheering me on to becoming my partners in this platform. They have helped me write, build, take pictures, brainstorm, share my posts, develop craft kits, ship out items from our shop, and eventually build a non-profit art studio. What a ride!

But we are keenly aware that it would have never happened if it weren’t for you – our loyal friends, readers, and fellow creators of Spoonful of Imagination. Thank you. No seriously… THANK YOU!!!

As we’ve grown and our kids needs have shifted and changed, I’ve honestly put this space on the back burner for a while. For those of you who have felt that shift, I’m excited to announce that is about to change.

With Matt working full time in video and film production and me working full time at managing the art studio, we’ve both found that our creative energy is being poured out like never before. We are so thrilled and privileged to be able to help so many people and organizations create. What we have found though is that we need to have a creative project that is “ours.” Something that we can do together, as a family. That brings us back to here, Spoonful of Imagination.

Now, as an all-hands-on-deck team, we are working on putting together new content for you, our loyal friends and readers.

We will have new posts and DIY tutorials just like the one I posted the other day. But it’s better than that! Starting today we are launching (well kinda re-launching, but I’ll get back to that in a minute) a YouTube channel dedicated to Spoonful of Imagination vlog content!

This is something we’ve been talking about, dreaming about, and planning for months. Oh my goodness, let me start by saying, “RESPECT!” to all of the faithful YouTube creators out there. We have spent a lot of time studying other channels out there. We have learned so much from people like Peter McKinnon, Casey Neistat, Art Hub for Kids, Matti Haapoja, That YouTub3 Family, just to name a few… and we’ve decided to toss our hat into the vlogging ring. We have a couple of new videos on the channel now. You’ll also see some OLD videos. We decided to leave some of those up for memories sake and to serve as a reminder of how far we’ve come.

Here’s a quick introduction from Matt and me just sharing the heart behind the channel and our vision for what we hope to accomplish. It’s the most boring video we will create, we promise. After this, it starts to get super colorful and very fun.

Like everything we’ve always done, our desire is to help other people create. We believe there is life changing power in being creative and if we can encourage someone to add a Spoonful of Imagination to their life, then we consider that a win!

Here’s our first DIY Tutorial. Enjoy! Oh and as we’ve learned from our YouTube mentors, please subscribe to the channel, like the videos, and share with your family and friends. Your comments, likes, and shares have been the fuel that have kept this blog going for so long. We would be honored to have you join us in stoking the fires for this latest chapter of our journey!

Share this:

  • Click to email a link to a friend (Opens in new window)
  • Click to share on Facebook (Opens in new window)
  • Click to share on Twitter (Opens in new window)
  • Click to share on Pinterest (Opens in new window)
Next Page »
  • Email
  • Facebook
  • Instagram
  • Pinterest
  • YouTube
YouTube-Channel
Erica Deuel

Subscribe for Weekly Updates!


Most Popular Posts

The Perfect Collaborative Art Party Game
Art from Tree Bark
Repurpose Kids Chairs into Wood Shelves
DIY Bookends (what you can make for being a hoarder)

Categories

  • All About the Kids
  • art journal
  • Blogging
  • Christmas
  • Craft Projects
  • Dancing Zebras
  • DIY
  • Eddy's postcards
  • Embroidery Journal
  • Family
  • Featured
  • Fireside Chat
  • Foster Care
  • Giveaways
  • Guest Posts
  • Home
  • Homeschooling
  • Kid Activities
  • Kid Craft
  • My Heart
  • Our Outings
  • Project Spotlight
  • Send Out Love
  • Shop
  • Sponsored Posts
  • Spoonful Lab
  • Spoonful Tribe
  • Tips + Tricks
  • Traveling
  • Uncategorized
  • Vlog

Favorite Categories

Subscribe for Weekly Updates!

Favorite Categories

© 2025 Spoonful of Imagination, Inc.