At the beginning of each new year, Matt and I go on a date to reflect on the past year and share goals for things we want to accomplish in the coming year. Last night we went out for that date and had a blast. We talked a lot about the blog, and it had me reminiscing some of my favorite moments and posts from last year. In that spirit, I decided to repost my favorite post (with some fresh edits and condensed content) from 2012 – my DIY King Size Rag Quilt. Enjoy!

My bed needed a makeover. I really wanted a colorful, anthropology type quilt. Every quilt I looked at online (and really liked) was easily over $300. I did not want to pay that, so I shopped and shopped for fabric. I found some at Wal-Mart for like $1 or $2 a yard! They aren’t the prettiest fabrics, but once they were mixed in with the others…they looked great! The rest of the fabrics were from Jo Anne’s, Hobby Lobby, and Hancock Fabric. I couldn’t get them all in one place. I was searching! After I had all my fabrics, I let them sit on my kitchen table for about two weeks. I would walk by and see if I liked them all together or not. I rotated fabrics in and out until I settled on these. No joke!! Does anyone else do that?!

After buying the front fabrics, I realized that this project could still be a bit costly. I decided to cut up my current quilt (and another green quilt we had lying around the house) to use in it. If you have ever made a rag quilt, you know it takes three layers of fabric to sew together, before you start assembling your squares. It takes the top/decorative fabric, the stuffing insert, and the back fabric. By using my old quilts, I not only saved money by not having to buy two of the layers (it worked for my stuffing and back fabric)…I also only had to cut TWO layers of fabric rather than three! This was a huge time saver considering how big my quilt would be. We had been using a big brown blanket on our bed while this quilt was in process (as seen above). So, we are really excited when it was done!

I’m going to try to share with you how I completed this project from start to finish. I’m sorry in advance for the lengthy post, but I hope you find some of my tricks helpful! The first step was to start cutting up my fabric and old quilts.

There were a lot of nights cutting squares in front of movies.
I finally finished cutting the old quilts plus all my decorative fabrics and thought that alone was a huge accomplishment!!

Next, I sewed my decorative fabric right on top of my old quilt’s decorative side. I wanted the back/solid colors of the two old quilts to be the back side of my quilt.

I literally took one cut square of my new fabric and one old quilt square and laid them on top of one another. I then sewed from corner to corner to join them together and create an “x” across the two pieces in order to make them one. After I had done this to all my fabric, I laid them out and decided how I was going to attack it. I got more fabric of some of my favorite pieces than others, so I didn’t have equal amounts of squares to create a pattern. I decided to try to do as random as I could.

I made little piles of 10 squares each (an estimate of bed’s width) and started sewing those together to make strips. Note: Lay the two backside fabrics on top of each other to sew the squares together. You sew directly onto the pretty side of the fabric. This is backwards from most quilts. By doing this the front layers will be out and have the “rag” fringe showing out front.
I did my best to pick different fabrics to be beside each other in the different strips. At times I would lay the strips I had completed down to see if I needed to sew a “purple type material” in the middle of or at the end of a strip. I didn’t want to finish my quilt and all the purple or all the red to be at the end of the rows, if that makes sense.

Once I finished all my strips, I started laying them out one at a time to see which strip looked good next to it. I tried to prevent two of the same fabrics from being directly above/below one another.
I kept sewing the strips together. I picked up a cute little helper at times during this process.

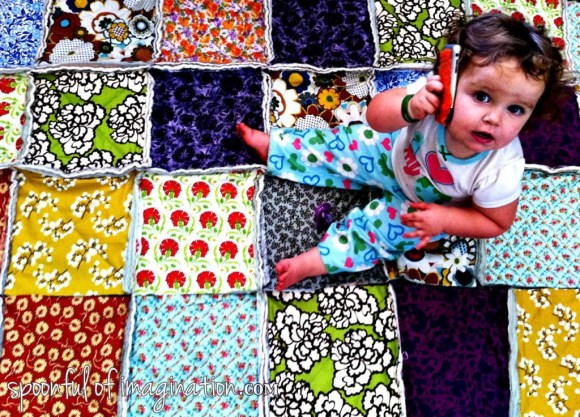
My sweet girl LOVED sitting on the quilt as I laid it out to see which strip should go next. It is quite colorful and fun. She was drawn to it, so am I!
Since I’m using my old quilts, the back looks kind of funky. It’s a mix of the two back fabrics, but I like it. No one sees the back! It just adds some character and story to this new quilt!

It got quite heavy to keep laying the quilt out and then picking it up to sew on another strip!

I finally got all my strips sewn together, and I laid it out on my bed to check the size.

I loved it, but I decided to give it a cleaner edge. I gathered all my beautiful scraps (that I couldn’t bear to throw away).

I sewed them together in one really long strip (about 3″ width), and then ironed it in half. This created a flap to lay over the edge of my quilt.


I sewed my edging strips onto the quilt. In this picture you can see one “downside” of reusing a quilt as your stuffing and backing. It will show your stuffing in the “rag” look of the quilt. I am ok with it, but I just wanted to warn you.

After I edged it, I wanted it to look more “finished”, so I went back and added another row of stitching to the edging. It was more for decorative purposes than anything else.

Our old quilt was a normal queen size quilt. It wasn’t a perfect square. After changing the sheets, we never could easily tell which way the quilt went back on so it fit the bed the way we liked it. I added a special touch to the corner of this quilt, that should be up by my husband’s head, to make that process easier from now on.
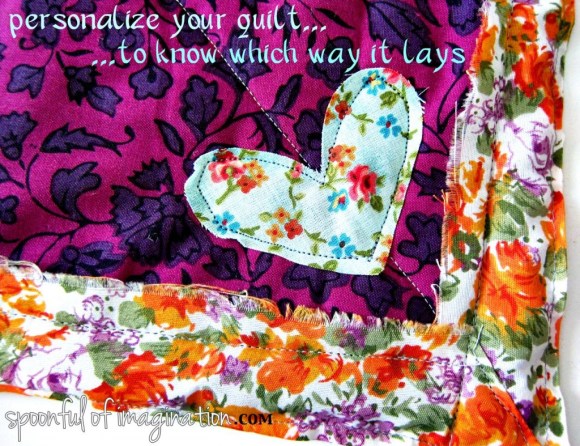
This little heart helps us easily know which way the quilt lies on our bed. I love that when you are making something, you can keep personalizing it all the way to completion!!


I love the final product, and I am so proud of it!! I hope it inspires all you non-sewing crafters to maybe want to start sewing! You can do it!!
This beautiful quilt was the start of our six month bedroom makeover. After making the quilt, I made the headboard, painted the room, redid an old auction chair, and added some fun new accessories. The space feels completely different, and it has become my favorite room in the house!
I am totally guessing on all my numbers here, but I am going to give you my best estimate of my quilt’s “facts” in case you want to try to make your own.
Materials:
- Two queen size quilts (for stuffing material and back material)
- My squares are 11″x11″
- My quilt is 10 squares down and 11 squares across in its rows
- About 15 yards of fabric. I think that’s about what I cut up. I got a yard of each fabric except my two favorites ( I got two yards of each of those)
- Although I bought 15 yards, I have lots of scraps! I edged with my scraps and I have enough to make the front of shams and probably some creative “scrap pillows”, so you could probably get away with maybe 13 yards?
- My edging is 3″ by whatever length. They aren’t the same length all the way around. The important part is the three inches, so the width is the same folded around your quilt’s edge. When they were folded in half and ironed to form a flap, that flap was 1.5″ wide.
- LOTS of thread
I hope this information is helpful for you to start your own quilt!! If you make a rag quilt, I would LOVE to see a picture! Thank you so much for stopping by!
