Spoonful of Imagination

Add it to a Family for Something Beautiful

  • Home
  • Our Family
    • Our Home
  • Courses
  • Shop
  • Contact

For the Love of Color!

July 12, 2013 By Erica Deuel 3 Comments

DIY King Size Bed MakeoverEver since I made our king bed’s rag quilt, I have wanted to sew some pillow shams for it. Finally after sewing my ruffle shower curtain, I had my sewing machine out and decided to just quickly do them! Sometimes pulling the machine and supplies out can be the hardest obstacle in creating a project with three little ones around. Can you relate?

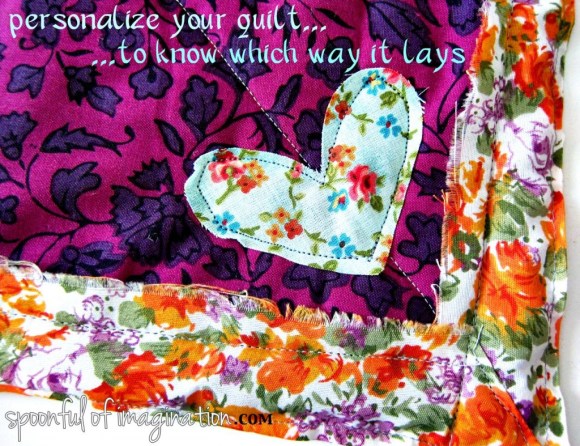
I picked two fabrics that I wanted to use for my shames, and I used a king pillow case as a template for their size.

I cut the front fabric the size of my pillow case and the back fabric a little longer (to allow room to seem one end and tuck the other inside for the envelope opening to have a good overlap).

I laid the two fabrics on top of one another and sewed the ends together.  I then cut the back fabric to allow the ability to seem the one side.

I rotated my fabrics inside out and folded it all in a way to where my seemed side would be seen and the overlap fabric would eventually be tucked in my case.

I pinned the fabric and sewed down both sides of the pillow case to close it off. Through the envelope opening, I turned it right side out. It literally took just sewing five lines to complete one sham, yet it took me a year to do this project. Oh life! 🙂

making a pillow shamThis might all sound a bit confusing, but I broke it down with more pictures on my yo-yo pillow, if you want to view that. Once the pillow sham was right side out, I simply stuffed it with a pillow and added it to my bed. I love how it turned out!

king size rag quilt
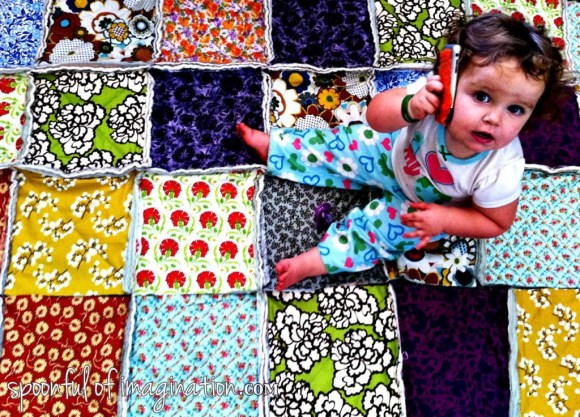
My house is really full of color, and I love it. This past weekend we hung our headboard up and the curtains in our room, and it is one more room that is slowly coming together around here. We’ve been moved for just over two months now, and the house is starting to feel more like us.

love of colorWhen you add the color from my set of drawers and my craft desk in with the mix of color in this room, I know it’s a lot of color. Somehow it all works though, and it feels like home and is a warm welcome whenever I walk into the room.

craft areaWhat about you!? Do you love color as much as I do, or do you struggle to try to incorporate it and stretch yourself from your usual pallet? If you ever have a question, shoot me a message and I would love to help you brainstorm on your project!

Happy Friday! I hope you have a great weekend! My BFF is in town, and I can’t wait to HANG!

p.s. Congratulations to Meredith H. for winning my embroidered hoops!

signature

c;

Share this:

  • Click to email a link to a friend (Opens in new window)
  • Click to share on Facebook (Opens in new window)
  • Click to share on Twitter (Opens in new window)
  • Click to share on Pinterest (Opens in new window)

DIY King Size Rag Quilt {Repost}

January 7, 2013 By Erica Deuel 39 Comments


At the beginning of each new year, Matt and I go on a date to reflect on the past year and share goals for things we want to accomplish in the coming year. Last night we went out for that date and had a blast. We talked a lot about the blog, and it had me reminiscing some of my favorite moments and posts from last year. In that spirit, I decided to repost my favorite post (with some fresh edits and condensed content) from 2012 – my DIY King Size Rag Quilt. Enjoy!

Anthropologie type quilts

My bed needed a makeover.  I really wanted a colorful, anthropology type quilt.  Every quilt I looked at online (and really liked) was easily over $300.  I did not want to pay that, so I shopped and shopped for fabric.  I found some at Wal-Mart for like $1 or $2 a yard!   They aren’t the prettiest fabrics, but once they were mixed in with the others…they looked great!  The rest of the fabrics were from Jo Anne’s, Hobby Lobby, and Hancock Fabric.  I couldn’t get them all in one place.  I was searching!  After I had all my fabrics, I let them sit on my kitchen table for about two weeks.  I would walk by and see if I liked them all together or not.  I rotated fabrics in and out until I settled on these.  No joke!!  Does anyone else do that?!

old master bedroom

After buying the front fabrics, I realized that this project could still be a bit costly.  I decided to cut up my current quilt (and another green quilt we had lying around the house) to use in it.  If you have ever made a rag quilt, you know it takes three layers of fabric to sew together, before you start assembling your squares.  It takes the top/decorative fabric, the stuffing insert, and the back fabric.  By using my old quilts, I not only saved money by not having to buy two of the layers (it worked for my stuffing and back fabric)…I also only had to cut TWO layers of fabric rather than three!  This was a huge time saver considering how big my quilt would be.  We had been using a big brown blanket on our bed while this quilt was in process (as seen above).  So, we are really excited when it was done!

recycle old quilt to sew new one

I’m going to try to share with you how I completed this project from start to finish.  I’m sorry in advance for the lengthy post, but I hope you find some of my tricks helpful!  The first step was to start cutting up my fabric and old quilts.

using old quilt for a new one

There were a lot of nights cutting squares in front of movies.

I finally finished cutting the old quilts plus all my decorative fabrics and thought that alone was a huge accomplishment!!

ready to quilt

Next, I sewed my decorative fabric right on top of my old quilt’s decorative side.  I wanted the back/solid colors of the two old quilts to be the back side of my quilt.

sewing a quilt

I literally took one cut square of my new fabric and one old quilt square and laid them on top of one another.  I then sewed from corner to corner to join them together and create an “x” across the two pieces in order to make them one.  After I had done this to all my fabric, I laid them out and decided how I was going to attack it.  I got more fabric of some of my favorite pieces than others, so I didn’t have equal amounts of squares to create a pattern.  I decided to try to do as random as I could.

quilting squares

I made little piles of 10 squares each (an estimate of bed’s width) and started sewing those together to make strips.  Note:  Lay the two backside fabrics on top of each other to sew the squares together.  You sew directly onto the pretty side of the fabric.  This is backwards from most quilts.  By doing this the front layers will be out and have the “rag” fringe showing out front.

I did my best to pick different fabrics to be beside each other in the different strips.  At times I would lay the strips I had completed down to see if I needed to sew a “purple type material” in the middle of or at the end of a strip.  I didn’t want to finish my quilt and all the purple or all the red to be at the end of the rows, if that makes sense.

quilt strips

Once I finished all my strips, I started laying them out one at a time to see which strip looked good next to it.  I tried to prevent two of the same fabrics from being directly above/below one another.

I kept sewing the strips together.  I picked up a cute little helper at times during this process.  

sewing quilt strips together

girl on a quilt

My sweet girl LOVED sitting on the quilt as I laid it out to see which strip should go next.  It is quite colorful and fun.  She was drawn to it, so am I!

Since I’m using my old quilts, the back looks kind of funky.  It’s a mix of the two back fabrics, but I like it.  No one sees the back!  It just adds some character and story to this new quilt!

back of rag quilt

It got quite heavy to keep laying the quilt out and then picking it up to sew on another strip!

heavy quilt

I finally got all my strips sewn together, and I laid it out on my bed to check the size.

unfinished quilt

I loved it, but I decided to give it a cleaner edge.  I gathered all my beautiful scraps (that I couldn’t bear to throw away).

use fabric scraps

I sewed them together in one really long strip (about 3″ width), and then ironed it in half.  This created a flap to lay over the edge of my quilt.

use scrap fabric

edgeing for quilt

I sewed my edging strips onto the quilt.  In this picture you can see one “downside” of reusing a quilt as your stuffing and backing.  It will show your stuffing in the “rag” look of the quilt.  I am ok with it, but I just wanted to warn you.

sew edge on quilt

After I edged it, I wanted it to look more “finished”, so I went back and added another row of stitching to the edging.  It was more for decorative purposes than anything else.

sew edge on a quilt

Our old quilt was a normal queen size quilt.  It wasn’t a perfect square.  After changing the sheets, we never could easily tell which way the quilt went back on so it fit the bed the way we liked it.  I added a special touch to the corner of this quilt, that should be up by my husband’s head, to make that process easier from now on.

personalize your quilt

This little heart helps us easily know which way the quilt lies on our bed.  I love that when you are making something, you can keep personalizing it all the way to completion!!

rag quilt edge

master bed

Anthropologie type quilts

I love the final product, and I am so proud of it!!  I hope it inspires all you non-sewing crafters to maybe want to start sewing!  You can do it!!

This beautiful quilt was the start of our six month bedroom makeover.  After making the quilt, I made the headboard, painted the room, redid an old auction chair, and added some fun new accessories.  The space feels completely different, and it has become my favorite room in the house!

I am totally guessing on all my numbers here, but I am going to give you my best estimate of my quilt’s “facts” in case you want to try to make your own.

Materials:

  • Two queen size quilts (for stuffing material and back material)
  • My squares are 11″x11″
  • My quilt is 10 squares down and 11 squares across in its rows
  • About 15 yards of fabric.  I think that’s about what I cut up.  I got a yard of each fabric except my two favorites ( I got two yards of each of those)
  • Although I bought 15 yards, I have lots of scraps!  I edged with my scraps and I have enough to make the front of shams and probably some creative “scrap pillows”, so you could probably get away with maybe 13 yards?
  • My edging is 3″ by whatever length.  They aren’t the same length all the way around.  The important part is the three inches, so the width is the same folded around your quilt’s edge.  When they were folded in half and ironed to form a flap, that flap was 1.5″ wide.
  • LOTS of thread

I hope this information is helpful for you to start your own quilt!!  If you make a rag quilt, I would LOVE to see a picture!  Thank you so much for stopping by!

signature

Share this:

  • Click to email a link to a friend (Opens in new window)
  • Click to share on Facebook (Opens in new window)
  • Click to share on Twitter (Opens in new window)
  • Click to share on Pinterest (Opens in new window)

The Six Month Bedroom Makeover

October 12, 2012 By Erica Deuel 13 Comments

I am so excited to share with you the process of our bedroom makeover.  This process began in May, and we are now in October.  Life with three young kids might be part of this six month process, but i like to think it was more about dreaming and creating to MAKE our favorite things ourselves.

I look at this picture and I am blown away that our room used to have a more “haphazard” and “messy” feel.

The dark wood headboard created a much darker feel in our room.  We originally painted this room with  a $5.00 can of oops paint from Home Depot five years ago.  We didn’t love the color, but we were planning on moving and knew a “clean” coat of paint would be more appealing than the dingy beige we had before.  While painting the green, we decided to use another left over paint to create a brown accent wall.

It was a mess, and as we have stayed in our house and not moved its been a goal of ours to fix up this space.  Unfortunately, it has been low on the list of priorities.  We finally had time and space to start fixing it up, and it started with this beautiful mirror my husband made for me for Mother’s Day.

That is the one of the best presents I have ever received!  For our eight year anniversary, we gave each other a new bed.  We upgraded our queen to a huge king size with nice firm mattresses.

This new bed helped me complete my king size rag quilt.  I made it on a small budget and yet it has an anthropology, bright, fun feel without costing a fortune.  It has become one my most prized projects ever.

Our room is small with only one wall without windows or doors.  The only way for us to both have a dresser is to have two tall dressers side by side.  Still trying to fix this wall, although we are attacking the piles on top.

We needed a new headboard, since we only bought a metal frame with our new mattress.  You got a glimpse of the DIY headboard that we created on last week’s Friday Project Spotlight.

I have posted a few pictures on Twitter and Facebook this week showing glimpses of how it looks hanging in our room!  I have been so excited to share with you all of these pictures.

We picked Rain Water from Behr paint as our new room’s color.  With all the bright color in our mirror, quilt, and headboard, we knew we needed a subtle color on the walls to let everything else pop.

It took two coats, but we got it painted!  I am a mess when it comes to painting. Fortunately there’s no shortage of blue tape and brown paper to help keep me in line!

Oops!  Who paints in jewelry!?!

The color goes on looking pretty close to white.  I was at first a little nervous that it was too light, but as it dried it became a really pretty light blue.  I love the color!

Seeing my headboard on the wall might have made me just a little giddy!  I have a feeling this room could become one our more used rooms.  🙂

Everything really does pop more and have a more feminine touch without hopefully feeling too girly!  Caleb was pleased that we chose blue for the walls since his “daddy has to sleep under a ‘girl’s’ blanket.”

That shag/t-shirt rug I got on clearance at Kohls sometime this summer for $4.00!?!  I bought it in a heartbeat and didn’t even know what I would do with it.  I just knew it was a great deal and I loved it.  Don’t you love finds like that?

Another find for me was that purple/turquoise chair.  Do you remember seeing it in my Ohio Auction post?  It was a great free find that looks so much better with a coat of spray paint.

We all love to hang out in our room now!  It is so fun that every one of our rooms is starting to feel like “us” and as “complete” as crafters can ever say.  I think I need to post a tour that is more professional than our last home tour.

Thank you so much for checking in on my Friday Project Spotlight!  Do you have a big project you are in the midst of working on?

Update:  I have since added some new throw pillows to our bed, and I love all the color they bring!

master bed

signature

Share this:

  • Click to email a link to a friend (Opens in new window)
  • Click to share on Facebook (Opens in new window)
  • Click to share on Twitter (Opens in new window)
  • Click to share on Pinterest (Opens in new window)
  • Email
  • Facebook
  • Instagram
  • Pinterest
  • YouTube
YouTube-Channel
Erica Deuel

Subscribe for Weekly Updates!


Most Popular Posts

Painting Flower Pot Party Tips
DIY Paper Butterflies- Spring decor for cheap
DIY {easy} Burlap Wreath
The Encanto, Madrigal's House Craft For Kids
Repurpose Old Kitchen Chairs
School Desk Makeover
Cheap lamp to Industrial Beauty
DIY King Size Rag Quilt {Repost}
Engraved Wood Sign Tutorial (and Dremel Micro)
DIY Fabric Bunting

Categories

  • All About the Kids
  • art journal
  • Blogging
  • Christmas
  • Craft Projects
  • Dancing Zebras
  • DIY
  • Eddy's postcards
  • Embroidery Journal
  • Family
  • Featured
  • Fireside Chat
  • Foster Care
  • Giveaways
  • Guest Posts
  • Home
  • Homeschooling
  • Kid Activities
  • Kid Craft
  • My Heart
  • Our Outings
  • Project Spotlight
  • Send Out Love
  • Shop
  • Sponsored Posts
  • Spoonful Lab
  • Spoonful Tribe
  • Tips + Tricks
  • Traveling
  • Uncategorized
  • Vlog

Favorite Categories

Subscribe for Weekly Updates!

Favorite Categories

© 2023 Spoonful of Imagination, Inc.