 Do you love recycling trash into treasures as much as we do!?
Art doesn’t have to be expensive. Using things you might normally throw away as art supplies is one way to create in an inexpensive way! Soup cans are one of our favorite recycling materials to repurpose into a fun craft. It is sturdy and strong and be a great base for something else.
Today, we are excited to show you how you can turn those cans into marbleized storage canisters.
![]() The first step is to collect your soup cans. We have gotten in the habit of just saving all our soup cans, so when a project idea arises, we are ready with cans on hand. I take the paper wrapper off our soup cans and run them through the dishwasher with our dishes to get clean. Once you have your dry cans, you are ready to create! We spray painted our cans white to have a nice matte base coat for this project.
The first step is to collect your soup cans. We have gotten in the habit of just saving all our soup cans, so when a project idea arises, we are ready with cans on hand. I take the paper wrapper off our soup cans and run them through the dishwasher with our dishes to get clean. Once you have your dry cans, you are ready to create! We spray painted our cans white to have a nice matte base coat for this project. 
 While the tin cans were drying, we collected our spray paint cans and filled a bucket with water. For each can, we choose two different spray paint colors. We added one color at a time.
All you have to do is spray the water with your spray paint color. The spray paint sits on top of the water. You then lay the can on top of the water and the paint will adhere to the can like a sticker might grab onto your hand. After one color was added, we simply looked at the can, maybe rotated it a little to figure out what side needed some more color, and did this step again with the second color of paint.


![]() The can comes out of the water looked marbleized and super fun! After you get the hang of it, you can play with how much spray paint you spray on top of the water to create a more thick or less thick look on your can. We had so much fun doing all four of our cans that we prepped!
The can comes out of the water looked marbleized and super fun! After you get the hang of it, you can play with how much spray paint you spray on top of the water to create a more thick or less thick look on your can. We had so much fun doing all four of our cans that we prepped!

 After the cans were dry, we used ours to hold art supplies. You could do the same or turn it into something else! A wind chime, flower pot, vase, or candle holder are fun ways to use your new canister too.
  You can personalize this craft using colors that fit your taste or the size can that fits your need best.
Sometimes it is easier to understand the steps to a project to see it actually happen. To see this craft in video form, you can watch the process on our YouTube channel here.
We love how quick, colorful, process art base, and inexpensive this paint technique can be! We had so much fun doing it to the tin cans that we bought some inexpensive raw wood candle sicks to paint this way too!
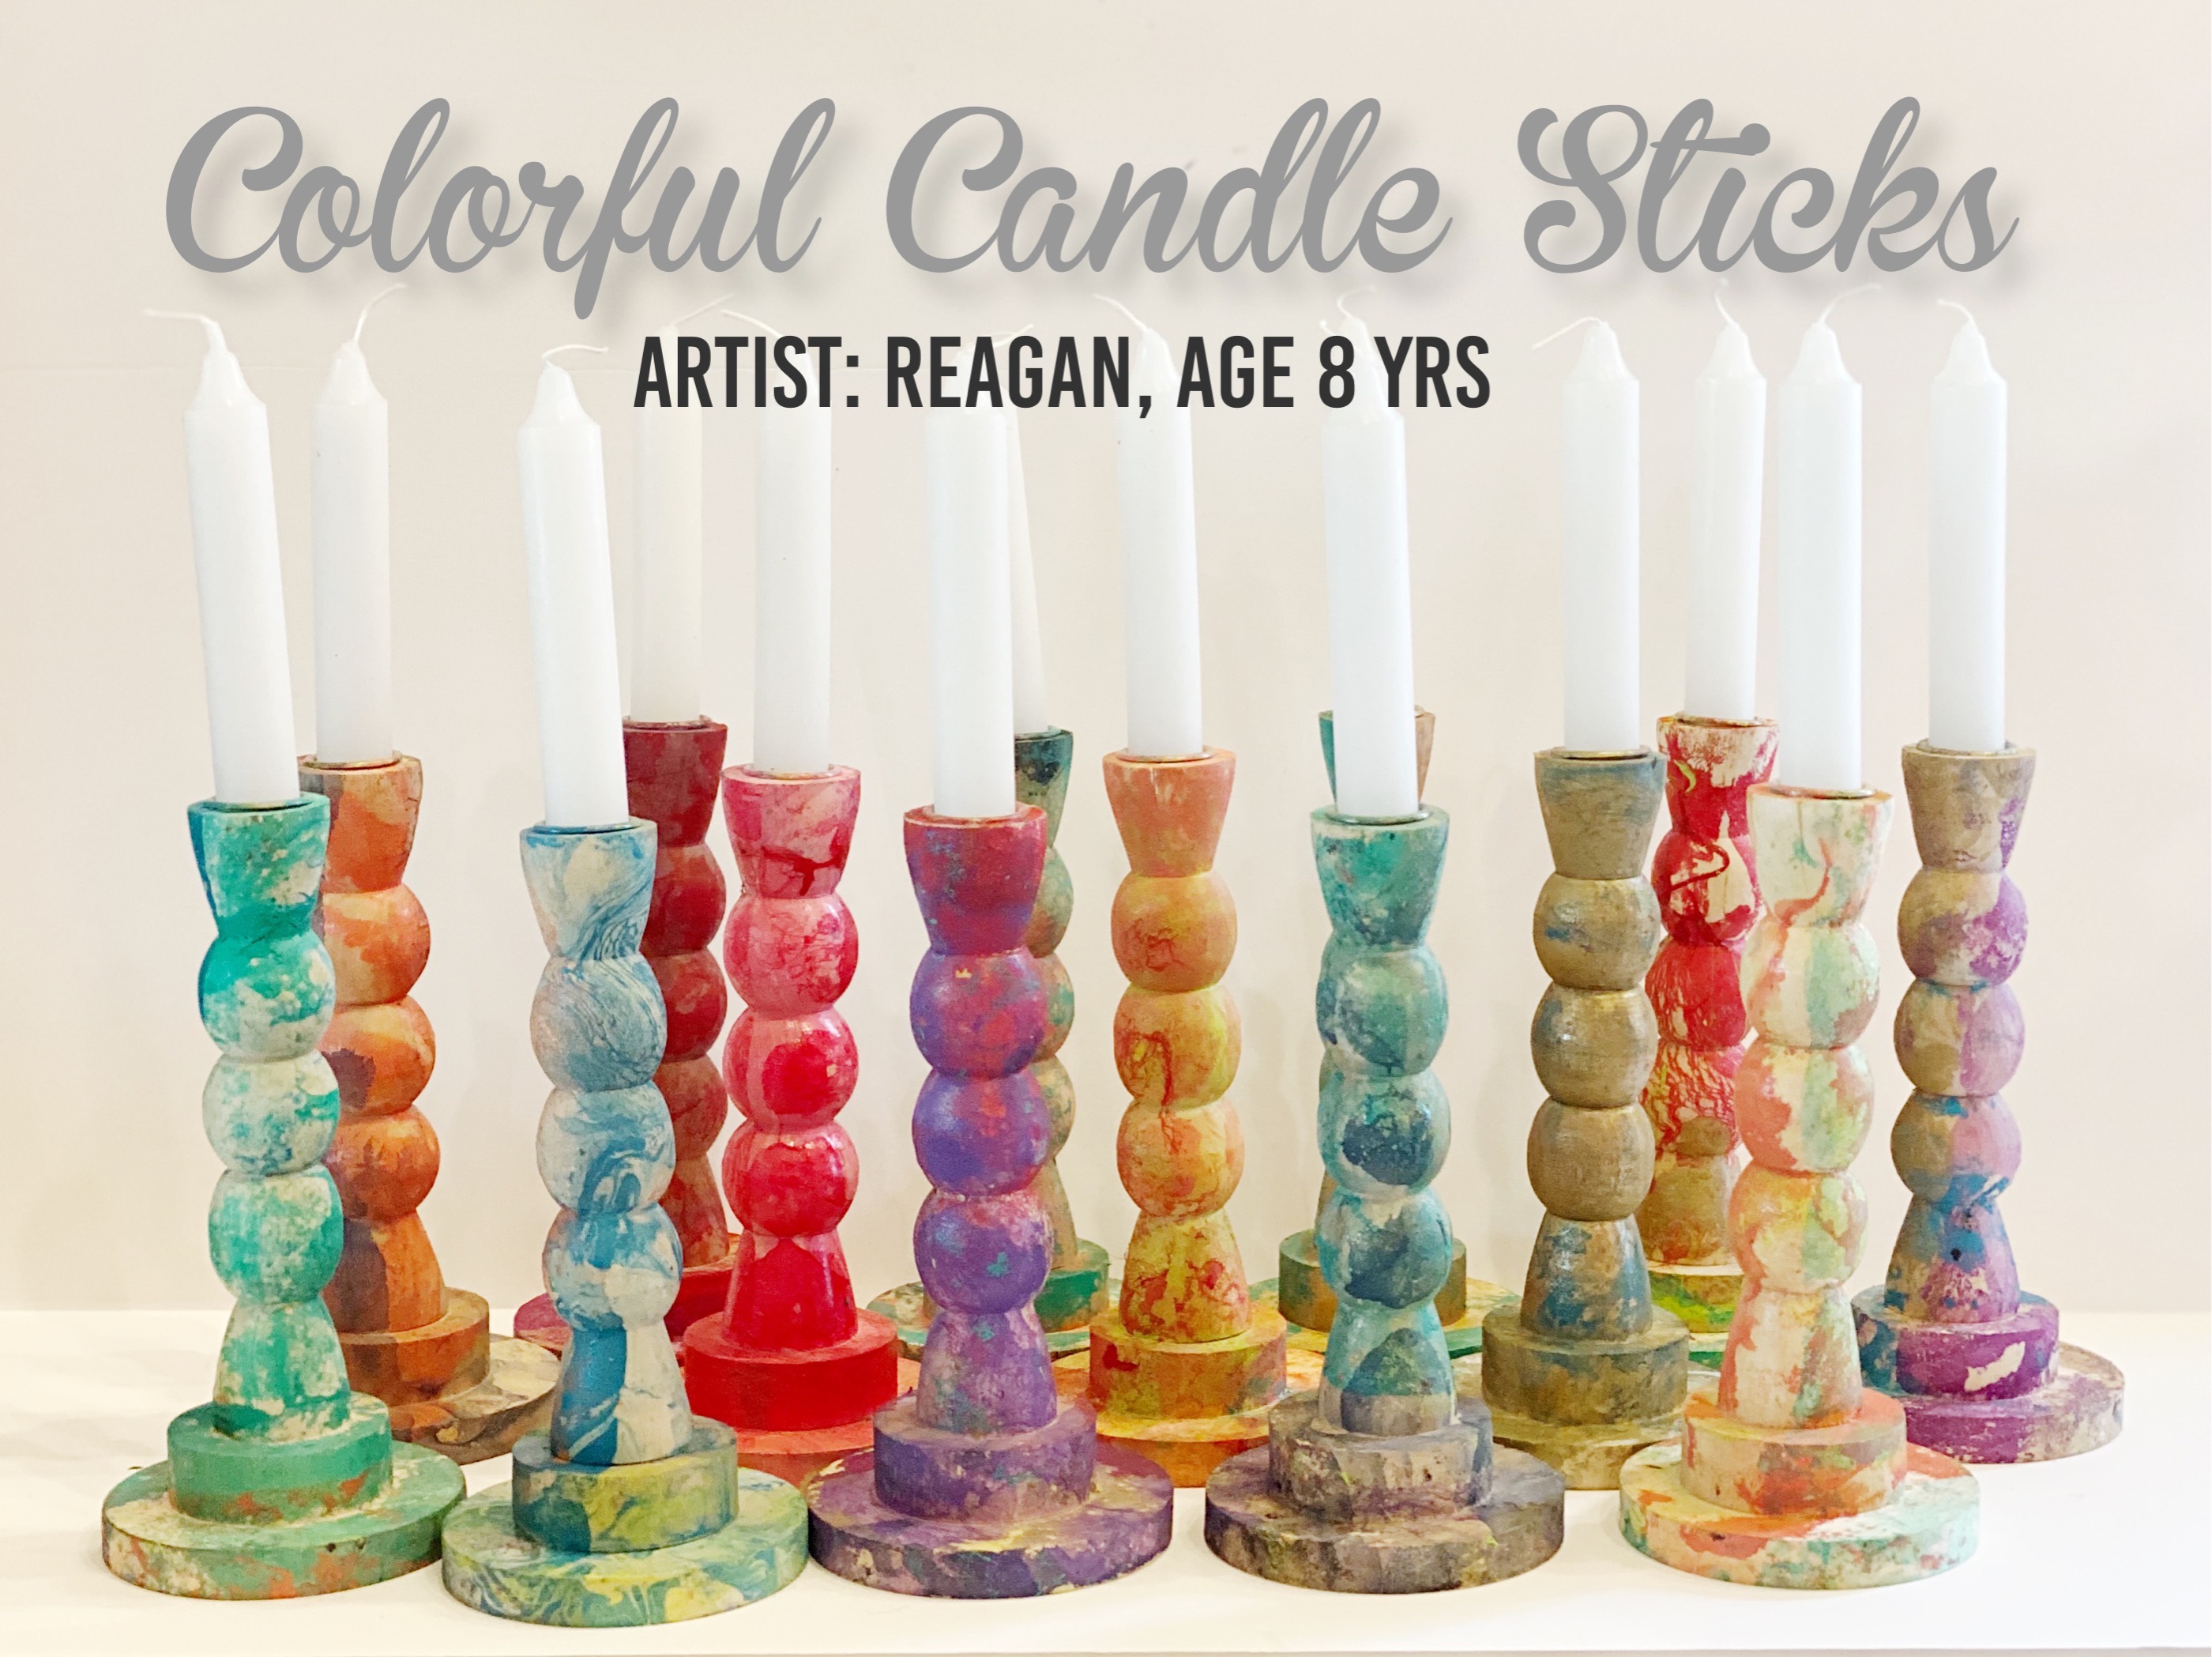 How fun are those!? We think they look like they belong on shelves in World Market or Anthropologie. We found some white candle sticks that make the colors pop even more, and we are going to use them as Christmas presents for family this year!
What do you think!? Will you try this paint technique? Do you like making Christmas gifts too!? We’d love to hear from you! Find us on social media by tagging us with your pictures #spoonfulofimagination
Thanks so much for stopping by!

 Do you love Christmas crafts as much as I do!? It seems that no matter how many I make, the following year I want to make more! Creating holiday crafts is one of my favorite holiday traditions and stringing together a fun garland is a fun way to add to the seasonal decor. In years past, I have made other
  How pretty are those colors all mixed up together!? I decided to drill a small hole in the center of each piece. This would allow me to later thread wire through to create a garland.


 Once I had a big pile of scrapwood drilled and ready to go, I attached one to the end of a strong wire to tie off the end of my garland. I then asked for little hands to thread the pieces on. My Jeremiah helped me. I wanted the pieces to be random without any order of size or color. Having a child help with this creative step is fun.

 We quickly realized that having all the pieces stacked neatly on top of one another was using up a lot of wood and our garland was getting heavy QUICKLY! We stopped. We took everything off and threaded our wire through a needle and then strung 1″ felt balls after every few pieces of wood. This really helped the wood pieces separate, give another texture, and help lighten the weight of the garland.
 I LOVE how it came out. I immediately started sending pictures to friends who I know also have lots of scrap wood. It’s just too fun not to share.
 A couple tips if you do this project,
 We didn’t even have our tree decorated yet, and I was hanging my garland up and snapping pictures. Making something you are proud of is a crafter’s highlight. What do you think!? What colors would you hope your garland would be? We are decorating our house with more bright colors this year than in years past.
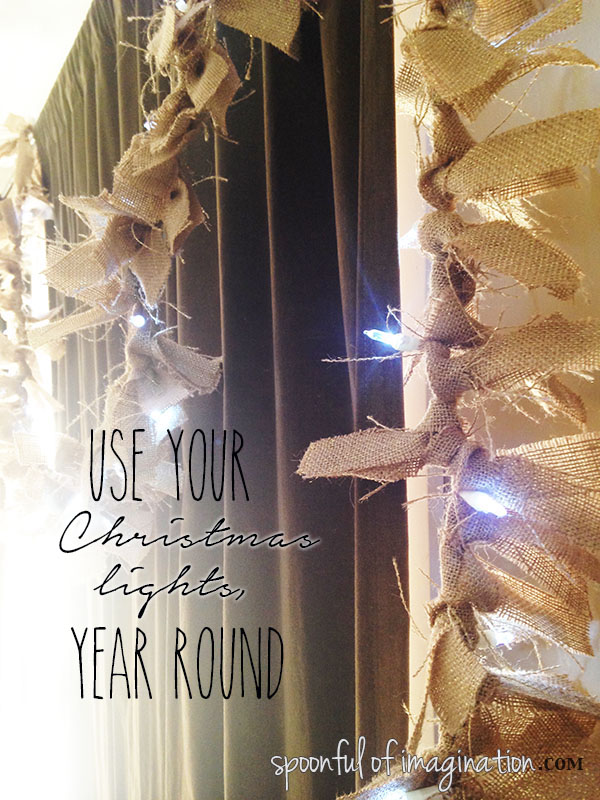 Do you miss your Christmas lights?
 The next step is to fold one of the pieces of fabric in half and place it behind the strand of lights. Then loop the ends of the fabric around the strand of lights and pull through that top fold in your fabric. The strand of fabric will have tied itself onto the light strand.
 That is the primary step! From there it is just repeating of cutting strips and tying them on. I like to create a really full garland, so I place three to four strands of fabric between each light. I think by doing this the electrical wire is really covered well.
 This one I am showing you, I mixed burlap with a creme fabric. I made it for a friend at Christmas. I have not found a good place for my lit garland yet, but you may remember seeing it in last year’s Valentine’s Day mantel. Once Christmas was over, I literally switched out Christmas elements and replaced it with winter ones and then just added Valentine’s Day decor like the
  Another inexpensive way to make this lit garland would be to use an old sheet and rip strips of fabric. I made one with this idea to list for sale in my shop. I added a little string to it for another texture. You could add ribbons, strings, beads, feathers, etc., to yours!
 I love how the fabric and little lights add a lot of fun to a space. Home decor doesn’t have to be expensive. I tried this garland in my kitchen and was tempted to keep it. The added texture creates some warmth that I just love.
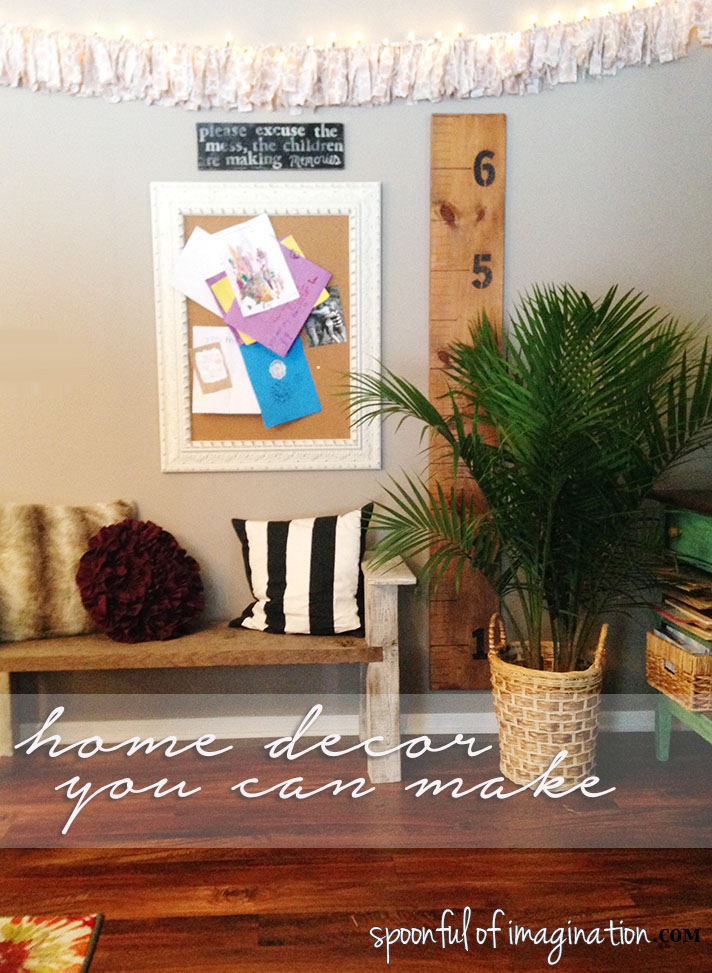
 I think it even looks pretty when it’s not lit! Wouldn’t this be so cute in a little girl’s room?
 What about you!? Do you have a thing for these fun little lights too? How do you create soft light in your home? I’d love to hear! Find me on Instagram (ericadeuel) and chat with me!
 I’ve got the joy, joy, joy joy, down in my heart

 I know there are lots of joy signs out there. I too have been eying them and wanting to create one for myself. I thought while I don’t have a house, I should make the sign. This way when we move into our new house, my sign is ready to decorate our new front door!
 Now, this method of attaching is not strong enough to make a shelf or something like a piece of furniture without being reinforced with more wood on the back side. For a sign that will just hang on a wall though, it was ok. I ended up making two signs, so I could give one to our sweet host friends.
 I then did a light sand to my paint and used this

 The final step was attaching my letters and wreath to my sign. I did the letters first, but I placed the wreath in the middle so I could figure out placement. I used wood glue and laid my letters in place. I used wood clamps to hold them tightly to the board while the glue dried. This step is important to make sure you get the strongest bond possible.

 Once the glue was good and dry, I removed the clamps and only had attaching the wreaths left to do. I brought in my husband to help me brainstorm. We thought we might use wood glue and then opted to just hammer a few small nails in place and stick the wreath on. By doing it this way, you can easily remove the wreath to store it better at other times of the year.


 I love how it came out! It is a classic piece that reminds us Joy to the world, the Lord has come. I might leave it up all year though, cause there is joy in the everyday. My amazing husband just spoke all about this at church, if you care to listen or watch, you can check it out
 I’m pretty excited about how this turned out! Christmas is such a fun time to craft. I made another
  Thank you so much for checking out my sign. This is a busy time of year and I hope you can all enjoy it with your families!! As always, thank you for following along with our journey. I love to hear from you! Follow me on Instagram (