![]() My fingers took one for creativity with this project. There were moments I am sure they were screaming at me to stop and be kind, but I kept telling them this project was worth it. I do believe it was!
My fingers took one for creativity with this project. There were moments I am sure they were screaming at me to stop and be kind, but I kept telling them this project was worth it. I do believe it was!
I had this old pillow that I no longer really cared for. In our continual task of looking for things to purge rather than pack, I decided to makeover this pillow rather than part with it. I love the small rectangle size.
 I’ve been on a yarn kick with my Adventure Awaits wall art, so I had this idea of using yarn in like an embroidery type way to decorate a pillow cover. I started with a big piece of burlap that I folded in half, so I had a thicker more dense burlap layer for my cover. I then sewed both layers of burlap to an old creme pillow case and cut the newly sewn (all four layer) pillow cover slightly bigger than my pillow. I just eye balled it an inch or two bigger on every side.
 This was a thick dense cover and my fingers felt it as I pulled yarn through it. I learned the hard way, and I have a few ideas that can help you take this idea and make it easier for your fingers.
But first, you need a design. I decided to do something basic and a silhouette or shape to keep it easier to complete. Burlap was the perfect choice of fabric because it gave me a grid of lines to help make my design symmetrical and straight.
![]() I drew an arrow on my burlap and then picked one color of yarn to sew around the border. I sewed the arrow like I would embroider a hoop. The difference was a thick, strong, sharp needle rather than a smaller needle with embroidery floss.
I drew an arrow on my burlap and then picked one color of yarn to sew around the border. I sewed the arrow like I would embroider a hoop. The difference was a thick, strong, sharp needle rather than a smaller needle with embroidery floss.
![]()
![]() After my arrow was outlined, it was time for the fun part. I looked at my huge basket of colorful yarn and started sewing stripes one color at a time.
After my arrow was outlined, it was time for the fun part. I looked at my huge basket of colorful yarn and started sewing stripes one color at a time.

![]()
![]()
![]() A few tips to help you:
A few tips to help you:
- Choose one color at a time and do all the stripes with that color at one time.
- Change up the thickness of the stripes and order, so it is not in a pattern or equal strip widths (any slight difference of widths would be very obvious if trying to make them the same). The randomness is easier to pull off and I think the look would be the same.
- Once I thought I had a wide enough strip, I cut the yarn and knotted the back.
- The length of stitches can vary. I tried to offset each stitch to have the middle of one stitch hit the end of stitch in the row before it. This created a weave type look and prevented the yarn to look like it was in rows.
- Use an embroidery hoop to help tighten the area you are currently working on and move the hoop as you progress.
- Use a thimble (or kiss as Wendy said to Peter Pan) to help pull your yarn through. If you can see how dense my yarn arrow is filled in, the back is that thick as well, but also has the knots, so it is a lot of layers to continually pull your needle through
- Ice your fingers 🙂 I worked on this an hour or two every night for a few days. It was fun and mindless, but I did ice my fingers a little afterwards and that prevented them from blistering or being sore the next day. I know, I know this is extreme… but hey, a crafter’s gotta do what a crafter’s gotta do, right!?
- MAKE an EASIER design. I love this arrow and am so glad I went with my gut and filled it in as I saw pictured in my head. If I was to do another though, I would outline the arrow and maybe sew a word in it or just a few stripes. It would be a slightly different look, but use the same technique and be equally cool.
![]() After I finished sewing my arrow, I made an envelope back like I did on my pillow shams. I decided to use my Waverly fabric I received from Online Fabric Store as part of my swag from Haven. I loved the black and white contrast with all the color on the front. I added a little pom-pom fringe on the envelope opening, so the back is just as fun as the front.
After I finished sewing my arrow, I made an envelope back like I did on my pillow shams. I decided to use my Waverly fabric I received from Online Fabric Store as part of my swag from Haven. I loved the black and white contrast with all the color on the front. I added a little pom-pom fringe on the envelope opening, so the back is just as fun as the front.
![]() I absolutely love all the color and different pops of textures! It is such a fun element that can brighten up any space. I also love how this project didn’t cost me a thing. I had everything on hand. Recycling an old object can give new life and lengthen the enjoyment of something. That old pillow has never looked better.
I absolutely love all the color and different pops of textures! It is such a fun element that can brighten up any space. I also love how this project didn’t cost me a thing. I had everything on hand. Recycling an old object can give new life and lengthen the enjoyment of something. That old pillow has never looked better.
 Right now I am carrying this pillow with me around the house and playing with it in different rooms. I like it in every single one. I might need to make some more yarn embellished pillows.
 What do you think!? Do you recycle your old pillows too!? Would you add yarn embellishments to a pillow like me?
This world would be a much boring place without color. I love it. I hope you are able to add some color to your life and use your imagination this week!

 Have you seen the fun yarn and weave crafts that have been going around?


 I had never created a weave and honestly didn’t know where to start. I used
 Once I finished my weave, I slipped the loops on a dowel rod and used a little hot glue on the back to hold them in place. Since this was only my first weave, I know there has to be a much better system to making sure the stitches stay tight. I will get there! Until then, I am so proud of my first little weave and it’s actually something I want to hold onto!
 Next, I needed to figure out how I wanted to add my inspirational phrase. I used creme canvas and folded a piece in half and then cut the edge to have a nice, simple point in the middle. I then placed my weave on top to give me an idea for spacing my words. I used a sharpie paint pen and just started doodling my phrase.
 It was a little too plain for me with just the words alone, so I went back and added some gold paint accents that matched my yarn for another pop of color.
 I then added a dowel rod and some fun rope to make sure my creation could hang on the wall.
 I then sewed around the edge, hot glued my weave to it at the top, and added some fun yarn pom poms to dangle down. I love it!
 I love how this simple wall piece incorporates several things that have been catching my eye. For now it hangs on
  When you think of yarn and felt, do you think of their use more for in the fall and winter?
 This week I shared my DIY Felt Hydrangea over on my friend
  I never get sick of seeing yarn pom poms. There are some awesome tutorials on pinterest, if you have been wanting to make a few. I simply spruced up the bouquet from my winter mantel with a few spring color pom poms.
 If you need some cheap wall decor, you can make a simple
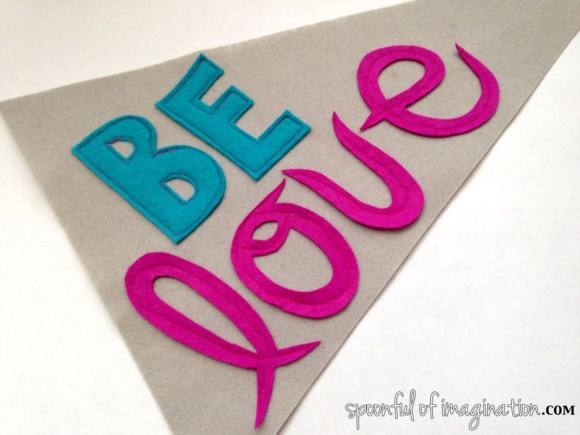
 Babies are being born year round, right!? Baby gifts can get expensive. I love to add a personal touch to my gifts. You can make this
 These are a few of my favorites, but I have a lot more too! Please feel free to bookmark, pin and share this image below to share the felt and yarn love year round!
 A few tutorials in the above collection are my…
 So, what do you think?! Are you in love with yarn and felt as well!? Are we rule breakers together!? I hope I’m not alone.
 She had a blast painting her Fluttershy. If you have a new three-year old, you know her painting looked nothing like Fluttershy. Yet, she was proud of it, and it truly was beautiful. I have so many paintings and “pictures” of hers like this. I decided to help her transform her art into a Fluttershy.
 After I printed off my Fluttershy, I taped the puzzle pieces of her together, cut the image out, and laid it on top of Reagan’s painting. I then traced the pony onto the painting, and cut it out.

 Once I had some pencil lines of Fluttershy’s features, I went over them in Sharpie. I ended up cutting out eyes and a wing from a different part of Reagan’s painting, and I glued them onto Fluttershy’s body to give her pony another pop of color and texture.
 Once all the yarn was in place and dry, our Fluttershy was complete! We think she turned out so cute, and Reagan wanted to carry her all over :).
 I had to convince her she was safer to hang on the wall. We ended up placing her in an Ikea frame and did a background matte like I did in this
  So, what about you!? Do you have a My Little Pony fan? You could easily take this concept and turn it into your child’s favorite character.