 Are you ready for spring?
I don’t mind the winter, as long as there is snow and it’s pretty! Sometimes the pretty is just the trees’ silhouette outline on a colorful sky, since we haven’t had as much snow this winter. There have been a lot of gray, wet days. It has me itching to bring back color, so the other day, I took down all the winter decorations at our art studio and started creating some spring ones. Let me show you how I came up with my foliage!
As the founder of a non profit art studio, we get a good amount of local craft donations from other artists or businesses in town. Recently, we got some fabric samples from a home designer and it got me thinking if I could turn those into some inexpensive green, spring foliage.
 I loved how there were different patterns, texture of fabrics and shades of colors. I started by cutting about 3″ long leaves. I didn’t measure or worry about the exact width or shape. This is a great activity to do during a movie or couch lounging one night.

Once I had a huge stack of leaves, I simply started hot gluing and folding them around some wire stems.
You can use whatever wire you have or you can pick some up in the craft floral section at your local craft store like I did. I added a dab of hot glue on the wire and kind of folded one end of the leaf around it. I don’t have any pictures of this step, but if you look closely you can see what I am saying.
 I worked in about 3′ long pieces of wire and made a stack of this foliage as I went. I made 8 separate pieces, but you could make as many as you wanted. I intended for my foliage to hang like a garland, but you could create yours on dowel rods for a sturdy base to stick in a vase as well. There are lots of possibilities!
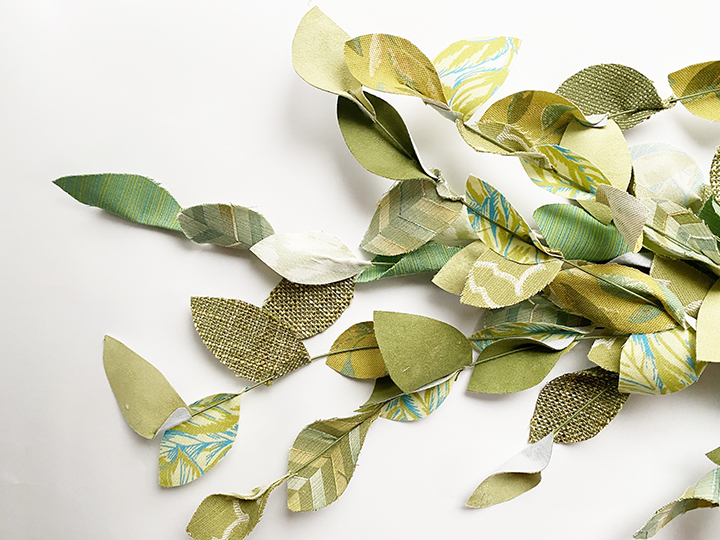
 I love how the fabric creates a soft leaf and foliage look. It really makes it more believable by how it moves and does not have a harsh fold. I took my foliage to the studio and hung it down in our faux fireplace.
I love the natural, yet creative pop of inspiration it gives in the space.
It was a perfect way to add some spring decorations in an inexpensive way to our space. What do you think?
 So, are you ready for spring? Or, do you want to will it into existence by creating spring looks too?
Creating doesn’t have to be expensive. Use what you have. If you have some old green Christmas decorations, you can cut that up for some leaves. Do you have some green shirts with a stain? You can use that too! On those little leaves, you can’t tell where they came from or what they use to be. When they are all strung up together though, they create a beautiful look!
Have fun and imagine the possibilities! If you create some inexpensive foliage, tag us on Instagram or Facebook so we can see!


 One day I was drinking a tea and started flipping through a book I flip through often for inspiration. It sits on a side table to be a quick read. As I was thumbing through it for the 100th time, I had the thought, “I wish I could see all the pages at once. They are so beautiful.” Almost as quick as the thought came, it was followed by thinking of my accent wall I had been trying to figure out. Could these book pages be collaged in a way to make wallpaper?
 I really didn’t give it any time or research before knowing I wanted to try my idea. I started ripping my beloved book up page by page. Once I had ripped out all the pages, I had a huge stack of beautiful paper. I used scissors and cut off all the frayed edges. I was then ready to figure out the wallpaper method.

 I taped a few pages up in different directions to figure out if I wanted a messy scattered look or if I wanted it to look more like organized rows. I decided I liked the messy look. I went to Lowes and asked where the wall paper paste was located. To my surprise, there was a roller of wallpaper paste made for doing wallpaper boarders. It was the perfect size for my project! It was a small bottle with a roller to easily apply the paste to my book pages.
 Most of the pieces didn’t need to be trimmed. I simply picked a page and decided which side of it I liked best, and rolled my wallpaper paste onto the side that would be up against the wall. I rotated the piece of paper different little angles so it didn’t look perfect and pressed it onto the wall. I then used the smoothing tool and pressed all the wrinkles and air bubbles out.


 A few little things I thought through as I worked…
 It was really messy. I used a huge old sign and placed it on the floor as my mobile work space, and it had gluey wallpaper paste all over it. I probably could have sorted my pages out to have a stack of images vs. a stack of quotes, etc, but I didn’t. The creative in me decided to just go for it. Some of you organized folks will probably have a much more calculated way to go about it, which is great!
 I love how it all came together! It’s so colorful and fun! The book, How to be a Wildflower by Katie Daisy, costs $11.46 on Amazon. I ended up buying two books from there. What an inexpensive way to buy wallpaper we love, to brighten up a small space!
 This door leads into our garage. It is the most used door in our house. We can see this little nook from our kitchen, which is part of why I wanted to brighten up the space! It is also our walk through laundry room into my craft room. This small nook is one high traffic space!
 I love how these beautiful pages are perfect for inspiration and deep conversations. The other day I was sitting at the table with my kids, and I asked them what they thought one of the pages meant when it said, “gather unlikely friendships.” It has led into some of the most real, challenging, and beautiful conversations.

 This little nook is a well used space in our home, and now as we come and go and just live…we can be inspired. It’s a small wall with a huge punch.


 Have you shopped for wallpaper recently?
 The small window does not let in a lot of natural light, so I painted this room a very, very faint blue to try and brighten up the space as much as possible. You can see the before wall color and other half of the room
  The first step was to pick out my colors. One reason I think my first floral wall took so long was I used cheap paint. I decided I needed to use nicer than the the least expensive acrylic paint bottles at the craft store. I ended up opting for paint samples mostly of the HGTV paint line at Lowes, and they were perfect.


 Each flower needed two coats. The only one that needed more was my fushia flower. The color has some red in it…which is always a hard color to paint. Red will always needs lots of coats. After each flower was covered in coats, I started adding more detailed layers to the flowers. I ended up leaving the limey green leaves in one coat. I liked the painted look it created.
 These pictures aren’t the best but are what I sent to my sisters and a few friends as I painted. I was obsessed and excited as the floral wall took shape. It was addicting and really only took a few days working off and on! I made a decision to enjoy it and not let it stress me out. I painted each flower like I would on a sign. I didn’t worry about the edges being “perfect”, but left them to have a slight brushed look. The simple imperfection and not correctly centered flower centers make all the little artsy elements come together to create a really fun/funky yet pretty look that I love.
 I really love how it came out! The flowers are simple yet beauitful. The pops of colors play together well and create a really warm, fun feel. That light blue wall was the perfect base to embellish on.
 This floral wall allowed that room to be a little more fun, yet it didn’t add a huge amount of color that would make a small, poorly lit room feel even smaller or dark.
  What do you think? Would you try to paint your own “wallpaper”? The thing with this design is I can just paint over it when we tire of it. For now, we love hanging out in this room.
 The creativity in this world amazes me.
 While the wrapping paper was taped to the wall, I looked at it off and on and thought how much I loved the print. I decided I wanted to try my hand at painting some flowers inspired by this design. I had a base wood sign that I had already built and painted white. It was a blank canvas waiting to be embellished and make into something. I came up with this idea to create a sign off a phrase that I have done a couple of times before (like in

 It was so fun just going for it. I loved laying my colors on top of each other and adding some details to the flowers to add another depth and color to the painting. It took a little while to wait for colors to dry before I could build on them. In between homeschooling and life I would capture a layer or two, so this part of the sign alone took about three days. It was worth it. I love how the sun was so much more fun and unique because of these flowers and to think it was all inspired by a piece of wrapping paper.

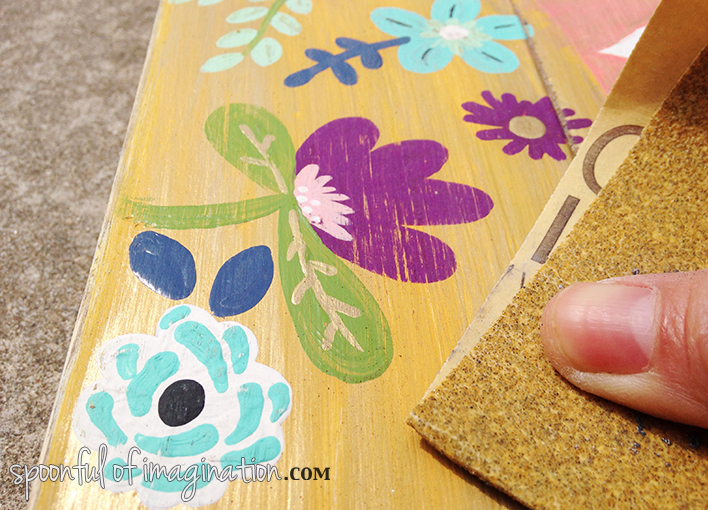 After I sanded, I painted on Minwax’s Early American stain and rubbed it off with an old cloth.
 I loved what this step did to the sign. My last step was to add the frame and stain it as well. I quickly measured the pieces and nailed them into place. My sign was finished, and I just adore it!

 I think it is a beautiful combination of color with a rustic/artsy edge. It’s so fun. This popular phrase has been made into all kinds of signs, but a small piece of wrapping paper helped me create a sign that I had not done/seen before. I love that we can find inspiration in the craziest of places.
 There are items that we can expect to find inspiration. Magazines, blog posts, and Pinterest are just few normal places to find inspiration. What are some of the weird ones you have found inspiration?