
Imagine the possibilities with me for a minute! What is a way you LOVED to create as a kid?
- Love playing outside and building forts with sticks and mud pies?
- Come alive cutting and gluing paper?
- Enjoy the heck out of painting free and big?
- Play with blocks or legos for hours?
- Was rearranging or redecorating your room the normal?
Chances are the way you enjoyed creating as a kid you will still enjoy today!
I know for me, growing up in a family of nine kids there were always DIY projects going on.
Recently, I have been thinking a lot about how expensive raising nine kids must have been for my parents. As my kids grow, it feels like it just keeps getting more expensive. Our oldest is learning to drive, and we all remember when we first caught wind of a brand we liked. Not just any pair of shoes always works anymore. I know my parents had to be thrifty to make our world work because I was so blessed and never went without. Being resourceful has been modeled for me.
I remember when my parents expanded our house. With nine kids, we outgrow the size house we had. The addition brought saw dust and scrap wood components to our lives. To this day, I still enjoy working with scraps.
Art doesn’t have to be expensive. We all have little things that we can reuse. For me, wood scraps has always been something I used, so to this day, I save them. The texture, possibilities of small pieces, and options of several things coming together to make something new is something I have always loved. Wood is a great material for all of those things to happen in the creative process.
Now, it’s no secret that I love to create in LOTS of ways. But, for many of us the ways we created as young kids can still be enjoyed years later or maybe the way we choose to create changes as we change.


Do you remember how you love to create? Has it changed?
Let me encourage you to imagine the possibilities.
Imagine trying that childhood creative process again that you loved so many years ago. Or, if you know of a new way you love to create imagine how you would feel if you took thirty minutes to do that activity this week?
We both know that your heart, mind, and soul will be better for that time of being FREE and using your hands.
I miss encouraging others in their creative process. It’s been a year, since we decided to close our art studio. So, as I was playing with some wood scraps, I dreamed up a kit with a lesson that I could share with all of you. If you need an extra nudge to get creative and imagine the possibilities, join me for this LIVE class one week from today. I will walk you through using these wood scraps to create a playful wood mobile. There will be a replay video, so if you miss the live. You can watch the tutorial replay back at a more convenient time.
Snatch up your kit to let me encourage YOU and your creative process. We will paint. Playing with order and design will definitely happen. Yarn will be wrapped. Of course, we will celebrate options and diversity. It will be so fun!


My hope for those that snatch up this creative kit (and for you on your creative journey) is that after playing with new materials and tools you feel a little more empowered in believing in yourself, knowing you can make good decisions, and trusting that how you think matters.
The creative process is a window into what’s going on inside us.
We find that inner discovery in playing, and pulling out of the expected. Keep playing. Keep creating. You never out grow the need to create.

 This project has so many of my favorite components. I love color, paint, process art, functionality, and several steps for a project and this fun project incorporates all of that.
 1. Build


 2. Sand and Prime
 3. Paint squares & Tray
 I pulled out a mix of different materials to allow my campers to paint their squares in an abstract, fun way. In this step, we focused on the process of creating, experimenting, playing, observing, pivoting to enjoy painting without a paintbrush.
 I planed to allow my campers to use a paintbrush to paint their wood trays, after they painted their wood squares.

 4. Dry and Spray Sealer
 5. Final details- Glue squares and add handles
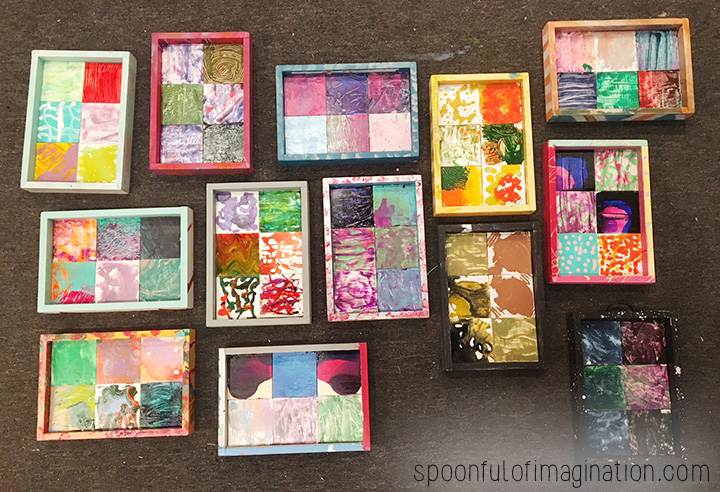 They were gorgeous! I added the handles to complete the trays and were ready to be taken home and stylized!
 Each tray turned out so different, yet beautiful and colorful. I love the mix of color, wood, and metal handles.
 I love how I had some ideas for the main parts/steps of this project, but it was open ended enough that the campers could play and personalize it to their own taste. I never mentioned splatter painting, yet the girls did play with that technique.
 There are so many ways to personalize this project or the paint techniques to make something fun today!
 Have you ever wanted to paint a heart?
 I used some leftover spray paints and sprayed just the top of my wood pieces. I didn’t need the sides covered or for the whole top to be really even. I was just trying to cover the middle of the wood piece well. I will show you why.
 After I painted the tops, I sanded my signs a little with a heavy grit sandpaper. I wanted the color to be mixed a little with a rustic appeal. By sanding the signs a little, some of the color was removed to show the natural wood below again.
 This next step is how you get your symmetrical heart. Remember the old elementary school trick of folding a piece of paper in half? Cut one rounded half of your heart, unfold it, and ta-da… perfect heart! So, I cut a bunch of hearts out of thin cardboard. You could use construction paper or even paper bags from the grocery store. Just something that will withstand a little spray paint. The hearts were different sizes and styles. I wanted a mix of different looks, and the different hearts helped create that.
  Now, I laid a cardboard heart on each wood sign and spray painted over them with a different color. The heart cardboard acted as a sticker shadow and allowed the new spray paint color to stay off the previous spray paint layer in the shape of a heart. Since this layer of spray paint is the top layer, you do want to spray paint the sides of your heart sign now.

 My hearts were pretty perfect. I did a light sand job to rough the edges up a bit more and then the signs were complete! If you have been following me for a while, you might remember I did this painting trick on
  Do you give out Valentines? Matt and I aren’t a big Valentines Day couple, but I have created a number of different Valentines for our kids through the years. This
  It is easy to fall into a birthday buying rut…especially for your husband. Do you know what I mean?

 After I had cut all the wood, we started playing with the best way to attach our side boards to the 12″ squares. Those squares were going to act as our top and bottom of the table, so in short we were building a box.


 We used my Ryobi Brad Nailer. It’s my absolute favorite tool. You may remember it from our
 After our box was complete, Jeremiah came in and sanded it down. He used a rough grit sandpaper and went to town on that thing. This boy of mine loves working with his hands. He often sands scrap wood next to me as I paint signs. He will be some kind of artist someday.
 After the box was sanded, we screwed on four little wheels we got at our local hardware store for a couple bucks. I marked a spot on the bottom of the box, and Caleb used the screwgun to get the wheels in place.

 Once our box was turned right side up and looked more like an end table, we decided it needed a little shelf in the middle to make it more practical. Caleb measured the wood and Jeremiah painted it. We used scrap wood to help give the shelf a little ridge to rest on and used the brad nailer to hold them in place.
 Here is the part Reagan was dying for. She got to paint the whole thing. She got quite messy and painted herself in large parts too by bending every which way to cover her project. She had a blast.
 Once the paint was dry, we gave it a light sanding job and then stained it.
 At times I wanted to jump in and remove a paint drip or wipe off the stain a bit better, but I refrained. I wanted it to be their piece, and it really does look more vintage-y, quirky fun for it. I just love it, and Matt did too!
 Here you can see it with his yellow chairs. It fits right in the middle of that nook to hold a coffee, but it can be wheeled out to hold a laptop for a quick meeting as well. Reagan got to paint a frame too 🙂
 This was a gift that had time and thought…and it’s practical! I don’t know how much it ended up costing since we had some of the supplies. You can use scrap wood-even for the top and bottom square pieces! Take this idea, modify it to make it your own (in size, style, etc), and have fun!