Spoonful of Imagination

Add it to a Family for Something Beautiful

  • Home
  • Our Family
    • Our Home
  • Courses
  • Shop
  • Contact

You are My Sunshine (and finding inspiration)

April 3, 2016 By Erica Deuel 1 Comment

wood_sign_tutorialThe creativity in this world amazes me.

There are times when I’m out or browsing online and I see something that stops me in my tracks. I can’t help but think how beautiful that creation is. I may not need that item, but there is something about the colors, design, uniqueness that caught my attention.

Creativity comes in all different ways, as I mentioned before in this post.

I love being inspired by other artists.  Sometimes either the placement of their design, the colors they paired together, the shapes they use spur an idea in me. I found a wrapping paper the other day at TJMaxx that did this to me. I instantly fell in love with the paper and knew I needed to bring it home with me, if only to continued to be inspired by the design.

I wrapped a few presents with it and then taped a piece to the wall. Could wrapping paper be turned into wall paper? This I’m not sure, but I may want to try it.

wallpaper_room_inspirationWhile the wrapping paper was taped to the wall, I looked at it off and on and thought how much I loved the print. I decided I wanted to try my hand at painting some flowers inspired by this design. I had a base wood sign that I had already built and painted white. It was a blank canvas waiting to be embellished and make into something. I came up with this idea to create a sign off a phrase that I have done a couple of times before (like in this wood sign post), but this time to embellish the sun with flowers inspired by this wrapping paper.

I painted the words, the sun, and then was ready for the fun part. I picked out my own colors for the flowers and just started having fun and painting away.

finding_sign_inspiration

painting_flowers

painted_flowersIt was so fun just going for it. I loved laying my colors on top of each other and adding some details to the flowers to add another depth and color to the painting. It took a little while to wait for colors to dry before I could build on them. In between homeschooling and life I would capture a layer or two, so this part of the sign alone took about three days. It was worth it. I love how the sun was so much more fun and unique because of these flowers and to think it was all inspired by a piece of wrapping paper.

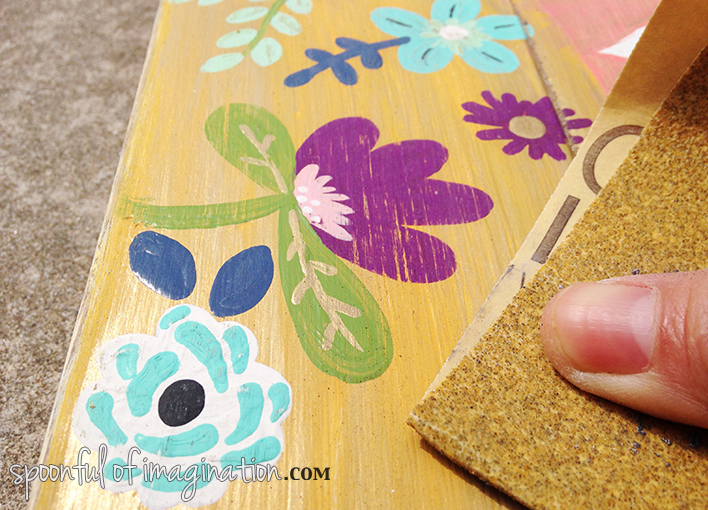
I was super nervous to add my rustic touch to the sign after spending so much time painting the flowers. I had a piece of art I loved and I was afraid I might ruin it to sand and stain the whole sign. I wanted to take that risk though. I knew the potential of the sign being even more beautiful with that light rustic/warm touch, so I slowly started sanding my creation very lightly.

you_are_my_sunshine

sanding_a_sign

making_a_rustic_signAfter I sanded, I painted on Minwax’s Early American stain and rubbed it off with an old cloth.

sign_tutorialI loved what this step did to the sign. My last step was to add the frame and stain it as well. I quickly measured the pieces and nailed them into place. My sign was finished, and I just adore it!

you_are_my_sunshine_sign2

you_are_my_sunshine_sign3

you_are_my_sunshine_sign5I think it is a beautiful combination of color with a rustic/artsy edge. It’s so fun. This popular phrase has been made into all kinds of signs, but a small piece of wrapping paper helped me create a sign that I had not done/seen before. I love that we can find inspiration in the craziest of places.

you_are_my_sunshine_signThere are items that we can expect to find inspiration. Magazines, blog posts, and Pinterest are just few normal places to find inspiration. What are some of the weird ones you have found inspiration?

A worn down barn?

The way a creek trickles over shallow rocks?

Weathered chairs?

What else?

What is something that has inspired a creation of yours?

wood_sign_tutorialIn a world that is constantly changing, evolving, and inspiration can be found everywhere, I think it is so important to lean into some of that to the next level of depth. Rather than just seeing something you love, figure out why you love it and do something about it. I loved the shapes of the flowers, so I took this inspiration and made something of my own with it. Instead of just looking, I used my hands and made something. Try it!

Thank you so much for joining me here today. If you may be interested in purchasing this sign, please check my shop to see if it is still available.

signature

Share this:

  • Email a link to a friend (Opens in new window) Email
  • Share on Facebook (Opens in new window) Facebook
  • Share on X (Opens in new window) X
  • Share on Pinterest (Opens in new window) Pinterest

DIY Pallet Wall

November 13, 2015 By Erica Deuel 3 Comments

DIY_pallet_wall_tutorialOh, my pallet wall.

I love it.

I’ve wanted to share it for so long. Today, we had one of those windy, wet, cold days and it was the perfect excuse to tell the kids we are chilling. We turned on Home alone and I got to editing pictures. Don’t let this tutorial intimidate you! If you have been wanting to try your hand at creating a pallet wall, you got this! Before you begin though, if you don’t already own the Ryobi Airstrike Brad Nailer, open up another little tab on your computer and purchase one. It’s our favorite tool and the one that saved us on this project.

Before_small_wallWe started with this thin wall. For as long as we have been in this house (a year now), I have wanted to pallet that wall. It’s small and broken up with the fireplace. It’s the perfect wall to turn into a fun accent wall. I’m not sure what the previous owners had in that little wall nook. It’s always been an awkward space for us. This pallet wall would fix that issue as well-we covered it up!

This is more Matt’s expertise than mine, he did a great job preparing the space to be covered up.

First up, he moved the outlet to outside the nook, so we could use it in a mantel. Please note: if you do not have experience with electrical work, find a friend who does or hire that step out.

moving_an_outletHe then used our Ryobi Brad Nailer to build studs in the nook. This gave us something to place nails into to attach the pallet boards.

airstrike_brad_nailer

pallet_projectIf you are just joining in with this project, click over to this previous post to read how we easily tore apart pallets to create our supply of wood. Once I had a big pile of pallet wood, I sorted it into three piles. I tried to separate it based on coloring. I ended up with a yellowish pile, a grayish pile, and a dark blackish pile.

My two thoughts that guided me were:

  1. to have each row of pallet wood be broken up by color so no two boards of the same shade were ever next to each other. This goal would keep the wall from looking like stripes. Having the piles of different color shades helped make this step easier.
  2. I wanted to break up the rows with different width of boards. I had limited “wide” pallet boards and I wanted to make sure that all those rows weren’t at the top and then we just got thinner rows all the way down. I alternated having a wide row and then a thinner row as much as I could.

sorting_pallet_woodWhen we were ready to start, I simply picked a board to start with and used my brad nailer to attach it to the wall. We used four nails per a board. It was one nail per corner.

how_to_start_a_pallet_wallThe only place where we didn’t put a nail in every corner was where we were covering up the open nook space. We attached the nails, so they would go into the studs that Matt had built.

We also realized there was a chance the raw wood might show through, since pallet wood is not perfect. I went back to stain the stud boards so they were a darker color and not as obvious as raw wood peaking through the gaps in our pallet boards.

Ryobi_nail_gun

covering_a_wall_hole

Ryobi_airstrike_brad_nailerFilling in the wall kind of felt like piecing a puzzle together. We didn’t want all of our ends to meet up together, so we intentionally would start a row placing a board in the middle of the seem of two boards in the row above. This little step created small spaces that needed filled with boards cut to a particular size (as shown below). In this scenario, we would mark a board where it needed cut and use our Ryobi Compound Miter Saw to trim that board to the correct size. Once it was cut, we could then nail it into the small gab and fill that puzzle piece space.

creating_a_pallet_wallWe intentionally picked a chipped board to be placed where the electrical outlet cord would be coming out. It worked perfectly to have the cord discreetly come out and have the wall still look rustic.

moving_an_eletrical_outlet

creating_pallet_wallAfter our longer rows were complete, we stood back and admired. It was so exciting and looked so good. One thing I will say about the way we cut our pallet wood: we were nervous about the short size of the boards. Instead of using the full 3-4ft width of a pallet board, the wood ended up being about half the width. My fear was that the smaller boards would create more of a uniformed tile effect than a rustic wood look. It turned out great though. Once we stepped back and observed, we realized the longer boards on this small wall would not have worked as well. Because this is such a small wall, the small boards allowed for several boards to go across in one row which ultimately gave the wall more color and character. These size boards were perfect. At this point I started running with it and Matt went more on kid duty. We make a great team.

DIY_pallet_wall

pallet_wall

pallet_wall_projectI love how the wall came out! If you too are covering a hole or wanting an outlet, this next step is for you. We let our wall sit for a few weeks while life happened. Matt did attach some 2×4’s to mount the electrical outlet and serve as the mount for the mantel that we would eventually create.

box_mantel

box_mantel_tutorial

box_mantel_project

rustic_pallet_wallMy wall looks rustic and completely natural doesn’t it!? Let me fill you in on a little secret. There were a couple rows, where I ran out of various shades of different colored boards so two colors ended up being next to each other. It didn’t look right. So I poured a little stain on a cloth and ran it over a few boards to break up the color. You wouldn’t be able to tell unless I pointed them out to you.

faking_pallet_wood

Now that you know, they totally are obvious aren’t they? To the unknown eye though, they just blend. Try that little trick… It helps.

fireplace_makeover

DIY_rustic_pallet_wall

This room now feels so warm and inviting. It has huge windows, if you remember from my new home tour post. The rustic wood wall embedded with a fireplace just completes the look. It’s our very favorite room to hang in.

It really only took us a day. We started sometime that morning deconstructing the pallets. We used four or five pallets total. We had our three kids and foster son with us all day and stopped for meals, ran interference with kids as we needed, tag teamed refereeing kid fights and still managed to get the wall complete in one day. It could have been quicker. We wouldn’t do it any other way though. But I share the details of our day with you to let you know-don’t be intimidated! If we could do it that way, you can do it too! The key tool for us was really our brad nailer. If you remember the shiplap wall we did in our last house that ended up being our previous foster son’s room, you know we didn’t have the brad nailer then. This new pallet wall is better and was so much quicker! The holidays are coming. Add this tool to your list. You won’t regret it. Please note: No one is paying me a thing to say that. It’s literally just our favorite tool on planet earth in the history of ever. That’s not an exaggeration.

I’m still trying to decide on how to finish off our mantel. I am thinking a lighter stain, so it dulls the stark plain wood yet keeps the wood grain showing.

How would you finish it off?

I will show you soon how we made it and what finish we decided on. Thanks so much for following along!

signature


Share this:

  • Email a link to a friend (Opens in new window) Email
  • Share on Facebook (Opens in new window) Facebook
  • Share on X (Opens in new window) X
  • Share on Pinterest (Opens in new window) Pinterest

How to Tear Apart a Pallet

November 1, 2015 By Erica Deuel 1 Comment

Disclosure: I received the saw for free to review, but all opinions and words are my own! I really do love this Ryobi Cordless Circular Saw!

stacked_pallet_woodDo you have those moments where you realize how pathetically weak you are? Maybe you encourage your kids to eat their chicken and finish their carrots, so they can be strong. You might hope those words are true for you too and you consider yourself relatively in shape. Then something happens (like a slap in the face) showing you how totally not strong you actually are?

That moment happened the one time I tried to pull apart a pallet. I had my hammer and a crowbar and was attacking and using my whole body’s weight to try to pry those boards apart. It was horrible.

I ended up getting a few pieces of wood that I was able to use for this poster size frame, but the experience left me never wanting to try that again…and nursing blisters.

I learned the hard way that pallet wood is some of the strongest wood. Although I never ever wanted to use a hammer and crowbar on a pallet again, I did want that beautiful, weathered, free wood.

Since we have moved into our new home (almost a year ago now!), I have dreamed of having a pallet wall around the fireplace. I put some thought into how there must be a simpler way to get this wood.

Ryobi_circular_sawWith the help from my friends at Ryobi, I found the simplest way to get this wood! Don’t mess with the nails. Use the ONE+ 18-Volt 6 1/2 inch Cordless Circular Saw and literally cut the boards off the posts.

how_to_take_a_pallet_apart

DIY_pallet_breakingWe sliced the wood right off the crossbar posts with our saw. We lost some wood by this technique, but we saved so much time and energy. We’d run the saw up one side and then down the other to free the pallet boards from the side posts. Then we’d go back and make cuts on each side of the center crossbar.

how_to_make_a_pallet_wallWe ended up with a huge stack of pallet wood that was about half the size in length as a normal pallet. It was so quick. Since we were cutting boards so fast, they didn’t have the straightest ends. We used our Ryobi Miter Saw to cut the ends even and straight.

ryobi_miter_saw

wood_shavingsOnce we had a bunch of wood with straight ends we were ready to get creating. What was at one time the worst job on earth became such a breeze and FUN.

pallet_woodWe did our wall from start to finish all in one Saturday with breaks, meals, and caring for four kids. If you have a pallet wood project you want to conquer, use this saw. You wont be sorry.

I had never used a circular saw before. Now that I have used this cordless Ryobi one, I can’t imagine another. It was amazing. Here are a few facts:

  • 40% more powerful motor provides corded performance with cordless convenience compared to previous model P506
  • 24-tooth ultra-thin kerf carbide-tipped blade for fast, clean cuts
  • 0-56° bevel cut capacity allows user the ability to cut the most common angles
  • Front pommel handle with overmold for 2-handed operation
  • Left side blade for better cut line visibility

I can’t wait to show you how we put our wall together. I will post more soon. For now, here is a sneak peek!

pallet_wallThis wall is in what we call our snow room. It’s the best room in the house to watch the snow fall. Now that temps are lowering, leaves are falling, and jackets are needed, snow will not be that far off. I can’t wait to sit in this room and watch the fluffy white stuff come down. This pallet wall makes the room feel so warm and welcoming!

Have you ever tried pulling a pallet apart? Did it make you want to pull your hair out too?

signature

Share this:

  • Email a link to a friend (Opens in new window) Email
  • Share on Facebook (Opens in new window) Facebook
  • Share on X (Opens in new window) X
  • Share on Pinterest (Opens in new window) Pinterest

DIY Bookends (what you can make for being a hoarder)

September 26, 2015 By Erica Deuel Leave a Comment

DIY Wood BookendsSurely I’m not a hoarder, right!? There are things that are easy to throw out. Toys the dogs have chewed on, stained socks with holes, and junk mail… no sweat!

But when it comes to craft supplies and crafting leftovers, you better watch out! I had cut some boards for another project, but I looked down on the floor and saw that my scraps were actually some really cute block type pieces of wood. I had to save and use them for something. It was a must. Well, lucky for all of us that I did, because these little pieces of fire kindling turned into a great little DIY.

scrap_woodI decided I would make some simple heart blocks and books ends. I love the simplicity yet loud message a heart speaks. What a cute little accent these would be on shelves and dressers.

The first step was to sand the pieces so they became smooth with rounded corners. This step is the most critical because the wood goes from looking like a scrap piece of wood to a block. Electric sanders work great, but I like to do this step by hand because I am OCD, and I want them perfect.

sanded_woodI then picked out some fun colors and painted the blocks. Once they were painted on both sides, I cut a heart out of cardboard to create a stencil. I then placed this in the center of my block and painted the heart in.

painting_blocks

painted_heartsI ended up creating several different sized heart stencils. This idea for a sign is similar to my ‘you are my sunshine’ sign.

I was pretty happy with how the blocks were turning out, but the second most critical step for me was to rough the blocks up a little. After they were painted, I sanded them to create a little more rustic look. I then sprayed my favorite shiny clear Rustoleum spray paint all over the blocks.

hearts

making_blocksI love how the blocks turned out. To turn some of the larger ones into book ends, I attached a 4″ L bracket to the bottom of two of the blocks.

L brackets

DIY_bookend

L bracket_craft

DIY_bookendsI think the blocks and bookends turned out so bright and fun. I really like them.

girls_bedroom_decor

girl_bookendI donated this round of blocks to a fun home decor sale in our town. The profits from this sale help send kids in Zambia, Africa to school! If you are local to Warsaw or Winona Lake, Indiana, please come check out the Hither and Yon sale October 16-17. You can find more details on their Facebook page.

Here is a sneak peek of a few more of my projects that I have also donated. I will try to share more details on these two pieces soon.

DIY_girls_decorI think one of the best gifts we have is the ability to use our gifts for good. What a power. The surprise is that we get something in return. It’s a win-win. I was thrilled to make some creations for a good reason. I just might have to buy one of these blocks back because I really like them.

What do you think? Do you have hard time throwing out craft supplies as well? Are you a craft hoarder as well? Maybe someone should make a reality show about us. What have you created out of your scraps?

signature

Share this:

  • Email a link to a friend (Opens in new window) Email
  • Share on Facebook (Opens in new window) Facebook
  • Share on X (Opens in new window) X
  • Share on Pinterest (Opens in new window) Pinterest
« Previous Page
Next Page »
  • Email
  • Facebook
  • Instagram
  • Pinterest
  • YouTube
YouTube-Channel
Erica Deuel

Subscribe for Weekly Updates!


Most Popular Posts

DIY Bookends (what you can make for being a hoarder)
DIY Outdoor Table
Easy Pallet Wood Sign
DIY Outdoor Checker Board
Feast with Friends
DIY {easy} Burlap Wreath
School Desk Makeover
The Encanto, Madrigal's House Craft For Kids
DIY Yarn Picture Frame
Marbled Soup Can Canister Tutorial

Categories

  • All About the Kids
  • art journal
  • Blogging
  • Christmas
  • Craft Projects
  • Dancing Zebras
  • DIY
  • Eddy's postcards
  • Embroidery Journal
  • Family
  • Featured
  • Fireside Chat
  • Foster Care
  • Giveaways
  • Guest Posts
  • Home
  • Homeschooling
  • Kid Activities
  • Kid Craft
  • My Heart
  • Our Outings
  • Project Spotlight
  • Send Out Love
  • Shop
  • Sponsored Posts
  • Spoonful Lab
  • Spoonful Tribe
  • Tips + Tricks
  • Traveling
  • Uncategorized
  • Vlog

Favorite Categories

Subscribe for Weekly Updates!

Favorite Categories

© 2026 Spoonful of Imagination, Inc.