Spoonful of Imagination

Add it to a Family for Something Beautiful

  • Home
  • Our Family
    • Our Home
  • Courses
  • Shop
  • Contact

DIY Painted Wood Hangers

May 6, 2014 By Erica Deuel 1 Comment

pretty_painted_hangers

If you are new to my blog, the heartbeat here is to encourage people to add a Spoonful of Imagination to their lives. I believe we all have some kind of creativity inside of us and the more we stretch ourselves to express that, the more beautiful life can be.

I think you can take almost anything, add in a little imagination, and come up with something that is full of meaning and charm. Today, I hope to prove that with my DIY Painted Wood Hangers.

I pulled together a little acrylic paint, wood hangers, glitter, glue, and sharpies and got started!

wood_hanger_craftThe first thing I did was paint my hangers a pretty coral pink on one side.

painted_wood_hangersNext, I used a little painter’s tape to add some stripes. I wanted to leave a little of the natural wood look, so I placed painter’s tape where I wanted the wood grain to show and painted the rest of the hanger.

Paint_tape_on_small_project

Paint_tape_small_project

After the paint dried, I pulled up the tape and the wood stripes looked perfect!

pretty_hangersI think the hangers looked cute enough to be left alone, but I wanted to embellish them a little bit more. I used a little glue, paint, glitter, and sharpie to add some fun touches to my hangers. Once they dried, my painted wood hangers were complete!

love_so_much

pretty_painted_hanger

love_hangers

painted_arrowThese little hangers were so fun and easy. My kids love them too and have given me requests to make some for them.

storms_make_trees_take_deeper_roots

wood_painted_hangerI love when you add a little print to these hangers and hang them on a hook, it is such a beautiful and simple wall decor! So, what about you? Do you think you will be painting some hangers?  Pssst if you love this print as much as I do, please check out my sweet friend’s store!


Share this:

  • Click to email a link to a friend (Opens in new window)
  • Click to share on Facebook (Opens in new window)
  • Click to share on Twitter (Opens in new window)
  • Click to share on Pinterest (Opens in new window)

Homeright Paintstick Ez-Twist Paint Roller

October 31, 2013 By Erica Deuel 5 Comments

Disclosure: This is a sponsored post on behalf of Homeright, but all opinions are mine.

Matt went out-of-town this week. He had a quick business trip, and I had a chance to get into his office and paint it. We share this office as it houses both of our computers. For two creative people, this office has been really boring. It needed life.

paintstick_ez_twistI got to learn a little about Homeright and their products at Haven this year. I was so excited when they asked if I would want to review one of their paint products. You know since I have moved into this new house, I have been on a mission to add color to all these bare walls. With Matt gone, I jumped at the chance to my pull my Homeright paintstick out and put it to work. Matt might not want to leave town again for a while because he came home to a purple wall 🙂

before and after painted roomI absolutely love the upgrade to our new space. I can’t get over how easy it was. To be completely honest I am not a patient person. I tend to jump into things and figure it out as I go rather than spend the time to research and do it right. I made my self open the instructions of the paintstick though. I knew if I was to give this an accurate review-I had to do it right. The instructions were so easy to follow. The simple picture and one sentence description was perfect. I had my stick ready in seconds.

easy instructionsI laid our a cardboard box and plastic tarp out of habit when I go to paint. I didn’t need either of them. This paint stick takes the paint right out of the can and fills the tube. It prevents so many messes. I had a tray ready, and I didn’t even need it.

Once the paint is in the tube, you simply twist the handle to push it to the roller. I was scared with would it drip. Was it going to give my wall an even coat? The answer is yes!

I pulled our desk out far enough from the wall to tape my paint area off and to cut it in with a brush, but as you can see I couldn’t fully move the desk for total access to the wall. I was so grateful for the long extension paintstick to help me get the job done. Even with the desk in the way and high ceilings, the paintstick enabled me to paint the wall without any ladders.

paint with a paintstick

review_HOMERIGHT_paintstick

use_HOMERIGHT_paintstickHomeright’s Paintstick Ez-Twist Paint Roller let me paint an accent wall in my office in record time. It was so fast. It wasn’t till I was finished painting that I realized I hadn’t put my usual paint scrubs on. I didn’t need them!  I am very impressed. To see a really quick time lapse video of how this paintstick roller compares to a regular roller and a paint sprayer-check out the video on this page.

what_should_i_paintMy biggest question now is “what should I paint next!?” Thank you Homeright for the great product! To learn more about Homeright visit them online, twitter, or facebook.

signature

Share this:

  • Click to email a link to a friend (Opens in new window)
  • Click to share on Facebook (Opens in new window)
  • Click to share on Twitter (Opens in new window)
  • Click to share on Pinterest (Opens in new window)

DIY Pallet Frame {Poster Size}

August 19, 2013 By Erica Deuel 10 Comments

build_your_own_pallet_fame


I have been wanting a rustic, vintage United States map for in our home. We love to travel and are constantly talking about different states and who lives there, what grows there, what its known for, etc. It would make it so easy to be able to point the states out to our kids as we talk.

I found this cool map for $5 and was pumped. I knew I wanted to make a cool frame to go with its look, and so once I got my Ryobi Sliding Compound Miter saw to review, I knew it was the perfect project to try it out on. You can read all about what I think of my new saw here.

My first step was to pick four pieces of wood from our pile of old collected wood. I chose four pallet pieces that I loved. Each one has either a huge knot or nails in it. They look old and have an edge. They were perfect.

Old_wood_pile
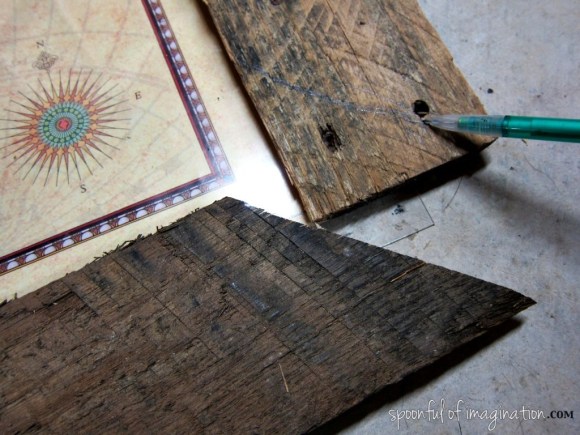
I laid them out around my poster to measure how much they needed cut. I placed each one carefully to figure out how the bent, warped wood would look best on side and placement. I didn’t want to have to make a cut where nails were, so I took all those things into consideration when I figured out which board would go where.

making_a_frame

Next, I rotated my saw to make 45 degree angles. The laser on my Ryobi Sliding Compound Miter saw helped me make these accurate cuts for sure!

conquering saw fearsI also used a pencil and drew a line for the direction of the angle each piece would need to be cut. Otherwise, I kept going back to my frame to figure out if that 45 degree angle needed to go to the right or slant to the left.

measuring_wood_cutsI did one board at a time and went around clockwise till my whole frame was completed.

making_a_pallet_wood_frameI then cut four small 90 degree triangle pieces from other scrap wood we had on hand. These I used to hold the actual frame together as well as hold the plastic protective cover, poster, and backing of another old poster frame in place and create the frame. An important tip at this step is to have big wood clamps that can keep your pallet poster frame in place while you get the other three layers in place.

wood_clampI then used wood glue and screws to hold the 90 degree triangles in place.

DIY_Poster_frameI added a little hanging bracket at the top in the center and my new pallet frame was almost done!

DIY_poster_size_frameI sanded the edges to get rid of some of the obvious splinters and used wood stain to stain the 90 degree triangles on the back. This way when my new art hangs on the wall, they will not stand out as eye sores. I didn’t end up staining the front pallet wood though because I loved the natural color of the wood. The old nails and knots still are my favorite pieces of this frame. Take note in the picture below how it was important to measure the cuts before I went to cut the boards. I was very close to getting nails.

45_degree_anglesHave you ever created anything with pallet wood? It is strong treated wood that makes for great projects!

make_your_own_pallet_fame

signature

Share this:

  • Click to email a link to a friend (Opens in new window)
  • Click to share on Facebook (Opens in new window)
  • Click to share on Twitter (Opens in new window)
  • Click to share on Pinterest (Opens in new window)

New RoomMates for my Boys

May 20, 2013 By Erica Deuel Leave a Comment

Disclosure: I received these products for free to review. All opinions are my own. When I say I love RoomMates, I really mean it!

My boys’ room is a disaster. There are clothes, toys, and furniture haphazardly placed all around it. It’s only been three weeks since we moved, so I am determined to not let it get to me. One day their room will be cute and finished. It’s just not today. Can you relate!?

One part of this messy bedroom is the boys don’t have beds yet. We decided in the move that they would get a bunk bed, once we were at our new house. Unfortunately, BOTH boys currently want to be up on the “top.” We are working through this issue, and in the mean time their room is the least set up, as their mattresses are just on the floor.

In-spite of all this, it is the kids’ favorite room to play (since it holds so many of the toys), so this weekend we decided to do one thing to help the boys’ room feel better and be more fun. We gave them some new RoomMates. 🙂

transformer wall decals

Optimus Prime and Bumblebee are two of my boys’ favorite Transformers. You know they love Transformers, and we have had a Transformer birthday party and created a Transformer school desk as a result. Now, they are thrilled to have Transformer RoomMates!

roommates wall decals

RoomMates is an online store that sells wall decals, murals, decor, and even wall paper. They were so generous to mail me their Optimus Prime and Bumblebee wall decals to review, and I could not be more pleased! They have been so wonderful to work with and these products are amazing! The decals have so much detail and the color is amazing. As we were hanging them up, I kept asking the boys if I could have them for my room.:)

easy apply room mates decalAs you can imagine two enthusiastic boys would be about putting Transformers in their bedroom, they wanted to help hang the decals. So, we let them. By letting them help, we had some slanted legs at different points and had to remove parts of the decal and re-apply it. They came up so easily and went right back down perfectly! I was very impressed with the durability of the decals, yet they did not damage our new walls.

Once the decals were up on the boys’ walls, they started setting up all their Transformers and decorating their dresser. They were so excited.

transformer battle

This room went from blah to feeling fun just by adding these decals. RoomMates are a quick and easy cure for blank, boring walls for sure!

before room mates decal

kids love transformers

I now feel excited and encouraged to finish this room and create a place that is not just a pile of toys and stinky (yet cute) boys. Thank you RoomMates for the decals as our room’s inspiration! I will keep you posted on the progress of this room and how the bunk bed debate gets sorted out.

For now, be sure to go check out RoomMates. They have some gorgeous damask wall paper that I would love for my bedroom and a huge world map decal that would look incredible in any room! To learn more about this awesome company and their products check them out on Twitter, Facebook, Pinterest, or visit the RoomMates blog for decorating ideas, tips, and inspiration.

signature

Share this:

  • Click to email a link to a friend (Opens in new window)
  • Click to share on Facebook (Opens in new window)
  • Click to share on Twitter (Opens in new window)
  • Click to share on Pinterest (Opens in new window)
« Previous Page
Next Page »
  • Email
  • Facebook
  • Instagram
  • Pinterest
  • YouTube
YouTube-Channel
Erica Deuel

Subscribe for Weekly Updates!


Most Popular Posts

DIY Outdoor Checker Board
Recycled Old Dresser Makeover

Categories

  • All About the Kids
  • art journal
  • Blogging
  • Christmas
  • Craft Projects
  • Dancing Zebras
  • DIY
  • Eddy's postcards
  • Embroidery Journal
  • Family
  • Featured
  • Fireside Chat
  • Foster Care
  • Giveaways
  • Guest Posts
  • Home
  • Homeschooling
  • Kid Activities
  • Kid Craft
  • My Heart
  • Our Outings
  • Project Spotlight
  • Send Out Love
  • Shop
  • Sponsored Posts
  • Spoonful Lab
  • Spoonful Tribe
  • Tips + Tricks
  • Traveling
  • Uncategorized
  • Vlog

Favorite Categories

Subscribe for Weekly Updates!

Favorite Categories

© 2025 Spoonful of Imagination, Inc.