 Have you shopped for wallpaper recently?
I have, and it can be expensive! I shopped a variety of stores and even looked into the removable wallpaper, and I just couldn’t stomach the price.
We have this room that has acted as our foster bedroom and guest room. It’s kind of an awkward sized room. Based on the door’s entrance, closet, and one small window the bed has had to be against this wall to allow for the most free floor space as possible.
 The small window does not let in a lot of natural light, so I painted this room a very, very faint blue to try and brighten up the space as much as possible. You can see the before wall color and other half of the room here.
I have loved the wall color, but there is a lot of it. I’m also realizing not one room in my house has all four walls the same. Accent walls are currently my jam. Off and on I have thought of wall papering that back wall to break up some of the blue. After researching a few papers, I realized the ones I loved would cost me around $300. With a list of other projects I want to do in the house, I couldn’t justify spending that amount on a room that is pretty finished compared to other spaces that need more TLC.
After ruling out wallpaper, I considered stenciling the wall since I did my daughter’s and boys’ bedrooms and love them. There was a part of me that wanted something different from a stencil though.
About five years ago, I painted a floral wall for my daughter’s nursery. I loved it, but it took forever. I was hesitant to do that again, but then I realized its been awhile. I have learned a few things, and why not try it again. It’s just paint! If I didn’t like it, I could always sand and paint over it. I went for it.
 The first step was to pick out my colors. One reason I think my first floral wall took so long was I used cheap paint. I decided I needed to use nicer than the the least expensive acrylic paint bottles at the craft store. I ended up opting for paint samples mostly of the HGTV paint line at Lowes, and they were perfect.
I used the same wrapping paper as my inspiration that I used on my last sign. Simple, sweet flower shapes would be my base and I would embellish them a little more towards the end of the project.
My second step was to figure out placement of color and different shapes. I picked two flowers to start with placement/color and grew one new color and flower/leaf at a time. Whenever I did that new flower, I tried to do a few of them at the same time…just spread out across the wall.


 Each flower needed two coats. The only one that needed more was my fushia flower. The color has some red in it…which is always a hard color to paint. Red will always needs lots of coats. After each flower was covered in coats, I started adding more detailed layers to the flowers. I ended up leaving the limey green leaves in one coat. I liked the painted look it created.
 These pictures aren’t the best but are what I sent to my sisters and a few friends as I painted. I was obsessed and excited as the floral wall took shape. It was addicting and really only took a few days working off and on! I made a decision to enjoy it and not let it stress me out. I painted each flower like I would on a sign. I didn’t worry about the edges being “perfect”, but left them to have a slight brushed look. The simple imperfection and not correctly centered flower centers make all the little artsy elements come together to create a really fun/funky yet pretty look that I love.
 I really love how it came out! The flowers are simple yet beauitful. The pops of colors play together well and create a really warm, fun feel. That light blue wall was the perfect base to embellish on.
 This floral wall allowed that room to be a little more fun, yet it didn’t add a huge amount of color that would make a small, poorly lit room feel even smaller or dark.
  What do you think? Would you try to paint your own “wallpaper”? The thing with this design is I can just paint over it when we tire of it. For now, we love hanging out in this room.
I also can’t stop painting these flowers. I made another sign that includes the flowers and I just love it!
 What do you think? Does this simple design yet pop of color pull at your eyes and heart too? This hymn just adds a sweet touch for a powerful reminder to hang in your home. If you are interest in this sign, you can see it in my shop!

 Sometimes dreaming big can be pricey, right? Even for the DIY creator, dreams take some dollar bills.
 I came up with an idea to let the kids have fun with it, while we are in the transition phase of our room. Why not let the kids paint one of our favorite Bible verses on it? Kids handwriting is the best. Plus, I don’t need to worry about sanding down the stroke marks when we are ready for a change. I will literally just brick over the artwork, when the time comes. It sounded perfect and now we all love it so much….I may never want to brick. Here is how we created our kid’s wall art:
 I printed the words off the computer with the actual amount of words I wanted on each line, so the kids could get an idea of spacing. I used a yard stick and level to draw lines on the wall. I then taped the printout onto the wall and let the kids start copying.

 My boys alternated line by line who was in “charge” of that line. I wanted both of their handiwork on the wall. Reagan wanted to get in on the fun, so we adapted and let her add some hearts. Her touch completed the piece.
 After the words/hearts were in pencil on the wall, we used simple craft acrylic paint to paint over the words. My oldest was able to hold the bottle and paint on his own. My younger two liked me standing there holding the bottle while they steadied themselves on the wall with one hand and painted with the other.


 They did an amazing job! We did space this project out over two days so they didn’t get burned out. The pencil writing was the first day and the painting was on day two. They were so proud and excited to be painting on the wall. My oldest was a little more timid at first saying I could do a better job and he was struggling with it not being perfect. It was a beautiful teaching moment, and I just adore kids hand writing. I wanted it in all the little imperfections and quirks. That is what made it beautiful.
 The wall was really dirty after pencil being smeared all over, as you can see in this picture below. I came back once the kids were all done and erased my pencil lines and as much of the smears as I could. What I could not get up with an eraser a Mr. Clean sponge was able to erase. Since we are covering these walls up someday, there was not pressure on if we were ruining them. We literally can’t.
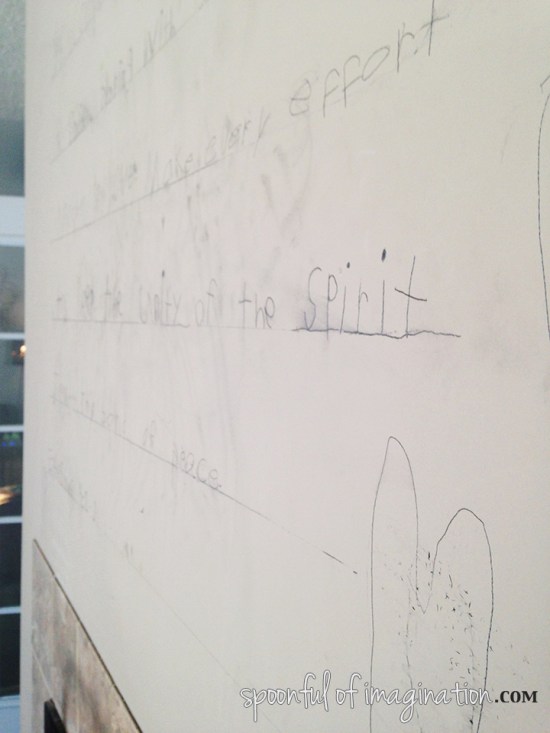
 We had so much fun creating this little focal point. What a fun way to get some truth on our walls as well. It is now one of the first things you see when you walk in our house. It’s perfect.

 I may never want to brick. My little artists won’t be young forever, but I love capturing their art with where they are…whenever I can.
 Do you have those moments where you realize how pathetically weak you are? Maybe you encourage your kids to eat their chicken and finish their carrots, so they can be strong. You might hope those words are true for you too and you consider yourself relatively in shape. Then something happens (like a slap in the face) showing you how totally not strong you actually are?
 With the help from my friends at Ryobi, I found the simplest way to get this wood! Don’t mess with the nails. Use the
 We sliced the wood right off the crossbar posts with our saw. We lost some wood by this technique, but we saved so much time and energy. We’d run the saw up one side and then down the other to free the pallet boards from the side posts. Then we’d go back and make cuts on each side of the center crossbar.
 We ended up with a huge stack of pallet wood that was about half the size in length as a normal pallet. It was so quick. Since we were cutting boards so fast, they didn’t have the straightest ends. We used our
 Once we had a bunch of wood with straight ends we were ready to get creating. What was at one time the worst job on earth became such a breeze and FUN.
 We did our wall from start to finish all in one Saturday with breaks, meals, and caring for four kids. If you have a pallet wood project you want to conquer, use this saw. You wont be sorry.
 This wall is in what we call our snow room. It’s the best room in the house to watch the snow fall. Now that temps are lowering, leaves are falling, and jackets are needed, snow will not be that far off. I can’t wait to sit in this room and watch the fluffy white stuff come down. This pallet wall makes the room feel so warm and welcoming!
 Painting is therapeutic to me, but I usually do have to do a big build up to start a room. There is something about just getting over that hurdle that is hard for me. I often joke with Matt that I would pay someone to tape off the room and prep it for me. I don’t mind the actual painting, but the prep work is what takes more time and is harder for me. I’m messy, so I have to tape and lay a little paper. Otherwise I’m scrubbing carpet like crazy. I’ve done that in two rooms so far in this house :). Whoops!
 When my stencil arrived, I was impressed with the awesome directions it came with. They gave tips on how to stencil, which end was the top of it, and what pieces of the stencil were your connection pieces to build on when you have to move it. The directions broke it down for me, so literally my fear started to melt. They were great.
 I got that stencil taped up and just went for it! I choose to go with a stippling effect that is much like my
 My hand got so tired. It started slow because I was really cautious to exam every little insert to see if they had the same “heaviness” of paint. It got faster as I became more confident. I got the hang of how much paint to put on the brush, how much looked right in a section, how to dab in the middle and then move out the sides with lighter dabs (so there was less likely a chance of paint oozing below the stencil). It got faster. My technique was to do about three or four stencil placements, before I would take a break. Usually at that point my kids needed me and my hand could use a break. This process took a couple of days. I didn’t work non stop on it because of life and the size of my wall, but I did want to get it done quickly, so my boys could stop camping out on the living room floor.
 One thing that I learned towards the end of my project was to just make it my own. The directions were so helpful, but at the end of the day this was my wall. Well, really it is my boys wall but you know what I mean. I cut my stencil up. I hated to do so, because I knew I loved the wall before it was even done-but it helped!
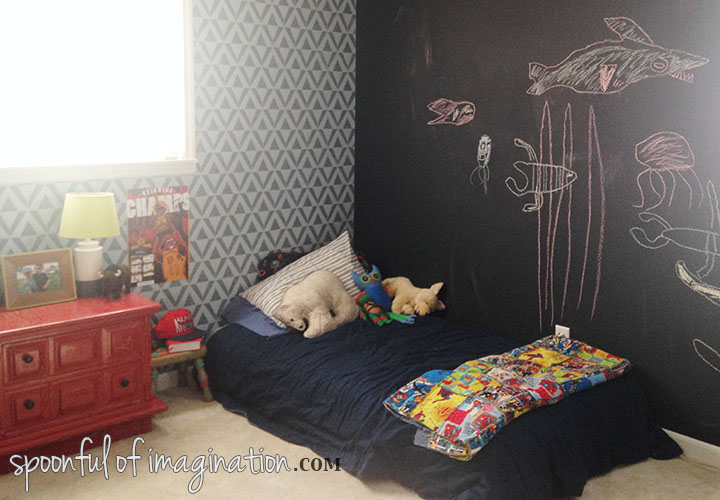
 This wall was so worth it. I absolutely love it. My boys do too. It really has me rethinking our loft bunk bed idea. I wonder if I can convince them that twin beds are cool after the
  I did go back with a small acrylic paintbrush and touch it up in a few places, but other than that I wanted it to look more stamped, rustic and I think we pulled that off. The boys love playing in their room.
 Have you ever stenciled a wall? I am so glad I tried this. I am now dreaming up Reagan’s bedroom and already have a stencil picked out for it. I can’t wait to start it!
 Thank you so much for checking out my boys bedroom stenciled wall! Please feel free to share a picture from here on Pinterest and be sure to stop by