Spoonful of Imagination

Add it to a Family for Something Beautiful

  • Home
  • Our Family
    • Our Home
  • Courses
  • Shop
  • Contact

A Safe Place

July 25, 2013 By Erica Deuel 10 Comments

One of the things I have been working on around here is getting a bed for our foster care bedroom. If you read my last post about when life happens, I hinted that we have a bed! I am excited to share it with you today.

After scouring Craigslist for weeks, I realized finding a daybed with a pop up trundle and two mattresses was going to be expensive-even if it was used. In a last resort kind of thought, I asked on facebook if anyone had one they would want to sell me. The next thing I know I had several comments and exactly what we needed was provided-for free! We had a beautiful bed given to us. I am still amazed and so thankful God provided through a really generous lady exactly what we needed.

Day bed makeover

After getting the bed, we decided to give it a quick spray paint job. We want to give the room the most “gender neutral” feel, so we had to paint over the floral decorations.

spray paintingSide note: do you spray paint in your pajamas barefoot with your six-year-old taking pictures too? 😉 

It took four cans of spray paint to cover both sides of the bed thick and evenly. I used my favorite spray paint (Dark Bronze), and I couldn’t be happier with how it came out!

spray paint metal day bedI will show you the bed put together, but first I wanted to also show you an inspirational pillow I made for this bed!

I took a $3.00 Ikea solid white pillow case and used a stencil to write a message I hope my kids (and any foster kids that come into my house) hold in their hearts: Believe in your dreams.

stenciling a pillowcaseAfter the stencil was outlined on the pillow case with a pencil, I used a dry brush technique to paint the letters in. I wanted it to look somewhat rustic, so I didn’t paint the letters solid and thick. If you have never done this technique, you can see this quick 60 second clip of me demonstrating how I do it.

I know the kids that stay in this room might not be able to read this pillow, but I will read it to them. No matter where we come from or what has happened to us, we all have dreams. Those dreams give us motivation, joy, hope, and drive.

believe in your dreamsOne tip for painting with this technique is to not dap a freshly filled paint brush all in the same place. It will create more of a “solid line” look rather than a “rustic by accident” look. You can see my mistake below. You can also keep a paper plate or something close by to tap the freshly dipped paint brush a couple of times before applying it to your fabric to get the more faint and dry look.

stencil a pillowI love the start of our foster care bedroom. We now have the bed complete! I have big plans for the rest of the room and will keep showing the process as it comes together. The ultimate goal is for the children to feel welcomed, loved, safe, and protected in our home. I hope our house and ultimately this room will give that atmosphere.

kids bed

Thanks so much for being on this journey with us!

signature

Share this:

  • Click to email a link to a friend (Opens in new window)
  • Click to share on Facebook (Opens in new window)
  • Click to share on Twitter (Opens in new window)
  • Click to share on Pinterest (Opens in new window)

Spray Paint Ikea Furniture

May 22, 2013 By Erica Deuel 1 Comment

spraypaint ikea furniture

Did you know you can spray paint Ikea furniture? I figured you could with the right spray paint, but I never had till Reagan’s bedroom makeover.

As we were planning her room, I knew she needed a toddler bed. I loved J’s old bed, but the blue was not going to go with Reagan’s theme. I wanted a rustic, darker color to help tone down the bright colors in her room. I also wanted it to look metallic as I was adding natural type elements in her room for the decor. I stumbled across my new favorite spray paint in this search.

Hammered spraypaint

This is not a sponsored post. I just really fell in love with this product and wanted to share it with you. I have never used a textured type spray paint. It is so forgiving! Usually when you spray paint and you spray it too “thick” is can dry with a dripped or spotted look. With this product, it just added more of a texture, and I loved it! I will show you more of what I mean further down. I used this exact color and finish on Reagan’s bed, and it was perfect!

The first thing I did for this bed transformation was take the bed apart it give it a good cleaning. I simply wiped it down with Clorox wipes to get rid of the dirt and grime from all the years the boys used it.

ikea toddler bed
After the bed was clean. I started spraying some base light coats. I wanted the bed to have a complete covering of all the blue. As I sprayed, with this hammered texture spray from Rustoleum, I started to notice that the really “wet” spots got the best texture look as you can see below.

spray paint light coats

hammed rustoleum spraypaintDoesn’t that look cool!? I love it and have found my new addiction. I also used this spray paint on a tall lamp in Reagan’s room. It’s such a fun quick thrill to spray something and give it a new look and life. Every item in my house better watch out now.

One thing that was hard for me was to not rush this project. This was a big item to spray paint and there were lots of sides and edges to cover and between each coat of spray, I had to wait till it was fully dry, before I could flip it and spray the other side. Once I thought it was almost done, I was out of spray paint and almost just quit because I was ready to put it back together and move on to the next project, but I was patient. I went and bought another can of spray paint. I think this project took 3 1/2 cans of paint. That cost was much less than buying Reagan a new bed.

be patient when spray paintingOnce it was completely dry and all the coats were complete, we moved the pieces to her room. We put the bed back together in her room to keep it easier to maneuver through the house.

putting a room togetherOnce the bed was put back together, the bed transformation was done! I set it up with her cute comforter and pillows and we all fell in love with it!

enjoy your workThe bed has not chipped at all and it is wearing incredibly well. I am so glad to know you can spray paint Ikea furniture! What a good trick to remember! One of my favorite moments was when J first saw the freshly painted bed. I was so afraid he’d be upset about us “ruining” and giving away his bed. He looked at it and said, “Wow mommy! I like Rea-Rea’s new bed!” It didn’t even register that it was his old bed – transformation success!

What about you? Have you spray painted anything lately? Have you tried using texture spray paints?

signature


Share this:

  • Click to email a link to a friend (Opens in new window)
  • Click to share on Facebook (Opens in new window)
  • Click to share on Twitter (Opens in new window)
  • Click to share on Pinterest (Opens in new window)

The Break Down of Curb Appeal

February 26, 2013 By Erica Deuel 5 Comments

Benefit of Curb Appeal

We have always been one of those families that would rather spend money and time working on the inside of our house…

or eating out…

or shopping…

or craft supplies (me)

or camera equipment (Matt)

or new clothes

or new home decor

or thrifting treasures

Really, we have always been that family that would rather spend time and money on ANYTHING but the landscape of our house. Our poor neighbors and tenants!  Although we love to play outside, none of us have much of a green thumb. We also exclusively use our backdoor since it’s connected to our carport, so we’ve kinda taken the front entrance for granted over the years.

When we went to put our house up for sale, we took a good look at our front yard with new eyes. It didn’t look good, and we knew we had to get rid of some of the major eye sores so we could get people in our house. This is where the term of curb appeal became a new word to my vocabulary. We needed curb appeal.

I want to share a few easy and less costly ways you can create curb appeal than having to hire someone or a bulldozer to completely redo your appeal to buyers.

Curb Appeal eye sores

The biggest change we did outside was spruce up our front entrance. Having potential buyers be greeted with an appealing warm entrance sets a good tone for opening the door and going in. I got two cans of black spraypaint and sprayed about everything outside my house. I started with the mailbox and lamp post we have beside it, and I worked up to all the railings that led to our front door. In the above picture, you can see the rust that was showing. I simply gave the railings a light sanding and spray painted them. If you are to do this too, be careful to block the spray from getting on the concrete or house siding!

Curb Appeal eye sore

A few more obvious things that needed to change are pictured above. Play “what’s wrong with this picture” with me and see if you can spot the eye sores. After you make your guesses, keep reading.

I’ll now break down what was wrong in each picture, and what we did to fix it.

1.  Problem: There were obvious spider webs and dirt on and around the door, doorway and entry.  Solution: I got a bucket of warm, soapy water and washed the door, door frame, and ceiling down. I then painted the trim and foot board with a new coat of white paint. It looks so much more fresh and clean.

2.  Problem: As fun and wintery as my wreath might look with the sparkly white ribbons, it blended into the door and looked more cheap than intentional. It might have come down, but I did save it. Solution: We painted the door a deep red. It took four coats, but I think the result is worth it. All of the sudden my door pops and looks intentional and loved. After painting the door, I made a new wreath. I wanted it to have a taste of red to blend with the door and create a warm feeling, but I also wanted an artistic and creative wreath to go with the rest of our decor inside.

3.  Our welcome mat was wet and old. It was not a clean welcoming feel. It felt dismal and forgotten. I scrubbed it clean, dried it out, and brushed all the leaves off the steps. We could have easily bought a new mat as well, but I didn’t want to spend the money on it.

4.  Our planters had dead flowers from last fall still in them. They looked abandoned, forgotten, and could give off bad feelings that the inside might look worn too. We cleared out the planters and put some fresh, bright colored plants in that created a new alive vibe. I also added a third pot because I like the look of three better than two pots.

red front door

I think the difference in the old entrance and new entrance is so cool. I am amazed that it wasn’t that much work and it didn’t cost a lot.

Here is the break down of costs for this cheap upgrade:

  • Paint:  $17.00 (we bought a quart of red paint/already had the white paint)
  • Spray paint:  $7.00 for two cans of flat black spray paint
  • Flowers:  $9.50 (we bought three purple cabbage plants at $2.50 each and two flower plants at $.99 each)
  • Wreath:  $2.50 for stick wreath (with coupon from Hobby Lobby/already had all the burlap, feathers, stones, hot glue)  Note:  I dried out the rose type flowers (they were real) and hot glued them into my wreath rather than buying fake flowers.  I think they look so much better and create a warmer more romantic feel than cheap fake flowers.

All in all this new front entrance cost about $36.00. It was not an expensive project, yet I think it changed the front of our house.

front door with appeal

romantic wreath

My five year old told me he didn’t like the new red door because it didn’t match the outside of the house anymore. I thought this was success. I had to explain that is a good thing that it no longer blends in with the trim or shutters, but it is a “pop” of color that draws your eyes. We have now been spotting front doors when we are out and about and it is remarkable at the ones that stand out to you and the ones that don’t.

house with curb appeal

Other than the front stoop, we added 30 bails of pine straw. I know, we could have taken our curb appeal even a step further by replacing those front dead hedge bushes, but come on!? We couldn’t stretch ourselves that much with outside projects.  🙂

So, what about you? Do you like working out in the yard/outside of the house or are you more like us and would rather do anything else??

signature


Share this:

  • Click to email a link to a friend (Opens in new window)
  • Click to share on Facebook (Opens in new window)
  • Click to share on Twitter (Opens in new window)
  • Click to share on Pinterest (Opens in new window)

Furniture with a Story

December 21, 2012 By Erica Deuel 2 Comments


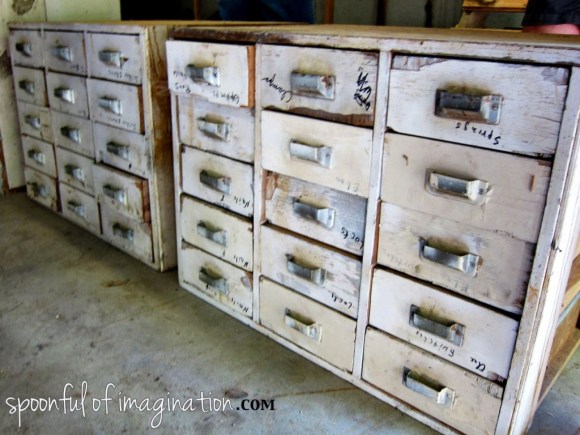
Have you ever taken an old piece of furniture (with a story) and given it new life to make it beautiful again?  It’s one of my favorite kind of projects to do.  You might remember seeing these before pics of my chest of drawers from my grandparent’s auction.

I loved the drawers and saw potential in this piece right away!  My cousin grabbed the second one, and I love how he remade his set chest of drawers to turn it into an end table!  I quickly redid that little chair (in the above pic) for my bedroom makeover, but the drawers have set in my car port since the beginning of this summer!?

They looked so sad and forgotten in the middle of all kinds of other projects.  I finally set out to tackle the transformation a little before Thanksgiving, and this is how I did it.

I gave the metal drawer slides a quick coat of silver spray paint to cover up the rust and grim.  I then gave the drawers a really good sanding.  This was the most labor intensive part of this project.

Once the drawers were sanded, I used a gray stain that I received at the Country Living Fair to cover the drawers and the chest itself.  I knew the stain would settle different on the chest (since that was just pure wood) than on the drawers (which were painted white).  I was excited that the drawers and chest would have the same finish, but (since the original base was different) the drawers would stand out a little.

I loved the result.  My son said it looks dirty, just like he said about my Rope Balls’ Planter.

Next, I gave the drawer handles a coat of a bright blue spray paint, and I then gave them a light sanding so they too looked more rustic.  I wanted to add some color to my piece, but let it be pretty timeless as well.  I think I accomplished that.

I decided that this chest of drawers would be a perfect addition to my craft table/area.  My hope was that it would help keep this area organized, so it didn’t always look such a mess.

Once it was set up in my house, I was so excited about it!  I quickly snapped this picture with my iPhone and sent it to a friend.

The desire to have a neat free craft area is good, but it probably isn’t practical, right!?  This is my area now…

It is complete with Legos and toys all over the floor.  Watch your step around here!

Although the table is a mess once again, the drawers have been super helpful, and I love all the drawers and dividers that help keep my favorite craft stuff organized.

I love the way this chest of drawers turned out, but what I love the most is that it use to be my grandpa’s.  I love the story that comes with it.  My grandpa has always been super handy and built amazing toys, clocks, and lamps.  I was just talking to my mom last weekend about how he made the most intricate doll house with furniture for my sister.  It is gorgeous.  With his auction this summer he sold most of his tools, since he is getting older, but I got this drawer set where he used to store his bolts and screws and used it everyday.  It is so special that I now can use it everyday to help my craft.

Do you have a piece of furniture in your home that has a special story?  Thank you so much for stopping by!

Share this:

  • Click to email a link to a friend (Opens in new window)
  • Click to share on Facebook (Opens in new window)
  • Click to share on Twitter (Opens in new window)
  • Click to share on Pinterest (Opens in new window)
« Previous Page
Next Page »
  • Email
  • Facebook
  • Instagram
  • Pinterest
  • YouTube
YouTube-Channel
Erica Deuel

Subscribe for Weekly Updates!


Most Popular Posts

DIY Floral Wallpaper
Art from Tree Bark
How to Embrace Winter's Warmth
Heartfelt Valentine's Finds
DIY {easy} Burlap Wreath
Cheap lamp to Industrial Beauty
Recycled Old Dresser Makeover

Categories

  • All About the Kids
  • art journal
  • Blogging
  • Christmas
  • Craft Projects
  • Dancing Zebras
  • DIY
  • Eddy's postcards
  • Embroidery Journal
  • Family
  • Featured
  • Fireside Chat
  • Foster Care
  • Giveaways
  • Guest Posts
  • Home
  • Homeschooling
  • Kid Activities
  • Kid Craft
  • My Heart
  • Our Outings
  • Project Spotlight
  • Send Out Love
  • Shop
  • Sponsored Posts
  • Spoonful Lab
  • Spoonful Tribe
  • Tips + Tricks
  • Traveling
  • Uncategorized
  • Vlog

Favorite Categories

Subscribe for Weekly Updates!

Favorite Categories

© 2025 Spoonful of Imagination, Inc.