 My seven year old cannot wait to be in charge. As the first born, he often thinks he is in charge or a part of our parental team. He’s smart and his processing is often spot on, but I try to gently remind him (sometimes more strongly than others) that he is a kid and to enjoy it!
Being a parent is one of the best jobs in the world. It is also one of the scariest. We are tools being used to shape a little ones outlook on life, character, sense of security, joy, peace, happiness, and all the other important outlooks on life (not to mention caring for the basic needs such as clothing, food, health, and a warm place to sleep). It’s a big responsibility. We know it. We feel it; but in a lot of ways we are set up to succeed, if we are humans.
Did you happen to see the Disney Bears movie this summer? This is in no way a pitch or sponsor post for Disney. We saw it as a family and I just love that movie.
I watched anxiously as a mama bear tried to navigate her two young cubs through a scary world. She protected them. She struggled to keep them safe and fed, and was always on the watch for those that could hurt her babies.
I could relate. Ever since that movie, I have had a fascination with bears. It was time I got one of my own. Although I have three little cubs under my roof, we needed a fury friend too. Here is how my plush bear came into existence. Be warned! I now want to make a whole collection of furry wild friends, and you may want to too!
 It started as an idea to sketch a bear. Since we are in transition to our own place, I don’t have all my usual craft supplies on hand. I did have some creme fabric though, so I started sketching on that. I had some sharpies
, pens, fabric markers
, and I just started to go at it. Now, I had never drawn a bear before, but I simply googled “bear sketch” and there were pictures that popped up that gave me an idea of where to start. What would we do without google!?


 I filled in my sketch with quick strokes to create a fur look. My goal was for the bear to definitely look like a bear, but to look simple and cartoon like. I think I got that. I cut the extra fabric off around my sketch. Be sure to leave enough margin to sew your sketch to a back fabric. Also, try to envision what cuts would make for a good pillow. In hind sight, I might have just cut one big oval out rather than cutting in to have the head and front and back paws in separate sections. It made it a bit trickier to stuff, but you will see that below.
 I then laid my sketch face down on a towel. I folded my towel over to have it be extra thick and used both sides of it to create the back of my bear. I decided to use a towel because it was a thick, sturdy material, but it also had a fur like texture. You could use any fabric or left over material.
If I had my sewing machine, I would have then quickly sewn around to join the towel and bear sketch together. Note: Be sure to leave a two inch opening, so you will be able to flip your new pillow right side out and stuff. I forgot that step and had to go back and cut some slits.
Since I didn’t have my sewing machine, I did a quick in and out stitch by hand to join the materials together. It did not have to be perfect, since my main stitch was going to be on the outside.
This is a pretty mindless craft at this point. I had one of my favorite movies playing as I stitched. Can you guess the movie!?


 I hand stitched a blanket stitch around the outside of my bear with yarn. I hadn’t done this is a long time, but by a simple Google search, I was able to see some pictures and learn how to complete this stitch. I love how it reinforces my bear, but also adds another texture and it looks so cute! Once the bear was stitched and stuffed to the thickness I liked, I simply stitched it close.

 The last step was to admire and enjoy him! I am pretty obsessed with this little guy. I now want to make him some furry friends and use bright colored towels to make some creative rabbits, foxes, and maybe even a giraffe! Oh the possibilities! The most expensive craft supply was the bag of Poly-Fil
. I used a whole bag. Depending on the size of your pillow you may need less or more.
I took my little bear around the farm for a photoshoot. What a good model! 🙂


 What an inexpensive, fun craft to make! They would make great Christmas or holiday presents! Do you know a young child that would love a fun pillow?
 If you have been following along with our move announcement, why we uprooted our family from sunny Atlanta to less-sunny northern Indiana, and how we have been adjusting, I would love for you to know we have found a house! We will be moving from our sweet friends’ basement into our own home in two weeks! Thank you for all the prayers, encouraging, and sweet comments as we have been transitioning to hooser territory!
Disclaimer: affiliate links were used in this blog post.

 I’ve been on a yarn kick with my
  This was a thick dense cover and my fingers felt it as I pulled yarn through it. I learned the hard way, and I have a few ideas that can help you take this idea and make it easier for your fingers.
 Right now I am carrying this pillow with me around the house and playing with it in different rooms. I like it in every single one. I might need to make some more yarn embellished pillows.
 What do you think!? Do you recycle your old pillows too!? Would you add yarn embellishments to a pillow like me?


 Sometimes in life we have time to process and prepare for change. There are other moments in life where we don’t, and we can feel robbed or cheated. I am continually thankful that we had time to process, prepare, cry and cherish
  I started with a plain dark grey, simple pillow case. I have had this one for sometime, but it didn’t look right in my home without a little jazz. So I decided to add my state outline to it. It is no secret that embellishing an already existing item can make a very easy craft. It can often times make your project cheaper. Just like
  I then pinned that fabric silhouette to a piece of burlap and cut about 1/4″ off the fabric silhouette to give the state a burlap border.
 I then used some scrap felt to cut out a heart. I placed this where our capital would be on a map. We live in a northern suburb of Atlanta, so it only seemed appropriate to make sure it is represented on the state. I embroidered the heart in place and then sewed the whole piece onto my existing pillowcase.

 I love how it turned out! It added a punch of personality and fun to a rather boring pillow.
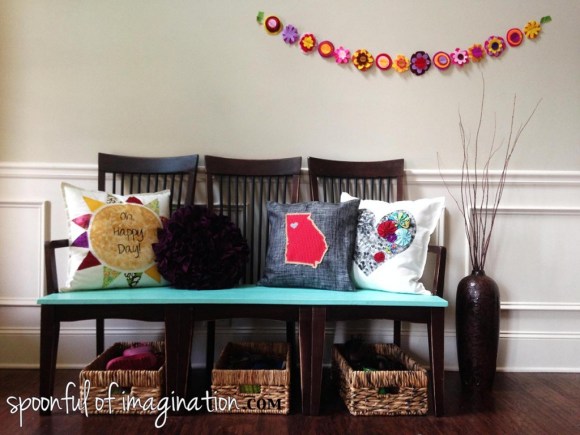 You could use this idea for any state, shape, or symbol!