 The creativity in this world amazes me.
There are times when I’m out or browsing online and I see something that stops me in my tracks. I can’t help but think how beautiful that creation is. I may not need that item, but there is something about the colors, design, uniqueness that caught my attention.
Creativity comes in all different ways, as I mentioned before in this post.
I love being inspired by other artists. Sometimes either the placement of their design, the colors they paired together, the shapes they use spur an idea in me. I found a wrapping paper the other day at TJMaxx that did this to me. I instantly fell in love with the paper and knew I needed to bring it home with me, if only to continued to be inspired by the design.
I wrapped a few presents with it and then taped a piece to the wall. Could wrapping paper be turned into wall paper? This I’m not sure, but I may want to try it.
 While the wrapping paper was taped to the wall, I looked at it off and on and thought how much I loved the print. I decided I wanted to try my hand at painting some flowers inspired by this design. I had a base wood sign that I had already built and painted white. It was a blank canvas waiting to be embellished and make into something. I came up with this idea to create a sign off a phrase that I have done a couple of times before (like in this wood sign post), but this time to embellish the sun with flowers inspired by this wrapping paper.
I painted the words, the sun, and then was ready for the fun part. I picked out my own colors for the flowers and just started having fun and painting away.


 It was so fun just going for it. I loved laying my colors on top of each other and adding some details to the flowers to add another depth and color to the painting. It took a little while to wait for colors to dry before I could build on them. In between homeschooling and life I would capture a layer or two, so this part of the sign alone took about three days. It was worth it. I love how the sun was so much more fun and unique because of these flowers and to think it was all inspired by a piece of wrapping paper.
I was super nervous to add my rustic touch to the sign after spending so much time painting the flowers. I had a piece of art I loved and I was afraid I might ruin it to sand and stain the whole sign. I wanted to take that risk though. I knew the potential of the sign being even more beautiful with that light rustic/warm touch, so I slowly started sanding my creation very lightly.


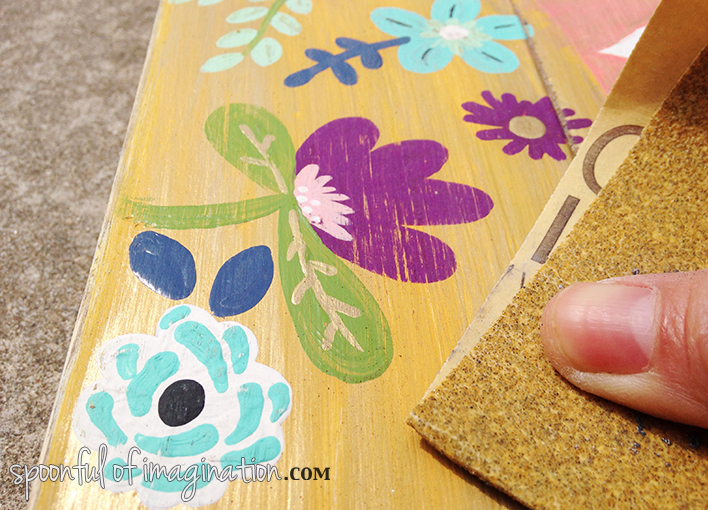 After I sanded, I painted on Minwax’s Early American stain and rubbed it off with an old cloth.
 I loved what this step did to the sign. My last step was to add the frame and stain it as well. I quickly measured the pieces and nailed them into place. My sign was finished, and I just adore it!


 I think it is a beautiful combination of color with a rustic/artsy edge. It’s so fun. This popular phrase has been made into all kinds of signs, but a small piece of wrapping paper helped me create a sign that I had not done/seen before. I love that we can find inspiration in the craziest of places.
 There are items that we can expect to find inspiration. Magazines, blog posts, and Pinterest are just few normal places to find inspiration. What are some of the weird ones you have found inspiration?
A worn down barn?
The way a creek trickles over shallow rocks?
Weathered chairs?
What else?
What is something that has inspired a creation of yours?
In a world that is constantly changing, evolving, and inspiration can be found everywhere, I think it is so important to lean into some of that to the next level of depth. Rather than just seeing something you love, figure out why you love it and do something about it. I loved the shapes of the flowers, so I took this inspiration and made something of my own with it. Instead of just looking, I used my hands and made something. Try it!
Thank you so much for joining me here today. If you may be interested in purchasing this sign, please check my shop to see if it is still available.

 Sometimes dreaming big can be pricey, right? Even for the DIY creator, dreams take some dollar bills.
 I came up with an idea to let the kids have fun with it, while we are in the transition phase of our room. Why not let the kids paint one of our favorite Bible verses on it? Kids handwriting is the best. Plus, I don’t need to worry about sanding down the stroke marks when we are ready for a change. I will literally just brick over the artwork, when the time comes. It sounded perfect and now we all love it so much….I may never want to brick. Here is how we created our kid’s wall art:
 I printed the words off the computer with the actual amount of words I wanted on each line, so the kids could get an idea of spacing. I used a yard stick and level to draw lines on the wall. I then taped the printout onto the wall and let the kids start copying.

 My boys alternated line by line who was in “charge” of that line. I wanted both of their handiwork on the wall. Reagan wanted to get in on the fun, so we adapted and let her add some hearts. Her touch completed the piece.
 After the words/hearts were in pencil on the wall, we used simple craft acrylic paint to paint over the words. My oldest was able to hold the bottle and paint on his own. My younger two liked me standing there holding the bottle while they steadied themselves on the wall with one hand and painted with the other.


 They did an amazing job! We did space this project out over two days so they didn’t get burned out. The pencil writing was the first day and the painting was on day two. They were so proud and excited to be painting on the wall. My oldest was a little more timid at first saying I could do a better job and he was struggling with it not being perfect. It was a beautiful teaching moment, and I just adore kids hand writing. I wanted it in all the little imperfections and quirks. That is what made it beautiful.
 The wall was really dirty after pencil being smeared all over, as you can see in this picture below. I came back once the kids were all done and erased my pencil lines and as much of the smears as I could. What I could not get up with an eraser a Mr. Clean sponge was able to erase. Since we are covering these walls up someday, there was not pressure on if we were ruining them. We literally can’t.
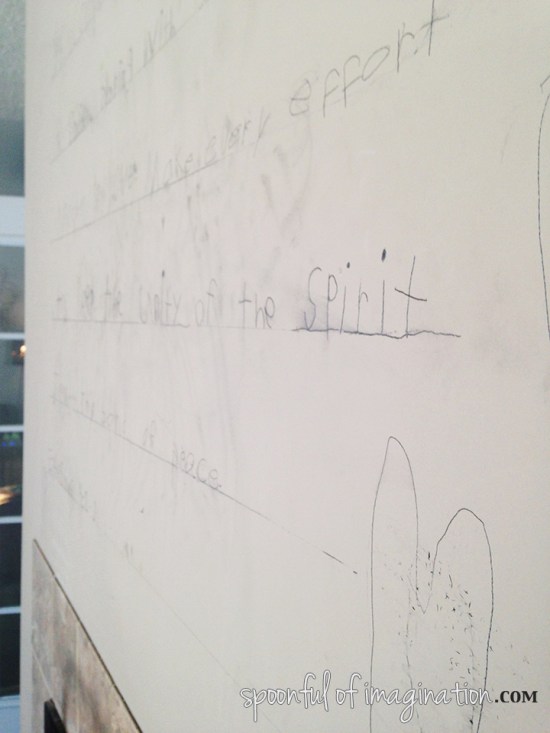
 We had so much fun creating this little focal point. What a fun way to get some truth on our walls as well. It is now one of the first things you see when you walk in our house. It’s perfect.

 I may never want to brick. My little artists won’t be young forever, but I love capturing their art with where they are…whenever I can.
 I love how Caleb just hungers to be near and talk to me. He will come in the room literally just to tell me something. He notices the small things and confidently gives out compliments. He has a bold aggressive spirit that just wants to succeed and do it on his own. When he pours himself into something, he is relentless and can succeed at anything. He’s so smart and self teaches himself daily. I often wonder why we ever bother doing school. Most days, he will finish my explanation of a lesson for me.
 1. Caleb is obsessed with sports. We didn’t end up finding a house with a basement, so we knew he would need a basketball hoop in his room instead. He saw one he liked at Walmart, but it would have been like the third or forth one we have had. The little plastic hoop breaks so quickly. Matt’s parents found
  I am also planning to create a little wall gallery with some of their art or things that I have already made them. We are going to hang up their
  We definitely need to hang this
  I painted this sign years ago. It’s funny I showed it on our very first blog. This
  I still like the
  I love the idea of this
  As you can see, we have lots of projects and are definitely dreaming big. Why not!? We only live once. There will be lots of love put into these projects, and I will take you on the journey with us. It will be fun to see if the final reveal has some or any of these elements.
 Do you have or know a little boy that would like this room too? Please feel free to share this post. I’d also love it, if you pinned it to one of your Pinterest boards! Inspiring others to dream big will always be one of my favorites things about this blog.
 It is funny to me that this will be the third house we do chalkboard walls, yet I have never shown you HOW I do my walls. I am obsessed with them, and I want to quickly show you how you can create one too.
 1. To prep your wall, you simply wipe it down with a damp cloth to remove any dust or grime.
 3. I then use a paint brush to cut in all the edges of my paint surface.
 Do not worry if the paint looks more navy while it is wet, It will dry a really pretty dark, soft black.
 5. Once the wall has two coats and is dry, we wait three days before we use it. Before writing on it, it is important to condition the wall by rubbing the side of a piece of chalk all over the surface and erase. This will create a layer of chalk dust that provides the best erasable surface later on. You should then wait seven days before using a damp cloth to wash the wall. This ensures the paint has fully cured for chalkboard mode.
 Oh the posters… I loath them. I think I literally shrieked when my brothers gave those to Caleb for Christmas. Caleb shrieked as well but his was from delight. Those posters are not what I had planned for my boys’ room, but it is their room. I hope they have the memory growing up that their mom let them have a say in their room.