Spoonful of Imagination

Add it to a Family for Something Beautiful

  • Home
  • Our Family
    • Our Home
  • Courses
  • Shop
  • Contact

Hey Babe, Where Did Our Towel Hooks Go?

October 15, 2013 By Erica Deuel 10 Comments

repurpose_towel_hooksA few weeks ago I went to Ikea with my best girl and our sweet friends. It was a rare weekday trip without the whole crew. My mom kept the boys for us, so it was a girls’ date. It was so fun.

We browsed and brainstormed lots of ideas. You walk in that place and inspiration is everywhere. I got a few things to help decorate our foster care room, and as soon as we got home I was ready to put them to use.

But there was a problem.

brainstorming_room_design I got home and laid my new items in my inspiration pile on the floor, and I started to put the curtains on the rod. I soon realized I only had bought one hook to hold my curtain rod. FAIL!

Needless to say, I was disappointed. I did not want to figure out a time to go all the way back downtown to Ikea for a simple curtain rod hook.

As I pondered my Ikea fail moment, I remembered I had two towel hooks that I wanted to hang on the wall. It came to me like a lightening bolt: “could the towel hooks hold my curtain rod?”

After a little convincing that it would be awesome, I got Matt to help me hang them up. It totally worked! We now have unique curtain rod hooks. I love the repurposed and creative use for the hooks. I think it adds a nice charm to the room.

unique_curtain_rod_hooks

What do you think? Would you use towel hooks to hold a curtain rod?

I’m sure you have a story like this. Sometimes a failed moment can lead to an idea that was even better than the original. It just takes a spoonful of imagination! Just between you and me, I’m going to claim my “mistake” was done on purpose, after this post 😉

signature

Share this:

  • Click to email a link to a friend (Opens in new window)
  • Click to share on Facebook (Opens in new window)
  • Click to share on Twitter (Opens in new window)
  • Click to share on Pinterest (Opens in new window)

Spray Paint Ikea Furniture

May 22, 2013 By Erica Deuel 1 Comment

spraypaint ikea furniture

Did you know you can spray paint Ikea furniture? I figured you could with the right spray paint, but I never had till Reagan’s bedroom makeover.

As we were planning her room, I knew she needed a toddler bed. I loved J’s old bed, but the blue was not going to go with Reagan’s theme. I wanted a rustic, darker color to help tone down the bright colors in her room. I also wanted it to look metallic as I was adding natural type elements in her room for the decor. I stumbled across my new favorite spray paint in this search.

Hammered spraypaint

This is not a sponsored post. I just really fell in love with this product and wanted to share it with you. I have never used a textured type spray paint. It is so forgiving! Usually when you spray paint and you spray it too “thick” is can dry with a dripped or spotted look. With this product, it just added more of a texture, and I loved it! I will show you more of what I mean further down. I used this exact color and finish on Reagan’s bed, and it was perfect!

The first thing I did for this bed transformation was take the bed apart it give it a good cleaning. I simply wiped it down with Clorox wipes to get rid of the dirt and grime from all the years the boys used it.

ikea toddler bed
After the bed was clean. I started spraying some base light coats. I wanted the bed to have a complete covering of all the blue. As I sprayed, with this hammered texture spray from Rustoleum, I started to notice that the really “wet” spots got the best texture look as you can see below.

spray paint light coats

hammed rustoleum spraypaintDoesn’t that look cool!? I love it and have found my new addiction. I also used this spray paint on a tall lamp in Reagan’s room. It’s such a fun quick thrill to spray something and give it a new look and life. Every item in my house better watch out now.

One thing that was hard for me was to not rush this project. This was a big item to spray paint and there were lots of sides and edges to cover and between each coat of spray, I had to wait till it was fully dry, before I could flip it and spray the other side. Once I thought it was almost done, I was out of spray paint and almost just quit because I was ready to put it back together and move on to the next project, but I was patient. I went and bought another can of spray paint. I think this project took 3 1/2 cans of paint. That cost was much less than buying Reagan a new bed.

be patient when spray paintingOnce it was completely dry and all the coats were complete, we moved the pieces to her room. We put the bed back together in her room to keep it easier to maneuver through the house.

putting a room togetherOnce the bed was put back together, the bed transformation was done! I set it up with her cute comforter and pillows and we all fell in love with it!

enjoy your workThe bed has not chipped at all and it is wearing incredibly well. I am so glad to know you can spray paint Ikea furniture! What a good trick to remember! One of my favorite moments was when J first saw the freshly painted bed. I was so afraid he’d be upset about us “ruining” and giving away his bed. He looked at it and said, “Wow mommy! I like Rea-Rea’s new bed!” It didn’t even register that it was his old bed – transformation success!

What about you? Have you spray painted anything lately? Have you tried using texture spray paints?

signature


Share this:

  • Click to email a link to a friend (Opens in new window)
  • Click to share on Facebook (Opens in new window)
  • Click to share on Twitter (Opens in new window)
  • Click to share on Pinterest (Opens in new window)

My Creative Spot

May 6, 2012 By Erica Deuel 4 Comments

Creating can be a messy, messy process. My little craft corner in the house had grown and grown into a monster since my last post about it.  Printers, books, supplies, food, toys, finished and unfinished projects literally covered my table.  This is what I am talking about…

Lately, I have just grabbed whatever I needed from this mess and took it over to the coffee table or kitchen table to have room to actually craft!  I got some christmas money in December that I have been saving to help organize this area!  I have been scouting pinterest and stores for ideas and slowly have bought a few things to try to help me.  Although, I had started this updo process, I had not given it the time it needed.

I read one of my favorite blogs the other day, DIYonthecheap.  Erin is trying to decide what she wants to do in her creative spot-which is a gorgeous space!!  I’m so jealous of her little workshop!  Her post was the little spur I needed to get back to my project!  Haha it is May after all!  This is not a task that should still be going on five months later!  I have been so excited about this process, yet I have been afraid to do anything!  There are so many possibilities that it has been over whelming and paralyzing.  That is my excuse at least!  Here is a another shot of my mess.

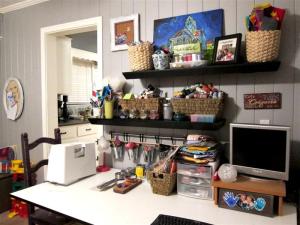
Such a mess.  I love that my favorite purple cup is right there.  That is my little sidekick and not ever very far away:).  In this shot you can see some changes that I had started since that post almost a year ago.  I put a wire note board on the far side of the door way.  Shhhh Secret!  I am slowly oozing my space further into my living room.  Also, I bought those cute little hanging buckets from Ikea.  I have been throwing just random stuff into them.  They have not been the “home” to any particular item.  Another Ikea purchase were the four cute spice jars on the first shelf.  The last change that I have added so far is the square cork board to the right of the doorway.    I still have some things I want to do, but I started by cleaning it up!

There is now a “home” for everything.  I LOVE the new little Ikea light next to the computer screen.  I’m all about “mood” lighting while I craft.  Oh! One thing that is not captured in these pictures are the bins of fabric and other goodies under this table, and I went through those too!  Success!  I’m kind of limited with what to do in this space because of it being in my living room, but my goal was to get more organized.  I’m getting there!

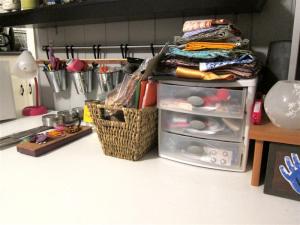
Scissors, hole punchers, glues, and feathers now live in my four metal buckets from Ikea.  The only thing that should EVER be stacked on top of my three drawer organizer is my current project.  That way the project can sit there out-of-the-way of grimy, sweet kid hands on the table until it is being worked on.  The current project resting there is a rag quilt for MY bed!  I am so excited!  Caleb’s quilt inspired me to redo my bed!  Hopefully, I’ll finish it soon and can post pics!

I love color and have tried to eliminate some of the almost empty bottles of paint, but I can’t bring myself to throwing any out!  I always think “it doesn’t take much paint on certain things!”  Might be a little hording?  That is a possibility.  I want to think of it as resourceful. 🙂

I have most of my fabric stored below the table in bins or in a cupboard on the other side of the room, but I keep my favorite hair bow fabrics out in that wire basket.  I think they are pretty, and I use them too often to have them buried.  Also, in one of those spice jars is the home for my snaps.  I go through those like crazy between all my superhero capes and making bibs or something like that.  Snaps are one of my favorite supplies to have on hand!

All my felt, ribbons, buttons are stored on this top shelf.  I love the little frame that holds a picture of my three cuties labeled as “my inspiration” because they really are.  Some of my thread is stored here too.  I really need another thread “store-er” but I don’t want that stack to get higher and cover up the beautiful painting my sister, Joni, did for me as a graduation gift from KSU.  Crazy that’s been 5 1/2 years.

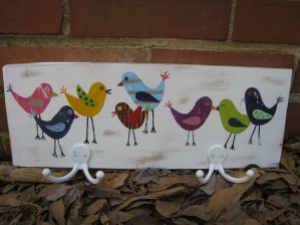
Below the cork board I want to put some kind of hook board.  Maybe like the bird ones I have made before…

For those of you wondering about my CA jar.  It is still out on my craft table, but I have booked my ticket to CA to see my best friend for her birthday!  I can’t wait!  I’ll be leaving on a jet plane June 8.

Now being real, I actually moved some items for that last picture.  Here is the current state of that area…

The hair bows are out to take pictures of and put on etsy.  The cork and hook board was a possibility to go under my current cork board, but I think I have ruled it out.  The three spice jars are going to go to the left of this board…

I also want to embroider some cool, creative quote onto a piece of fabric and hang it in an embroidered hoop for this area.  (Next post will be whats clipped to this board)!  I think after those few additions I will be pretty much done, but can you ever be fully be done as a creator!?  I think not!  I’ll be done until I get bored or something else catches my fancy!

Please check out my friend Erin’s post who has examples of LOTS of cool ideas for a craft room!  I hope you enjoyed a small tour of my creative spot!

Share this:

  • Click to email a link to a friend (Opens in new window)
  • Click to share on Facebook (Opens in new window)
  • Click to share on Twitter (Opens in new window)
  • Click to share on Pinterest (Opens in new window)
  • Email
  • Facebook
  • Instagram
  • Pinterest
  • YouTube
YouTube-Channel
Erica Deuel

Subscribe for Weekly Updates!


Most Popular Posts

Painting Flower Pot Party Tips
DIY {easy} Burlap Wreath
DIY Outdoor Checker Board
DIY Burlap Flowers
Cheap lamp to Industrial Beauty
Chiffon Flower Tutorial
DIY Paper Butterflies- Spring decor for cheap
DIY Outdoor Table
DIY King Size Rag Quilt {Repost}
Engraved Wood Sign Tutorial (and Dremel Micro)

Categories

  • All About the Kids
  • art journal
  • Blogging
  • Christmas
  • Craft Projects
  • Dancing Zebras
  • DIY
  • Eddy's postcards
  • Embroidery Journal
  • Family
  • Featured
  • Fireside Chat
  • Foster Care
  • Giveaways
  • Guest Posts
  • Home
  • Homeschooling
  • Kid Activities
  • Kid Craft
  • My Heart
  • Our Outings
  • Project Spotlight
  • Send Out Love
  • Shop
  • Sponsored Posts
  • Spoonful Lab
  • Spoonful Tribe
  • Tips + Tricks
  • Traveling
  • Uncategorized
  • Vlog

Favorite Categories

Subscribe for Weekly Updates!

Favorite Categories

© 2023 Spoonful of Imagination, Inc.