 Do what you love.
God has given us all gifts and passions in our heart, and if we live out using those we are our best versions of ourselves. When we are at our best, we are best used to impact and love on others, right!? Our gifts and passions are usually tied to our strengths. When we operate out of our strengths, we can truly be happiest as well. So, do what you love. Make time for it. If it can’t be your full-time gig at this point in time, it is still important to carve out that time for you. Everyone around you will ultimately thank you.
For me, I love to craft. Nothing new, right!? When I finish a project and get to show it to my family, you, whoever-my heart smiles. I feel like I am a better mom, wife, friend, etc. because of it. I made this simple sign last night. I will show you the steps. Please feel free to alter my design to make it your own, and stay till the end of this post for a special giveaway.
I started with a simple chip board sign I found at Hobby Lobby. You could also use wood or whatever you find. I simply used some acrylic paint and painted my sign a minty green. 
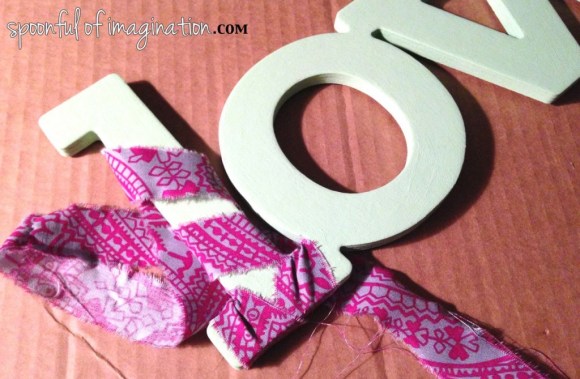
 I then took some fabric and cut slits in the top about an inch long and an inch apart. I then ripped the fabric along each of those slits to get about one inch strips of fabric with pretty fringe on either side.
 I put a dab of hot glue on the back of my sign and pressed one of the ends of a fabric strip into it. Once the glue had set, I started wrapping my first letter with my fabric strip. I was sure to leave some space between some wraps. I did not want it to seem perfect or polished. I liked how my mint green paint coordinated with my fabric and wanted to see some of it. You can certainly wrap yours tighter or more to cover all the letters evenly. I only added glue at the end of my first letter, but if you find your fabric is slipping-simply add a dab of glue here and there to hold it in place.
 After I finished one letter, I cut my fabric strip. I simply did the same process one letter at a time. You could easily switch out your fabrics at this point too, if you wanted every letter to be something different. I decided to make all my letters the same. Just keep wrapping and doing each letter till you are done, and then find a fun place to hang your sign!
 For now, my sign is hanging in Reagan’s room. I’m sure that will change at some point though. I would love to have it in my office, once we get that room pulled together!
 Do you love what you do? I pray you are living our your gifts and passions too. I feel like I have a dream job, and I am so so blessed. Creating and being with my family are two of my great loves. I would love to help make creating easier for you as well. It might not be your thing, but you can carve some “me time” and try. Yesterday, I released registration for February’s Spoonful Tribe craft kits. Take a look at the three options, and order your membership today!
  Today, I am going to also give away a box! Please let the rafflecopter widget load, and then enter in as many ways as you would like for your chance to win February’s Spoonful Tribe craft kit. I will release the winner in a post next Wednesday, January 29, 2014.

 Being a part of my son’s learning experience is one of the most rewarding things I have ever done. I am constantly surprised by what I am learning with him as well. We have been studying Egypt this fall, and I am reading aloud books that fascinate me. It is so cool how these little lessons carry over to our everyday life, and we can talk about it freely since we are discovering it together.
 I love that this project came with everything I needed. Every supply that I needed, I pulled from the box. It had paint, a brush, sponge, plate pallet, the lesson plan with pictures and maps, and an easy step by step tutorial on how to replicate their example frieze.
 Caleb loved the hands on approach to learning. For a young guy, he really got to realize the work it took to write in hieroglyphics by writing his name in them!
 He is so proud of his piece and quickly ran to show it to his siblings when he was done.
 Discovery through Creativity


 I started by folding one of my big pieces of scrapbook paper in half and measuring how much needed to be cut off, so it fit perfectly in my envelope. For other cards I used my cardboard cardstock. The main idea here is to use a thick piece of paper to give it a real greeting card feel while also providing a sturdy pallet for all the embellishments.
 Once I had the size of my card, it was my blank canvas to decorate. I started on my first card by ripping the edge around one of my graphics to add a fun textured look.
 I cut a piece of burlap slightly bigger than my ripped graphic. I pulled a few strands off the ends of the burlap to create a more fringed look, and used a mini round brad to attach both the graphic and the burlap to my folded card.
 I love the layer look and the mix of frayed edges with the clean straight lines of the card’s background. I started playing with my paper and came up with a few other designs. This next one, I cut the graphic out with straight lines (rather than the ripped technique) and glued it to the card. I then ripped a decorative piece of paper to border it. and glued it on top. Lastly, I cut out small burlap circles, pulled out a few strands again (to create a fringe), and used a mini round brad to attach the burlap flower to my card.
 I made these so quick. I love the textured look with the burlap, but you can keep your design even simpler. The following two I created with just scrap paper and glued them on the card with my graphic.
 These cards are all 5″ x 7″, but I then made some easy smaller ones as well. There are so many possibilities and designs when creating cards with just a few supplies.
 These were so easy to make. You could of course create your own printout with a special saying, quote, or picture and that opens the door for even more possibilities. You could also do the same techniques but put it in a frame rather than on a card like I did for my sister


