
As I mentioned in my last post, we are READY for spring around here. Sunshine. Warmth. Color. Anything to get beyond this cold grey reality. While the weather around here isn’t totally cooperating with my desires, I’ll continue to take matters into my own hands and create something to introduce a little warmth and pop of color. Take that Old Man Winter.
If you’ve been around here for a while you know that I love to make flowers out of all kinds of materials for different projects. Burlap. Felt. Chiffon. Today I want to walk you through one of my all-time favorite projects, the Easy DIY Satin Flower.
If you like to read the step by step, carry on, my friend. However, if you’d like to get your supplies and create along with me – you can do that too! Our latest YouTube video is me walking you through this tutorial step-by-step. Enjoy!
Supplies:
- Your favorite colors of satin fabric. (An 1/8 of a yard will go a long way. The more satin flowers you want to create and the more colors you would like to incorporate, the more satin you should purchase.)
- Sharp scissors
- Needle and thread (thread color doesn’t matter because it won’t be seen)
- A multi-purpose lighter
- Fun embellishments of your choice, i.e., buttons, beads, scrapbook charms & hardware, jewels, etc.
- Hot glue and hot glue gun
- Once you’ve created your flower it can be used in dozens of different projects. In the YouTube video, I use mine for hair bows and headbands. You can get a variety of those from the dollar store.
- Alligator clips (If you’d like to have a flexible way to attach your flower without permanently connecting it to a hairband.)
Tutorial:
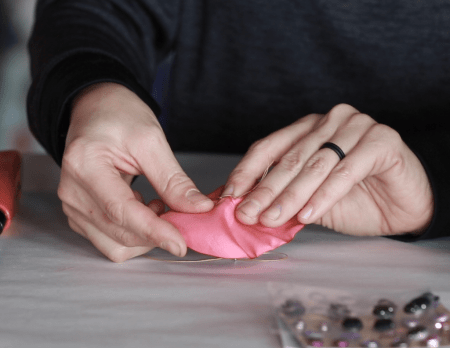
For this tutorial, you are going to cut your satin into 6 circles. When you branch out to make your own, feel free to adjust the number of layers for your own unique look. Before starting on your circles you may want to cut the satin into manageable squares/rectangles to making cutting the circles easier.

The circles do not need to be perfectly round and you’ll see why in a moment. The first circle should be the largest. You can decide how large you’d like for your flower to be but I’d recommend 3-4″ round for the first one. Now cut 5 more circles making each one a little bit smaller.


Now being very careful, use your lighter to singe the edges of your satin circles. As the flame is applied to the satin, the heat will cause the edges to begin to curling up. The longer the heat is applied the more the satin will curl. Test it out and find the look that you prefer. This step will also help to seal the edges of the fabric and keep it from fraying in the future. The satin flower should not catch fire. If it does, you are holding the flame to the fabric too long.

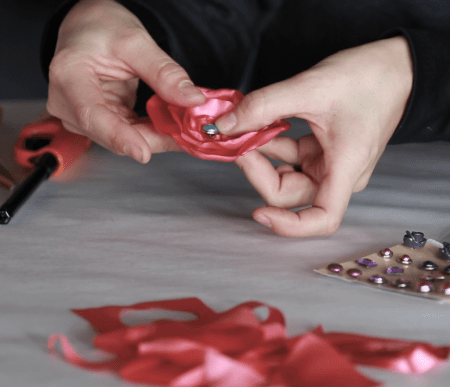
Once all of your satin circles have been curled with the lighter, stack them largest to smallest. Get your needle and thread and go ahead and thread your needle. I like to double thread mine to make it extra strong. Give yourself about 18-24″ of thread and double knot it at the end leaving a few inches of slack past the knot.

Now sew your needle through the bottom of your satin flower petals all the way through to the top of the smallest one. Because you are going through 6 layers of satin you may want to use a table or hard surface to help push your needle through. Be careful and watch your fingers! Don’t ask me how I know!? 😉 Pull your thread through so that the knot presses against the bottom of the satin petals. Now sew back through the top down to the bottom. Repeat this step 5 to 6 times to make sure that your satin flower petals are securely fastened. Finish by sewing through the bottom. Take the remaining thread and the slack from your first knot and tie them together with another double knot. Your flower is now secure you can cut off the slack, being careful not to cut through the knots.


Pick out a fun embellishment for the center of your flower. Sew or hot glue it to the center of your flower depending on what you choose.

At this point, your satin flower is done. Now the question is, what are you going to do with it?
The possibilities are endless. Make several and sew them to a pillow. Hot glue it to a frame or table display. Sew or clip it to a handbag. Or you can do like I did and incorporate it into a hair bow.

If you are going to use it in a hair bow for a little one and you’d like to add some flexibility and longevity to your flower, I’d recommend hot gluing one of the alligator clips to the back. That way the flower can be attached to the perfect newborn headband for those itty-bitty newborns… but as they grow, it can be moved to a bigger hairband to grow with them!


You can do this! This project is easy, fun, and a GREAT way to give an inexpensive but super special gift for a variety of occasions. Share your projects on social media using the #spoonfulofimagination hashtag so that we can be inspired by your creations. Keep checking out our YouTube Channel for new videos and projects. We’d appreciate it a ton if you’d subscribe and share with your followers. Have a great week that hopefully filled with lots of warmth and color!


 I planned a craft that I could get the supplies for. Since it is summer, I thought painting flower pots would be fun and is a seasonal decor item that everyone can use. Even if you aren’t super crafty, you can paint a pot and wouldn’t feel bad putting it in your yard. I think planning a craft that is useful is key!
 The next step was getting guests! I ended up just posting a Facebook status asking if anyone else was interested in crafting and chatting. I was amazed at the responses I got! That led me to pricing out what my costs would probably be. I bought all the supplies, tablecloths, and drinks. I ended up asking everyone to bring a side to share. This gave away the part that stresses me out, kept the cost down, and kept me planning the part I most enjoy – the craft! I learned from hosting


 I used brown painting paper to place on the tables and had extra for my guests to take a piece in the car home with them to keep their pot from getting the floor dirty. You will see why below on how the cars could get dirty.
 I gave instructions on how I painted a few pots that I had on my patio. One of the tips that was the biggest hit was to spray paint the pot a solid color first and then embellish. Please note: I sprayed all the pots with a waterproof sealant 48 hours before.
 A few facts that I either did or learned:
 I loved having a little surprise for my guests. All the flowers that were used as centerpieces on the tables were for them to fill their pots. How much more fun is it to take home a flower-pot with dirt and flowers in it than an empty one that might just sit in the garage!?
 As guests arrived, we did a little mingling. We then ate as we talked. I gave a brief explanation on how to paint flower pots and told my guests they could make some greeting cards as they sit and wait for paint to dry as well. From there, it was just a fun night. I wanted it to feel more casual than an official event or class, so I didn’t talk for long. They just crafted away. I decided I’d mingle and talk and be available to help anyone. This helped since I didn’t give lots of step by step instructions. It was so much fun! I think I was giddy all night long.
 Now, when I smile at the girls at church I feel like we both know each other a little better. Sometimes the first step to a friendship is just saying hello, but sometimes we need to branch out a bit more and share parts of our lives, talents, homes in serving or hosting or something. I am so glad I branched out.
 To all the beautiful girls that came, THANK YOU! I had a blast with you!
 Do you like crafting and chatting too!? I love deep talks, but sometimes a coffee date can intimidate me on getting to know someone without something in my hands. Crafting is my favorite way to talk with others. A fierce game of kickball with my kids and their friends is fun too. I plan to do that this weekend.
 When I started dreaming of how I wanted to create my Reagan’s new bedroom, I knew I wanted lots of color, texture, patterns, and fun. I pictured fun color with pops of natural elements and black and white contrasts thrown in. What I did not take in account was my daughter having an opinion, and she had one.

 It was really bright. I had to try to envision the end result. I kept thinking this seems like a nursery for a pink ballet themed room. I just kept playing in my head “I love my daughter, I really love my daughter” as I painted every stroke. I fought that picture in my head with what I knew the end result could be.
 I was so excited when I saw that Royal Design Studio Stencils had so many fun, girly stencils. I fell in love with the

 This stencil was so simple in the fact that I did not worry about it looking slanted when I stood back. Based on the pattern there was no fear of my stencil going crooked. What was a little more tricky was lining up the stencils, and that was only because the connecting pieces (petals) were smaller.
 I decided to use gold as the accent color for this stencil because it’s fun and also subtle. I wanted the wall to ultimately look purple but also fun and a true accent wall. The stencil created that look!
 The process wasn’t fast enough for this sweet, exited girl.
 I love how this room can grow with her. It’s so fun now, but it can also last for years. I joke with her now about trading rooms. What I love most though, is she loves it as much as me. She calls her wall her golden flowers.
 As I painted this room, I realized I really didn’t want to spend the paint or time to paint her closet. It was a clean light gray. It looked fine and was in good shape. There was really no need to paint it except that it would have this harsh line that might look like I took the lazy way out in not painting it, whenever the closet doors were open.
 By doing this technique the wall looks intentional (not like a lazy mom), and it’s also a fun element all on its own! I really love it, and now I want to go back and do the same thing in my boys’ bedroom.
 What do you think of all the color and splashes of fun? Does it make your heart go pitter patter as well?
 I love felt. I do a lot of projects with it, but I have always cut it by hand. At times I have found it therapeutic, but at other times it can get to feel tedious cutting the same patterns over and over.
 I am a basic crafter. Having lots of tools to store, clean, figure out intimidates me. Part of why I have just been content with cutting felt by hand is I like the simplicity, but I have to say this machine is so easy to understand.
 It was simple and so quick. I placed my felt on top of
 It was so quick. I was giddy at the perfection of the cut and the amount of time I was saving, so I took a picture to send to my fellow crazy crafter friend, Erin. If you like my Sizzix machine creation, you will lover her
  I cut a bunch of different colors of flowers out. This machine will also emboss and cut paper so there are lots of possibilities.
 After I had a bunch of different colors cut, I started playing with styling. I used the different petals and colors to form my own flowers. I was careful to space them out by size and color so my “R” was nice and balanced.
 The next step was to sew the flower petals together. I used a needle and thread to sew each flower together. I did a mix of just sewing the petals together and using a bead to center on top of the flower to sew together. I like the mix of the plain flower with the beaded ones. The contrast added another level of depth and texture. After all the flowers were sewn, I picked one at a time up and hot glued it onto my “R”.


 I ended up spray painting the “R” with
 I love the way this felt initial came out. It is a baby gift for my soon to be born niece. I paired it with my
  I am so excited to use