 Have you ever looked at something and seen it all of a sudden completely different?
I sit in my snow room (which is like a sun room, but in Indiana it has snow outside more than sun) daily. It’s my favorite room to drink morning coffee and wake up for the day. As things have slowly winded down with our Spoonful Studio and the days of it closing are nearing, I have found myself with more and more free time.
One day, I was sitting there and looking at the same mantel that I have every other morning but I asked myself, “when did that turn yellow?” I noticed the stain had yellowed and it now looked dirty and old. I realized that as my mind was being freed up from running a business- it all of a sudden had margin to process other things.
 It was such a cool moment to mentally process the margin I was working hard to find-I was finding. If you listened to Matt and I share why we are closing our non-profit Spoonful Studio, you heard that wearing all the hats felt like I had 5 full time jobs. I was working nights and weekends, and I desperately needed to be freed up to be more present at home (physically and mentally) to my fast growing kids.
So, here I am now remembering how creativity is a muscle. It needs space and time to heal, play and grow just like any other muscle. Below are a few very real life pictures of the mess my snow room had become with the busyness of life and my over crowded brain…

 I love to work on our house. It is part of how this blog began 14 years ago, by sharing my projects with all of you. Yet, as running an art studio took over my time, I have found I have not worked on or done a project on our house in a long, long time.
Side Rant: Our houses don’t have to have the latest trend or constant projects, but I do believe our houses should be a safe place. I want my house to breathe rest, peace, and love to my family and those who visit. We all know that messes, piles, un-attended decisions can lead to more stress or tension, which is in conflict to what we want our houses to represent. Part of finding margin in my days was to make our home more peaceful as well, which for me is attacking some of the projects.
What began as “I’m going to paint that mantel” led to…painting the walls, painting the trim, painting the doors, ripping up the carpet, staining the concrete, panting the handles on a chest of drawers, washing the curtains, and reorganizing some games we pull out regularly in this room. Here are a few pictures of my process.


 This room isn’t very big, so I did half the room at a time. Whichever half was not getting worked on, kept all the furniture piled up.
What I found as I created was I was super rusty. I stepped in the can of paint and literally spilt almost an entire gallon.


 I then went to shake the gallon of cement stain and the lid wasn’t on all the way. Stain went flying on my freshly painted trim and walls. I wasn’t even mad though. I felt alive.
As I have been finding more time available in my days, I have done yard work, read and felt rest filtering into my new routines. I was doing things I enjoy, but have not had time to do in a long time. Yet, I did not feel completely like myself. When you change what you have worked so hard to build and have a lot of identity wrapped up in it, I am sure it takes a lot of time to deconstruct and process all the feelings and experiences just lived. Getting messy with paint was one of the first moments I have felt so alive and like ‘Erica’ once again. I needed to create and dive into the process myself.
It didn’t matter that it got worse before it got better.
It didn’t matter that I was rusty and “messed up” a lot along the way.
I was creating, and my heart needed it.


 This room reminded me that creating is a muscle and it needs practice and margin to grow. We can’t live extremely stressful and busy lives and expect to come up with our best ideas, most creative dreams, and to see everyday things differently. Just like athletes need to rest after a big game, our brains, souls and creative spirits need to recharge as well.
It took quitting my job to find margin to see this room in a new way and imagine how I could keep my favorite bohemian, colorful vibe but breath new life into it.
For laughs and because it makes me smile, I did leave a hidden footprint in the cement. It’s a reminder to make time to play with paint and not to take anything too serious.
 What about you? Do you need to create margin in your life? You may not need to go as extreme as I did with changing up your career. You can form a new habit by switching out an old one.
Go for an evening walk after dinner.
Get off social media, if you can. I did, but that will be another post.
Make a no laptop or phone spot in your house so you unplug.
Sit on the patio, as the day turns into night, being with the people around you.
Tell a few close people what you’re going through. It matters.

 We only have one life. I am encouraged how one of my favorite writers, Bob Goff, said “he choose the life he wanted and placed work around it- rather than choosing a job and trying to squeeze a life into it.”
I will always look fondly back on the times Spoonful Studio was open and the powerful work I got to do with it. Yet, I need more life. I want to enjoy my kids and have time to let creativity grow. Because we all know, I believe a Spoonful of Imagination leads to a more beautiful life.
To see more of my room remodel, Caleb created this quick video for me to share with all of you!

 Who is ready for winter to be over!?
 I went straight to warm colors, softer textures, and crafty bits for spring. It was inspired by these two baskets I found thrifting last weekend.
 I wanted to use the baskets as little shelves to hold a vase of flowers in our new mantel display. Although I had this idea, I knew the vases needed to be light since the baskets are thin.

 I stuck some fake flowers in the can, and my light vase to go in my basket was complete. I wrapped some wire around my new vase and stuck it through the basket and twisted the wire behind the basket to get my vase to stay in place.


 I ended up putting the vases in the middle of the baskets, so the baskets look more like a frame than a shelf. It looked better to scale this way. If I had bigger “vases” I might have kept with the shelf idea. I like this process of creating where an idea might start as one thing, but as you create, you take it somewhere else.
 I strung up a clearance banner I found at Target for $0.50, put some Dollar Tree succulents in some wood pots we sell at the studio for people to paint, and hung up two umbrellas (for that spring rain) that I found at Hobby Lobby for $7.00 each and my spring mantel was complete.
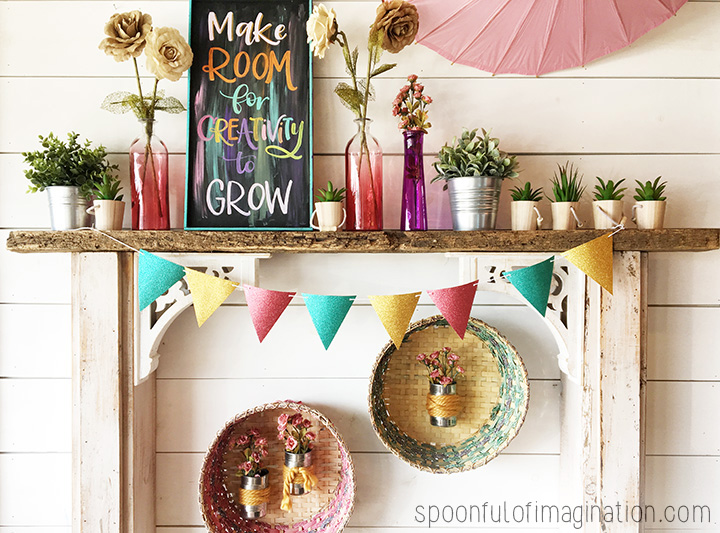 Do you ever find one item that inspires a look? I had a bunch of random ideas in my head for this new mantel, but once I found the baskets- it all came together!
 Do you have spring fever?
 What’s cheap? Paper can be the most inexpensive way to decorate. I saw these butterflies in the school section of my local Dollar Tree. I snatched up several bags as soon as I saw them. An idea clicked, and luckily they had the butterfly net in stock too for my idea.
 For every one of my butterflies, it took two pieces of paper. I simply folded one butterfly in half, placed a little hot glue on another butterfly down it’s center, and then pressed the folded butterfly into the glue on the fold line. Check out these pictures to see what I mean.

 That was it! I just used a little tape to put the butterflies in place on my wall.
 Are you ready for spring too!? Maybe you live more in the south and it’s already spring where you live. Have you pulled out spring decor??
 These paper butterflies were so cheap. The project could even be cheaper if you hand cut butterflies or have a die cut machine of your own. For me, I don’t have a machine and 32 butterflies for a $1 was so worth it.
 When I was a little girl, I wanted to be a librarian. Visiting used books stores and using my baby-sitting money to buy books was one of my favorite things to do. Today, I still have a lot of those books. My Baby-Sitters Club series I know is a hot commodity. I just hope Reagan likes those books too or I have saved them all these years…to just save them.
 Supplies needed for each shelf: (The length of wood or the amount of each item is up to how long your shelf may end up)
 The shelf seemed a little crooked at first. Keep in mind you are working with wood that could be warped, so look for the strongest/flattest boards when picking up your supplies. This can take some time and patience. Big box store wood is usually crappy but if you dig through the pile you can find some good pieces. Also, keep in mind the boards may settle a little once there is weight on them. Finally, once all of your shelves are in place and staged, it is very difficult to spot minor imperfections.
 We placed our shelves the same 18″ apart. This step is totally up to you. I wanted room for tall books, decor, and to still see some wall which is how we came up with our distance. Matt completed the same process on the two lower shelves. Once we had the pipes in place, it was easy to tell how long our boards needed to be cut. We cut them and placed them on the pipes to be sure it was what we wanted.
 This is where we realized the pipes we had bought did not look right. We started with the 10″ black iron pipe, but ended up returning them for the 8″. If you buy the 8″ pipes than you wont have the large gap in your shelves. What we also realized is that the threads on the pipe will not screw all the way into the flange or the cap. Below you can see the difference in using the 10″ inch and 8″ pipes. Of course you could purchase 2″ x 10″ wood to give yourself a wider shelf. That’s what I love about this shelf system, it’s totally customizable.
 I was not sure what kind of color I wanted to make the shelves, so we tested a few out. Since this room is a little smaller with only one small window, it tends to feel darker. I painted the walls a light, light blue and decided to keep the shelves light as well. I thought if the walls and shelves were lighter overall, I could add pops of color for fun but still brighten the room up a bit in the overall feel. I ended up going with Rust-oleum’s Driftwood Stain. I love it!
 I used a sponge brush and painted the boards. I let the stain sit for a while and then I used an old t-shirt to rub the excess stain off.
 Once the stain was dry, we put the boards in place. I loved the look, but decided I wanted one more shelf. I opted for it to not go any lower, so the kids were not at arms reach. We did something a little different and ended up turning around the corner and adding another shelf out of the middle of our current series.
 I love how it turned out! I even got most of our books out on the shelves in the process. I plan to switch out the books in the basket (on the floor) with new ones from the shelf or kids room, so our kids can be regularly reading/looking at books but not having to try to get them off the shelf themselves.
 I’m so excited at how fun this little corner turned out while still being very functional. We rocked all three of our babies in that rocker, and now it’s in a room where we hope to love on more kids that come into our home.
 When you walk in our front door, this room is immediately to your right. I love that it looks like a fun, welcoming spot. We all love to sit in there already. Matt called it my library the other day, and my heart smiled. This room will hopefully get lots of use.
 What do you think? Do you have a place in your home that could use some fun, industrial type shelves?