Spoonful of Imagination

Add it to a Family for Something Beautiful

  • Home
  • Our Family
    • Our Home
  • Courses
  • Shop
  • Contact

Craft Supplies

March 15, 2013 By Erica Deuel 4 Comments

20 top DIY craft suppliesIf you aren’t a DIY crafter, it can be really overwhelming to walk into a craft store like Hobby Lobby, Jo Annes, or Michaels.  There are so many different products and all classified in aisles with similar type items.  I assume you stand there looking at it all and wonder which do you choose and where do you start.

Today, I want to give you a list of my favorite craft items.  These items (other than the ones that don’t need replacing like scissors and ruler) I am regularly buying, even if I don’t have a project in mind.  They are the items that I use ALL the time for a wide range of projects.  I feel like if you have these items you can jump start DIY projects and decorating your home for much less.  Below I have listed 20 items and given examples of ways/projects I use these craft items.

Read the list, print it out, and go shopping!

1. Clear Sewing Ruler

My favorite ruler is 3″ x 18″. I use it to measure everything-not just sewing projects! I love to use it on paper crafts as well because you can align patterns better with the see through style. Example of use: making cards and centering applique items on fabric

clear sewing ruler

2. Mod podge

I think Mod Podge can make any project look more “finished” and “professional.” There are lots of different finishes, but the gloss and matte are my two favorites. Example of use: finishing off any ceramic paint job, collages, or appliqueing pictures/papers to other objects

modpodge

3. Sharpies

I use sharpies everyday. There are lots of different sizes and colors. Having a multi pack is a great thing to have on hand. Example of use: making cards, organization, banners, decorating jars/signs

sharpies

4. Exacto Knife

Having an exacto knife on hand is so helpful. It can be used to cut all those small or intricate things that scissors can’t do really good. Example of use: create your own stencil

SONY DSC

5. Burlap/Burlap Ribbon

Burlap is so fun and cheap! You can buy it by the yard, or (in the flower section at Hobby Lobby) they sell it in a variety of different ribbons to make it more manageable to create with. I have both on hand and use them all the time. Example of use: create a table runner, decorate jars, make a banner, wreaths, and embellish pillows

burlap_ribbon

6. Brown packaging paper by the roll

I buy mine for a $1.00 at the Dollar Tree in the office supply section. It makes great wrapping paper, but I end up using it a lot on other projects as well. Example of use: table runners, banners, stuffing for filler items, cards, wall art, or a drop clothe for other projects

brown-wrapping-paper-8-meter-roll

7. Paint brushes

Having paint brushes in a variety of different sizes is so helpful! I also like to have a variety of types as well. I have a Dollar Tree ones that I use on quick, one time projects like staining a sign. I also have nicer fine brushes that help me paint small things like letters. Example of use: painting signs, using mod podge, or decorating anything

775paintbrushes

8. Acrylic paint

I have a whole basket of different colors of small acrylic paint bottles for like $0.49 each. I like the Americana brand at Hobby Lobby. Example of use: creating a sign, painting seasonal items, embellishing items, or organization

art-deco-paint

9. Scrapbook paper

I buy the brown paper package at Hobby Lobby and use it for everything! I also love to have lots of fun sheets and patterns on hand. I use to scrapbook, but now I use all my scrapbook paper for different projects! Example of use: cards, background for frames/wall art, banners, and embellishing

scrapbook paper

10. Packages of fun/vintage buttons

There are so many fun uses for buttons and you can never have too many! Example of use: hair bows, wreaths, pillows, wall art, necklaces, and embellishing

buttons

11. Cute glass jars to store craft supplies in

I love to store my beads and other small craft stuff in pretty jars, so I can easily see my supplies and also enjoy their fun bright colors. Example of use: storage, organization, vases, gift to give flowers

glass-jars-with-lids

12. Sheets of felt

They sell pieces of felt for $0.25 each at Hobby Lobby. I use felt on a lot of different projects. Example of use: hair bows, embroider hoops, sewing projects, wreaths, and embellishing

sheets of felt

13. Embroidery floss with needles

They are like $.19 each and I always use it for something! Example of use: wall art, embroider hoops, hair bows, monogramming, sewing projects, and embellishing

embroidery floss

14. Jute rope

Jute Rope is a staple. I use it on everything from wrapping presents to making banners & tags. Example of use: decorate jars, banners, gift tags, cards, wreaths, and wall art

jute rope

15. Small sewing scissors

Good scissors are so important, but also there are so many projects (even paper ones) where I need a small point to cut something out and need a small sharp needle. Small thread scissors can be perfect for this OR in the BEAUTY section at Target the eyebrow trimmer scissors are really good too. Example of use: creating stencils, cards, hair bows, paper wall art, and sewing projects

eyebrow scissor

16. Stencils

Stencils are great to have on hand. If you don’t want to buy one, you can make one like I showed you on a personalized sign I made for my sister. I think having a nice font with all the letters of the alphabet is a great place to start. Example of use: signs, cards, organization, and embellishing

stencil-alphabet

17. Fun tape or ribbon

I recently bought some fun patterned duct tape in the Target dollar section at the front of the store, and I know I will be using it on something other than a normal duct tape use. Example of use: wall art, wreaths, hair bows, embellishing

ribbonspools

18. Little Things

I love little things like knobs, scrap book pieces, feathers. I use them all the time in random projects. Example of use: signs, hair bows, wreaths, and signs

craft feathers

19.  Hot glue gun

A hot glue gun is a staple in the craft room. I have two guns. I have a fine tip hot glue gun that I use to make hair bows, but I also have one that has a wider end that is helpful to use on bigger projects. Example of use: ANYTHING!  I just used it to make a rug 🙂

Hot-Glue-Gun

20.  Natural elements

Here is where I might sound weird. I have zip locks of natural elements that I love to use in decorating or other craft projects. Examples:  acorns, pine cones, bark, hay, and rocks. Example of use: filler to lanterns/jars, mantle decor, banners, signs, and wreaths

pinecones

Spring is such a wonderful time to de clutter and get motivated to start new things.  I hope this craft list can help encourage you to try a DIY project if you don’t already craft. If you are ALREADY a crafter, did any of these items surprise you from me?  I think the BEAUTY supply item (eyebrow trimmer scissors) is such a valuable tool!  What is your favorite craft item?

signature

Share this:

  • Click to email a link to a friend (Opens in new window)
  • Click to share on Facebook (Opens in new window)
  • Click to share on Twitter (Opens in new window)
  • Click to share on Pinterest (Opens in new window)

DIY Burlap Hair Bow

January 30, 2013 By Erica Deuel 11 Comments

vintage burlap hair bows

Do you have a baby shower or girl’s birthday coming up and you’d love to show up with a really special and unique gift?

My friend Erin and I are throwing a small craft/girls night/baby shower for one of our mutual friends next Tuesday night, and it has me making hair bows for the first time in what feels like forever.  I am loving it.  Hair bows can be such a quick craft that make a wonderful gift for babies and really girls of all ages. (including trendy mamas of course!)

The burlap trend is big right now and one of my personal favorites. Today I’m going to walk you through some DIY burlap hair bows.

I love how even after you “master” making one style, you can do small changes to make several of those hair bows all different from one another. For example, these burlap hair bows are all made with the same method, but the finishing elements gives each one a different look.

vintage hair bow

Materials:

  • Burlap (cut into strips about 1″ wide)
  • Craft feathers
  • Buttons, beads, parts of old necklaces
  • scrap fabric pieces like chiffon and tulle
  • felt (cut into about a 2.5″ across square
  • Hot glue gun with glue sticks

hair bow materials

The felt squares will help save your fingers from being burned by the hot glue as it acts as like a canvas to hold your hair bow.

You begin with one felt square and a piece of burlap.  Add a little hot glue to the outside edge of your circle and stick the end of one of your burlap strips on it and press it tight together.  Give it a few second to “set”.  Depending on how far down you start gluing your burlap on your felt square and how wide your burlap and felts circles are, will determine the actual finished size of your hair bow.  Mine are all a little over 3″ across.

Next, add a little glue on top of your burlap in about the same spot you glued the burlap to the felt.

burlap projects1

Fold your burlap slightly over and press it for a few seconds into that hot glue glob so it “sets”.  This will step will start to create a slightly ruffled look.

burlap projects

Once it has “set, you add another glob of glue on the end of that ruffle.

hot glue project

Slightly fold over your burlap strip again and “press” it for a few second to “set.”

gluing burlap

You keep doing this step all around your piece of felt.  There is no need to fully make sure each “fold over” is glued more than to just the top of the fold in line in front of it.  The ridges in the burlap allow the hot glue to seep through and some of it catches onto the bottom felt.  That is good enough for now.  I will show you when to add more glue to make sure the burlap ruffles are tightly attached to the felt circle in a minute.

Once you are back at the beginning of your felt circle, you cut off the extra burlap.

making burlap hair bow

You now have the rough base of your hair bow.

I like to add feathers here to start the embellishing fun stuff.  Lift up the edge of your burlap.  There should be a flap of felt left open to attach your embellishments.  Add a glob of glue on the felt and stick a feather (or a few) into the glue.

glueing burlap and feathers

Press it for several seconds. At this point, you might realize that during this “pressing” part of hot gluing the burlap, you fingers can get burned.  ouch. I’ve been doing this for years and have just kinda gotten used to it. Silly, I know! You could certainly find some good gloves at Home Depot to avoid the burns.

hot gluing burlap

Now, after the feathers had set, I went back and added more glue under the edge of my burlap ruffles onto the felt to make sure they were good and sealed on the felt.  I don’t want my hair bow to fall apart, so I am OCD with my glue.

I wanted to add more texture and depth to my hair bow, so I actually cut one of my 1″ strips in half and did the same ruffle steps on top of my current burlap ruffles to add another layer of ruffles for this hair bow.  On the other hair bows (in the top picture), I also did this step with the 1″ burlap strips.  It is up to you if you add this extra layer or and you can choose how wide you would like them to be.  The important part is to just make sure you glue the initial edge of burlap onto the center of your hair bow.

cutting burlap

I then hot glued an alligator clip onto the back of my hair bow (that I had covered with ribbon). This gives the clip a strong bond to the bow while staying in your hair or attach to a headband.

back of hair bows

Since my burlap hair bow is thick with hot glue, I opted to glue my button into the center on the top (rather than try to sew it through all those layers of hot glue).  And with that, the burlap hair bow is done!DIY burlap hairbow

I am giving this one to my friend at her baby shower.  I can never make just one though. So, now I have a bunch ready for my next sale.

If you follow me on instagram or twitter, you get quick previews of things I am working on during the week.  You may have seen some of the other types of hair bows I made this week on those two sites.

Wanna see some suggestions for variations on your bows? I did slight changes to each one to make the hair bow look unique and kept me feeling creative rather than like a machine making the same thing over and over.

burlap flowers

I can not promise that injury to your fingers will not happen when using a hot glue gun for this long. (Again, gloves. It’s not like they hand out badges for being a tough crafter!)

hot glue gun burn

My fingers are a little sore today.  What we do to get our crafting on!  I love it. (but seriously, gloves.)

When I make this many hair bows at once, I have a little pile of small ribbon, fabric, buttons, scrap-book embellishments, and other odds and ends next to me.  I simply start playing and adding something here and there.  Usually adding one element (like a shiny black button) will make that hair bow seem fancier, so I add other things to keep it fancy (like black feathers).  If I add a duller wood type bead, that hair bow takes on a more vintage, rustic persona and I keep to that feel by adding duller ribbon and funnier feathers (like burnt orange) as well.

DIY hairbows

My little girl has not been feeling well this week, so this is the best model shot I could get out of her.  You can see the hair bow size and how we like to wear it on the side.

sick little girl

I absolutely love how each hair bow can be different, if we just add a little imagination to the base format.  I hope you will feel like hair bows can be simple and that you can make one now and use some of that scrap burlap from your other projects.

vintage love


Thank you so much for stopping by! Let’s get the link party started!  Have you made a kid related craft this week too?  I would love to check out your All About the Kids post.  Please link them up!      signature          


Link up at Mod Vintage Life

Share this:

  • Click to email a link to a friend (Opens in new window)
  • Click to share on Facebook (Opens in new window)
  • Click to share on Twitter (Opens in new window)
  • Click to share on Pinterest (Opens in new window)

Ruffled Fabric Bag

December 29, 2012 By Erica Deuel 4 Comments

Now that Christmas is over, I can show you some things I made as presents and gave away this year.  I’m not a fan of surprises but people I love are, so I have been withholding showing these presents.  I am excited to start with a walk through on this ruffled fabric bag!

Do sewing patterns scare you?  They scare me!  I have used sewing patterns twice with my mother-in-law’s assistance, and I’m still intimidated.  I think there is something with how they have to be precise and accurate that keeps me away.

Instead of buying a simple sewing pattern with canvas material, I preferred to buy a canvas bag for $2.99 (that I got when it was 50% off) to use as my template.  I would rather see what it is supposed to look like finished and take the time to deconstruct the bag by literally picking all the stitches out, just to sew it back together later.  Is this messed up?  Probably.

After taking apart a brand new bag, I picked out the fabrics I wanted to use as my ruffles.  I wanted to make the ruffles fun but also not too bright since this gift was for Matt’s aunt.  I cut my fabric into 3″ strips, and I then lightly folded the fabric slightly over every inch or so.  This created a ruffled look once I sewed a line at the top on the fold.

Once I had several ruffled fabric strips, I started pinning them onto my bag, leaving a little overlap of the two ruffles to cover the seam.  I started at the bottom of the bag and worked up.  Once they were all pinned on both sides of the bag, I was ready to sew the strips on.

After the strips were all sewn on the bag, I trimmed the “extra” ruffles that were hanging off the side of the bag.  Those you can just throw away.  The next step is to turn your bag inside out and sew up the edge of the bag to join the two sides of the bag together again.

inside out bag

To have the feminine flare at the end of the bag like mine, simply push the last two ruffles up so they do not catch in your sewn seam down the side of the bag.  An easy way to measure this is to fold the bottom of the bag back to what is was like and leave your ruffles out of that fold, so when you sew down the edge of the bag they are not caught.

I went back and added a ruffle on the top of my bag.  Since my bag was already closed all the way around, I simply overlapped the ruffle at the top and ended the new ruffle edge folded over so it looked like a ruffle.  I think the edge is pretty hidden this way.

edge in ruffle

I also covered the straps of my bag with a matching fabric.  To do this, cut two 2.5″ wide strips.  I then ironed my fabric strips to create a fold like this…

My bag’s straps were 1″ wide, so I ironed the fabric strip covers with a 1″ margin, so they would wrap around the original strap and could be sewn down the middle.

bag straps1

I literally then sewed down the middle of the strap, so my fabric covers were attached to the original straps.

Where the fabric covers started and ended I added a row of stitches to seal the fabric closed (as shown above).

It was not the prettiest finished look, so I hand sewed some big buttons over the handles’ edge to cover up the transitioning seam of fabrics.

I really liked it with the buttons, But I decided to pin on a big floppy flower I found at Old Navy for $2.99.  The bag can be worn with the flower, or it can easily be taken off for a different look.

I really love how it came out!  Now, that I have completed one bag, I think I could make it a lot faster a second time and might be brave enough to try just buying some canvas rather than a bag to add that destroying step at the beginning.

What do you think?  Do you ever add steps that seem to make your project easier, but they might actually make it harder?

Did you make any Christmas gifts this year to give away?

I hope you have a great weekend with your family and enjoy the last of this year!  If you have not entered my Year in Review Giveaway, please do!  It’s not too late!

signature


Linked up at:  Miss Information

Share this:

  • Click to email a link to a friend (Opens in new window)
  • Click to share on Facebook (Opens in new window)
  • Click to share on Twitter (Opens in new window)
  • Click to share on Pinterest (Opens in new window)

My Creative Spot

May 6, 2012 By Erica Deuel 4 Comments

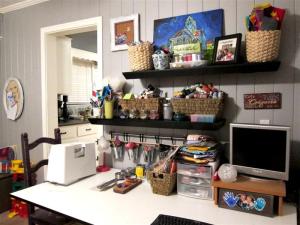
Creating can be a messy, messy process. My little craft corner in the house had grown and grown into a monster since my last post about it.  Printers, books, supplies, food, toys, finished and unfinished projects literally covered my table.  This is what I am talking about…

Lately, I have just grabbed whatever I needed from this mess and took it over to the coffee table or kitchen table to have room to actually craft!  I got some christmas money in December that I have been saving to help organize this area!  I have been scouting pinterest and stores for ideas and slowly have bought a few things to try to help me.  Although, I had started this updo process, I had not given it the time it needed.

I read one of my favorite blogs the other day, DIYonthecheap.  Erin is trying to decide what she wants to do in her creative spot-which is a gorgeous space!!  I’m so jealous of her little workshop!  Her post was the little spur I needed to get back to my project!  Haha it is May after all!  This is not a task that should still be going on five months later!  I have been so excited about this process, yet I have been afraid to do anything!  There are so many possibilities that it has been over whelming and paralyzing.  That is my excuse at least!  Here is a another shot of my mess.

Such a mess.  I love that my favorite purple cup is right there.  That is my little sidekick and not ever very far away:).  In this shot you can see some changes that I had started since that post almost a year ago.  I put a wire note board on the far side of the door way.  Shhhh Secret!  I am slowly oozing my space further into my living room.  Also, I bought those cute little hanging buckets from Ikea.  I have been throwing just random stuff into them.  They have not been the “home” to any particular item.  Another Ikea purchase were the four cute spice jars on the first shelf.  The last change that I have added so far is the square cork board to the right of the doorway.    I still have some things I want to do, but I started by cleaning it up!

There is now a “home” for everything.  I LOVE the new little Ikea light next to the computer screen.  I’m all about “mood” lighting while I craft.  Oh! One thing that is not captured in these pictures are the bins of fabric and other goodies under this table, and I went through those too!  Success!  I’m kind of limited with what to do in this space because of it being in my living room, but my goal was to get more organized.  I’m getting there!

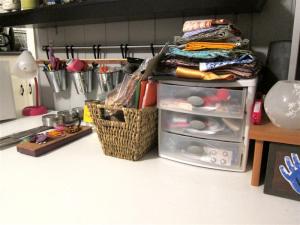
Scissors, hole punchers, glues, and feathers now live in my four metal buckets from Ikea.  The only thing that should EVER be stacked on top of my three drawer organizer is my current project.  That way the project can sit there out-of-the-way of grimy, sweet kid hands on the table until it is being worked on.  The current project resting there is a rag quilt for MY bed!  I am so excited!  Caleb’s quilt inspired me to redo my bed!  Hopefully, I’ll finish it soon and can post pics!

I love color and have tried to eliminate some of the almost empty bottles of paint, but I can’t bring myself to throwing any out!  I always think “it doesn’t take much paint on certain things!”  Might be a little hording?  That is a possibility.  I want to think of it as resourceful. 🙂

I have most of my fabric stored below the table in bins or in a cupboard on the other side of the room, but I keep my favorite hair bow fabrics out in that wire basket.  I think they are pretty, and I use them too often to have them buried.  Also, in one of those spice jars is the home for my snaps.  I go through those like crazy between all my superhero capes and making bibs or something like that.  Snaps are one of my favorite supplies to have on hand!

All my felt, ribbons, buttons are stored on this top shelf.  I love the little frame that holds a picture of my three cuties labeled as “my inspiration” because they really are.  Some of my thread is stored here too.  I really need another thread “store-er” but I don’t want that stack to get higher and cover up the beautiful painting my sister, Joni, did for me as a graduation gift from KSU.  Crazy that’s been 5 1/2 years.

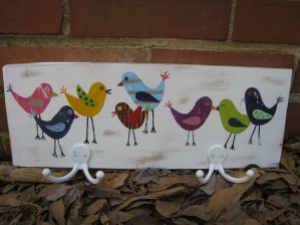
Below the cork board I want to put some kind of hook board.  Maybe like the bird ones I have made before…

For those of you wondering about my CA jar.  It is still out on my craft table, but I have booked my ticket to CA to see my best friend for her birthday!  I can’t wait!  I’ll be leaving on a jet plane June 8.

Now being real, I actually moved some items for that last picture.  Here is the current state of that area…

The hair bows are out to take pictures of and put on etsy.  The cork and hook board was a possibility to go under my current cork board, but I think I have ruled it out.  The three spice jars are going to go to the left of this board…

I also want to embroider some cool, creative quote onto a piece of fabric and hang it in an embroidered hoop for this area.  (Next post will be whats clipped to this board)!  I think after those few additions I will be pretty much done, but can you ever be fully be done as a creator!?  I think not!  I’ll be done until I get bored or something else catches my fancy!

Please check out my friend Erin’s post who has examples of LOTS of cool ideas for a craft room!  I hope you enjoyed a small tour of my creative spot!

Share this:

  • Click to email a link to a friend (Opens in new window)
  • Click to share on Facebook (Opens in new window)
  • Click to share on Twitter (Opens in new window)
  • Click to share on Pinterest (Opens in new window)
  • Email
  • Facebook
  • Instagram
  • Pinterest
  • YouTube
YouTube-Channel
Erica Deuel

Subscribe for Weekly Updates!


Most Popular Posts

DIY {easy} Burlap Wreath
Painting Flower Pot Party Tips
Cheap lamp to Industrial Beauty
Wood Slice Valentine Art
Chiffon Flower Tutorial
Repurpose Old Kitchen Chairs
Engraved Wood Sign Tutorial (and Dremel Micro)
DIY Paper Butterflies- Spring decor for cheap
DIY Valentines Heart Wreath
DIY Bookends (what you can make for being a hoarder)

Categories

  • All About the Kids
  • art journal
  • Blogging
  • Christmas
  • Craft Projects
  • Dancing Zebras
  • DIY
  • Eddy's postcards
  • Embroidery Journal
  • Family
  • Featured
  • Foster Care
  • Giveaways
  • Guest Posts
  • Home
  • Homeschooling
  • Kid Activities
  • Kid Craft
  • My Heart
  • Our Outings
  • Project Spotlight
  • Send Out Love
  • Shop
  • Sponsored Posts
  • Spoonful Lab
  • Spoonful Tribe
  • Tips + Tricks
  • Traveling
  • Uncategorized
  • Vlog

Favorite Categories

Subscribe for Weekly Updates!

Favorite Categories

© 2023 Spoonful of Imagination, Inc.