 Have you ever looked at something and seen it all of a sudden completely different?
I sit in my snow room (which is like a sun room, but in Indiana it has snow outside more than sun) daily. It’s my favorite room to drink morning coffee and wake up for the day. As things have slowly winded down with our Spoonful Studio and the days of it closing are nearing, I have found myself with more and more free time.
One day, I was sitting there and looking at the same mantel that I have every other morning but I asked myself, “when did that turn yellow?” I noticed the stain had yellowed and it now looked dirty and old. I realized that as my mind was being freed up from running a business- it all of a sudden had margin to process other things.
 It was such a cool moment to mentally process the margin I was working hard to find-I was finding. If you listened to Matt and I share why we are closing our non-profit Spoonful Studio, you heard that wearing all the hats felt like I had 5 full time jobs. I was working nights and weekends, and I desperately needed to be freed up to be more present at home (physically and mentally) to my fast growing kids.
So, here I am now remembering how creativity is a muscle. It needs space and time to heal, play and grow just like any other muscle. Below are a few very real life pictures of the mess my snow room had become with the busyness of life and my over crowded brain…

 I love to work on our house. It is part of how this blog began 14 years ago, by sharing my projects with all of you. Yet, as running an art studio took over my time, I have found I have not worked on or done a project on our house in a long, long time.
Side Rant: Our houses don’t have to have the latest trend or constant projects, but I do believe our houses should be a safe place. I want my house to breathe rest, peace, and love to my family and those who visit. We all know that messes, piles, un-attended decisions can lead to more stress or tension, which is in conflict to what we want our houses to represent. Part of finding margin in my days was to make our home more peaceful as well, which for me is attacking some of the projects.
What began as “I’m going to paint that mantel” led to…painting the walls, painting the trim, painting the doors, ripping up the carpet, staining the concrete, panting the handles on a chest of drawers, washing the curtains, and reorganizing some games we pull out regularly in this room. Here are a few pictures of my process.


 This room isn’t very big, so I did half the room at a time. Whichever half was not getting worked on, kept all the furniture piled up.
What I found as I created was I was super rusty. I stepped in the can of paint and literally spilt almost an entire gallon.


 I then went to shake the gallon of cement stain and the lid wasn’t on all the way. Stain went flying on my freshly painted trim and walls. I wasn’t even mad though. I felt alive.
As I have been finding more time available in my days, I have done yard work, read and felt rest filtering into my new routines. I was doing things I enjoy, but have not had time to do in a long time. Yet, I did not feel completely like myself. When you change what you have worked so hard to build and have a lot of identity wrapped up in it, I am sure it takes a lot of time to deconstruct and process all the feelings and experiences just lived. Getting messy with paint was one of the first moments I have felt so alive and like ‘Erica’ once again. I needed to create and dive into the process myself.
It didn’t matter that it got worse before it got better.
It didn’t matter that I was rusty and “messed up” a lot along the way.
I was creating, and my heart needed it.


 This room reminded me that creating is a muscle and it needs practice and margin to grow. We can’t live extremely stressful and busy lives and expect to come up with our best ideas, most creative dreams, and to see everyday things differently. Just like athletes need to rest after a big game, our brains, souls and creative spirits need to recharge as well.
It took quitting my job to find margin to see this room in a new way and imagine how I could keep my favorite bohemian, colorful vibe but breath new life into it.
For laughs and because it makes me smile, I did leave a hidden footprint in the cement. It’s a reminder to make time to play with paint and not to take anything too serious.
 What about you? Do you need to create margin in your life? You may not need to go as extreme as I did with changing up your career. You can form a new habit by switching out an old one.
Go for an evening walk after dinner.
Get off social media, if you can. I did, but that will be another post.
Make a no laptop or phone spot in your house so you unplug.
Sit on the patio, as the day turns into night, being with the people around you.
Tell a few close people what you’re going through. It matters.

 We only have one life. I am encouraged how one of my favorite writers, Bob Goff, said “he choose the life he wanted and placed work around it- rather than choosing a job and trying to squeeze a life into it.”
I will always look fondly back on the times Spoonful Studio was open and the powerful work I got to do with it. Yet, I need more life. I want to enjoy my kids and have time to let creativity grow. Because we all know, I believe a Spoonful of Imagination leads to a more beautiful life.
To see more of my room remodel, Caleb created this quick video for me to share with all of you!

 What do you think about the fur craze?
 The first thing I did was use some pliers to pull the little staples out that were holding the cushion in place. I was excited to see the foam was in good condition, so I decided to reuse it. I gave it a Lysol scrubbing to make sure it was clean and set it aside.
 I then spray painted thin coats till the stool was covered with a pretty dark teal.
 I bought a couple small faux furs in the craft aisle at Hobby Lobby. If you are a regular there like I am, it is down the felt aisle and costs around $2-$3 a piece. I sewed two pieces together to make one larger sheet of fur.

 I laid the foam back on the stool, figured out where I wanted my seem in the fur to be, and started using my staple gun to attach the fur. After getting one side secure, I stretched the fur across the stool, trimmed some of the excess and then started stapling the rest of the fur in place.

 Once the fur was complete, the stool did not give me the “fun” look I was hoping for. I decided to use some paint tape to tape off paint lines to add gold paint to the stool’s legs. That was just what it needed.
 I love how it turned out! It is such a fun eye catcher. The mix of texture and neutrals with a pop of color is exactly what I had in mind.
 Reusing a tired old piece to create something beautiful is so fun. It’s one of my favorite crafts to do.
 My little Reagan has currently claimed this stool and moves it from room to room. Today, it lived in our sun room where we do most of our school during the week.
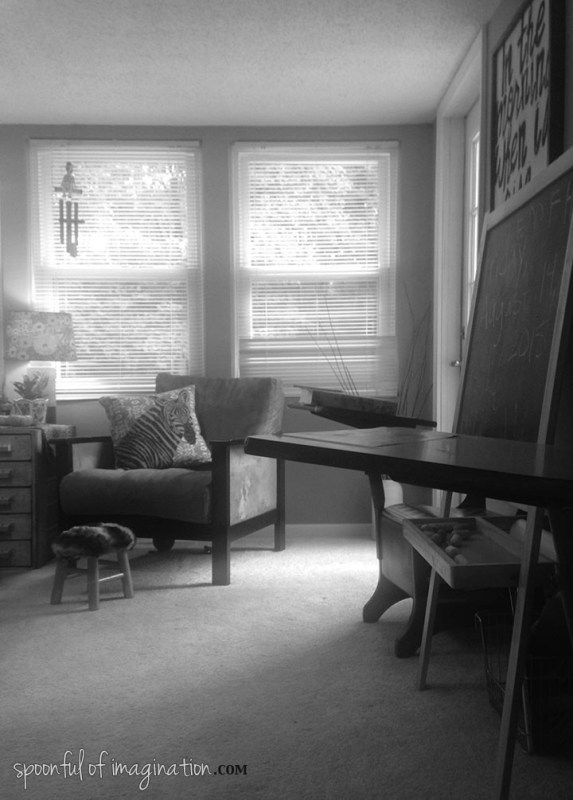 If you’ve looked into fur pieces, you know that they can be pricey. I think this stool cost me about $7, since I already owned several of the supplies. Creating something can be so much cheaper.
 When I started dreaming of how I wanted to create my Reagan’s new bedroom, I knew I wanted lots of color, texture, patterns, and fun. I pictured fun color with pops of natural elements and black and white contrasts thrown in. What I did not take in account was my daughter having an opinion, and she had one.

 It was really bright. I had to try to envision the end result. I kept thinking this seems like a nursery for a pink ballet themed room. I just kept playing in my head “I love my daughter, I really love my daughter” as I painted every stroke. I fought that picture in my head with what I knew the end result could be.
 I was so excited when I saw that Royal Design Studio Stencils had so many fun, girly stencils. I fell in love with the

 This stencil was so simple in the fact that I did not worry about it looking slanted when I stood back. Based on the pattern there was no fear of my stencil going crooked. What was a little more tricky was lining up the stencils, and that was only because the connecting pieces (petals) were smaller.
 I decided to use gold as the accent color for this stencil because it’s fun and also subtle. I wanted the wall to ultimately look purple but also fun and a true accent wall. The stencil created that look!
 The process wasn’t fast enough for this sweet, exited girl.
 I love how this room can grow with her. It’s so fun now, but it can also last for years. I joke with her now about trading rooms. What I love most though, is she loves it as much as me. She calls her wall her golden flowers.
 As I painted this room, I realized I really didn’t want to spend the paint or time to paint her closet. It was a clean light gray. It looked fine and was in good shape. There was really no need to paint it except that it would have this harsh line that might look like I took the lazy way out in not painting it, whenever the closet doors were open.
 By doing this technique the wall looks intentional (not like a lazy mom), and it’s also a fun element all on its own! I really love it, and now I want to go back and do the same thing in my boys’ bedroom.
 What do you think of all the color and splashes of fun? Does it make your heart go pitter patter as well?
 I’ve been on a yarn kick with my
  This was a thick dense cover and my fingers felt it as I pulled yarn through it. I learned the hard way, and I have a few ideas that can help you take this idea and make it easier for your fingers.
 Right now I am carrying this pillow with me around the house and playing with it in different rooms. I like it in every single one. I might need to make some more yarn embellished pillows.
 What do you think!? Do you recycle your old pillows too!? Would you add yarn embellishments to a pillow like me?