Spoonful of Imagination

Add it to a Family for Something Beautiful

  • Home
  • Our Family
    • Our Home
  • Courses
  • Shop
  • Contact

Easy Carpet Bag Tutorial

September 8, 2014 By Erica Deuel 3 Comments

rug_bagI find it funny how many items in our day-to-day life were made for one thing, but with a little imagination and ingenuity can be used for something completely different.

Your cell phone can be used as a camera, calculator, a GPS, or about a million other things besides a phone. I’ve heard dental floss can be used for fishing. A bandana can be used as a fashionable headpiece or a practical face mask… bank robbers anyone?

So why can’t a piece of carpet be used to make a bag? Well, I’m here to tell you that it can.

Bohemian_Rug_craft

These beautiful rugs can be found at Walmart for $4.97 each. Incredible price, right!? I didn’t need a rug, so I stood there staring and thinking what could I possibly do with these beauties. You might remember my Rug Pillow. I decided I could always do that, so I picked three rugs out and quickly placed them in my cart.

After I walked around another aisle and saw the burlap/lace ribbon, I knew exactly what I wanted to create. Don’t we all need a HUGE carpet-bag? I love the thickness the rug creates as a nice sturdy bag, without needing a reinforcing liner. They are bright, beautiful and full of texture. Here is how I made my bag.

I started by folding one of my rugs in half and cutting the tag off it. Next, I folded the ribbon in half of what I thought would be a good length for handles. I wanted both sides of the handles to show the fun lace print, and by folding the ribbon in half you accomplish that and make them extra sturdy.

DIY_Bohemian_bagI sewed the ribbon sides together and then pinned them to where I thought they would look right on my bag. I then tried it on to make sure I liked the length and placement of the handles.

sewing_bag_straps

DIY_simple_bag

measuring_bag_strapsI was so excited. I almost rotated the bag around to make it a more horizontal bag rather than a vertical bag, but I decided I wanted the length this way as I have other bags that fit the horizontal shape. The vertical shape is different. I sewed the handles in place on both sides of the bag, so I had two handles.

sewing_straps_onto_a_bagI tried stuffing my bag into my machine to sew the two sides of the rug together, but it was too fat. I was left needing to sew the sides by hand. It wasn’t hard, since there were only two sides needing sewn together (no need to sew the fold side).

I found a thick, sharp needle and used some embroidery floss to stitch up the side and bottom. When my floss ran out, I simply tied the end of the embroidery floss to another piece and kept going.

hand_sewing

hand_stitch

sewing_a_bagOnce my side and bottom were sewn, I flipped my new bag inside out and it was complete! This bag is huge! To show you the size, I took a few pictures of it with some of my favorite items.

simple_carpet_bag

carpet_bag_tutorial

DIY_carpet_bagMatt jokes that the kids could use it for a three legged race. They could! I love the massive size and plan to use this bag a lot. If you wanted your bag to be smaller, you could easily cut your rug before you sew up the sides. I think this idea would also be great for laundry hampers or storage bins. I’ve seen poufs made from rugs too. The possibilities are endless when we use our imaginations and inspire one another to try new things.

DIY_carpet_bag

easy_DIY_bag

DIY_fun_bag

Carpet_bag_tutorial

Isn’t Reagan just the cutest? She wanted to help me model the bag (and yes we are still wearing our Love is Patient Shirts). I wasn’t planning on using these pictures, but they were too cute not to share.

Would you ever make something from a rug? I’m playing around with what I should do with my other two pretty rugs I bought. Maybe more bags? Maybe new pillows? Or maybe something complete different!

I hope you had a great weekend! Thanks so much for stopping by!

signature

Share this:

  • Click to email a link to a friend (Opens in new window)
  • Click to share on Facebook (Opens in new window)
  • Click to share on Twitter (Opens in new window)
  • Click to share on Pinterest (Opens in new window)

Easy DIY Gift Bags

May 2, 2014 By Erica Deuel Leave a Comment

easy_gift_bag_tutorialDo you ever get tired of store-bought gift bags? I do! They are expensive. Most of the time they are used once and discarded. It just seems like a waste all the way around. But on the flip side, I love giving gifts and need something to put them in. So, I decided to make gift bags that could be used well beyond the gift.

With my Spoonful Lab approaching, I wanted to give all my attendees a great SWAG Bag. While I was out getting supplies, I found these canvas bags at Hobby Lobby. They came in a pack of three for $8. However by using the weekly 40% off coupon they come out to $1.60 each before tax. Can you even buy a large paper gift bag for $1.60?!? You feeling me now? This thing is a no brainer and will be a hit the next time you have gifts to give.

After bringing the bags home, I came up with a simple design to make them special and I want to share the process with you today.

I started with the blank canvases bags and a little acrylic paint.

canvas_bag_craftI cut a stencil out that I liked. I big heart is always easy, subtle but has a big message.

create_a_stencilI then dabbed paint into my stencil just like I did on my Shine Sweatshirt. The key is to go all over sporadically. Don’t start at one side and move across. To get the different levels of thickness of paint, dab all over randomly till it fills in.

stenciled_heartOnce the paint dries, you have a really pretty and fun gift bag that is as pretty as a screen print and cost you way less. I love how these bags are a gift alone, yet you can use them to give gifts. Add a little ribbon and a card or tag, and it’s ready to go!

gift_bag_tutorial

DIY_gift_bagThis idea of embellishing a pre-existing bag is something I love to do. If you like this idea of taking something premade and just embellishing it, you will like my Little Tote Bag and my Ruffled Fabric Bag. Isn’t it great how we can make something nice for less, if we just use our imagination!? I love it.

signature

Share this:

  • Click to email a link to a friend (Opens in new window)
  • Click to share on Facebook (Opens in new window)
  • Click to share on Twitter (Opens in new window)
  • Click to share on Pinterest (Opens in new window)

DIY Little Tote Bag

December 20, 2013 By Erica Deuel 2 Comments

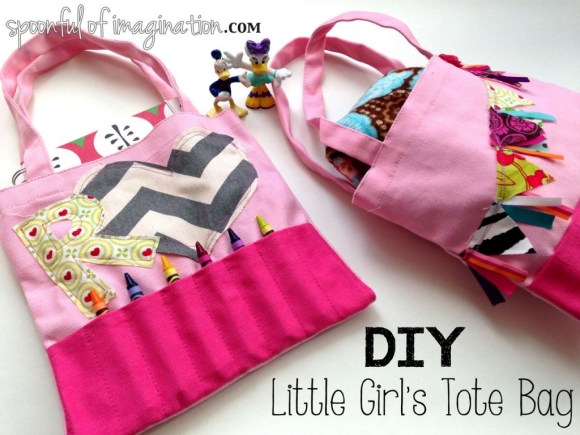
DIY_little_girl_bagOne thing that I don’t think is really communicated to a first time mom is the bag you will need AFTER the diaper bag.

The diaper bag fits a great season where you have lots of diapers, wipes, bibs, bottles, baby food, and rattles that need to be carted around. It is crucial to a mom’s ability to leave the house. There is a phase afterwards where you don’t need to carry as much, but you certainly don’t want your purse to weigh a 100 pounds either. I think of this phase as the little tote bag stage. Reagan is currently there, and I made her a few for Christmas. In this bag I can throw her favorite little toys that she wants to carry at all times, her favorite blankie for long errand times in the van, and even an extra set of underwear and leggings…just in case she has a potty training accident.

The bag is cute. It is almost like a purse to her, but it is multi functional for me too. I think this bag is an essential. I made Reagan a few by embellishing an existing canvas bag. You can do the same to personalize yours in a way to customize it for your child.

Start with getting a canvas bag that you like the size and shape. I found mine at Hobby Lobby, but I think this bag
is pretty cute too with the closure feature.

I found a bunch of scrap fabric that I liked and I started just cutting to make some fun embellishments.

Girls_toy_bagHandmade_Girls_toy_bagOnce I had my embellished pieces, I simply stuffed it all through my sewing machine to attach them to my bag. One thing to be careful is you don’t sew through both sides of your bag, otherwise you wont be able to open it! You can applique your embellished pieces on with fusible web, if you want. This step would help make it much easier. I was too impatient to do it the right way. 🙂

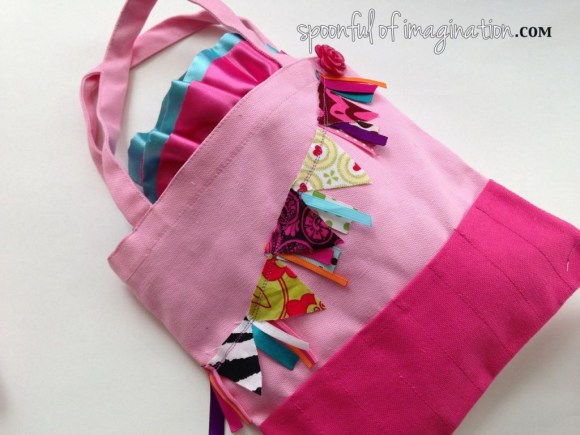
embellishging_toy_bagI ended up adding some fun ribbon for another texture and look to one of my bags. I had a little gap open space at one end of this design so I sewed on a button to make it prettier. Also, I used a lighter and slightly burned the ends of my ribbon to keep them from fraying.

Toddler_bag

stop_ribbon_frayMy bags were then done! They were so simple to embellish and create something fun and useful while still looking cute. Reagan loves to draw so I have one set up with art supplies to go and the other has her spare little travel size blanket.

handmande_bag

DIY_diaper_bagI know these bags will get a lot of use, and I am excited to give them to her! If you saw my Handmade Gift Guide, we can add this little project to that list. I think this is a great, meaning full gift to give a child. Sticking in it something they love doesn’t hurt either ;).

Toddler__girl_bagThank you so much for checking in! I am so excited to let you know that registration for my January Spoonful Tribe membership opens tomorrow! If you are just checking in, you can find more information on this system here. I will be announcing the craft and you can check out my creations of it to inspire you as you order yours!!

signature


Share this:

  • Click to email a link to a friend (Opens in new window)
  • Click to share on Facebook (Opens in new window)
  • Click to share on Twitter (Opens in new window)
  • Click to share on Pinterest (Opens in new window)

Ruffled Fabric Bag

December 29, 2012 By Erica Deuel 4 Comments

Now that Christmas is over, I can show you some things I made as presents and gave away this year.  I’m not a fan of surprises but people I love are, so I have been withholding showing these presents.  I am excited to start with a walk through on this ruffled fabric bag!

Do sewing patterns scare you?  They scare me!  I have used sewing patterns twice with my mother-in-law’s assistance, and I’m still intimidated.  I think there is something with how they have to be precise and accurate that keeps me away.

Instead of buying a simple sewing pattern with canvas material, I preferred to buy a canvas bag for $2.99 (that I got when it was 50% off) to use as my template.  I would rather see what it is supposed to look like finished and take the time to deconstruct the bag by literally picking all the stitches out, just to sew it back together later.  Is this messed up?  Probably.

After taking apart a brand new bag, I picked out the fabrics I wanted to use as my ruffles.  I wanted to make the ruffles fun but also not too bright since this gift was for Matt’s aunt.  I cut my fabric into 3″ strips, and I then lightly folded the fabric slightly over every inch or so.  This created a ruffled look once I sewed a line at the top on the fold.

Once I had several ruffled fabric strips, I started pinning them onto my bag, leaving a little overlap of the two ruffles to cover the seam.  I started at the bottom of the bag and worked up.  Once they were all pinned on both sides of the bag, I was ready to sew the strips on.

After the strips were all sewn on the bag, I trimmed the “extra” ruffles that were hanging off the side of the bag.  Those you can just throw away.  The next step is to turn your bag inside out and sew up the edge of the bag to join the two sides of the bag together again.

inside out bag

To have the feminine flare at the end of the bag like mine, simply push the last two ruffles up so they do not catch in your sewn seam down the side of the bag.  An easy way to measure this is to fold the bottom of the bag back to what is was like and leave your ruffles out of that fold, so when you sew down the edge of the bag they are not caught.

I went back and added a ruffle on the top of my bag.  Since my bag was already closed all the way around, I simply overlapped the ruffle at the top and ended the new ruffle edge folded over so it looked like a ruffle.  I think the edge is pretty hidden this way.

edge in ruffle

I also covered the straps of my bag with a matching fabric.  To do this, cut two 2.5″ wide strips.  I then ironed my fabric strips to create a fold like this…

My bag’s straps were 1″ wide, so I ironed the fabric strip covers with a 1″ margin, so they would wrap around the original strap and could be sewn down the middle.

bag straps1

I literally then sewed down the middle of the strap, so my fabric covers were attached to the original straps.

Where the fabric covers started and ended I added a row of stitches to seal the fabric closed (as shown above).

It was not the prettiest finished look, so I hand sewed some big buttons over the handles’ edge to cover up the transitioning seam of fabrics.

I really liked it with the buttons, But I decided to pin on a big floppy flower I found at Old Navy for $2.99.  The bag can be worn with the flower, or it can easily be taken off for a different look.

I really love how it came out!  Now, that I have completed one bag, I think I could make it a lot faster a second time and might be brave enough to try just buying some canvas rather than a bag to add that destroying step at the beginning.

What do you think?  Do you ever add steps that seem to make your project easier, but they might actually make it harder?

Did you make any Christmas gifts this year to give away?

I hope you have a great weekend with your family and enjoy the last of this year!  If you have not entered my Year in Review Giveaway, please do!  It’s not too late!

signature


Linked up at:  Miss Information

Share this:

  • Click to email a link to a friend (Opens in new window)
  • Click to share on Facebook (Opens in new window)
  • Click to share on Twitter (Opens in new window)
  • Click to share on Pinterest (Opens in new window)
  • Email
  • Facebook
  • Instagram
  • Pinterest
  • YouTube
YouTube-Channel
Erica Deuel

Subscribe for Weekly Updates!


Most Popular Posts

DIY Outdoor Table
Squeeze One More Project Out of Your Old Paint Bottles
DIY Outdoor Checker Board
Chiffon Flower Tutorial

Categories

  • All About the Kids
  • art journal
  • Blogging
  • Christmas
  • Craft Projects
  • Dancing Zebras
  • DIY
  • Eddy's postcards
  • Embroidery Journal
  • Family
  • Featured
  • Fireside Chat
  • Foster Care
  • Giveaways
  • Guest Posts
  • Home
  • Homeschooling
  • Kid Activities
  • Kid Craft
  • My Heart
  • Our Outings
  • Project Spotlight
  • Send Out Love
  • Shop
  • Sponsored Posts
  • Spoonful Lab
  • Spoonful Tribe
  • Tips + Tricks
  • Traveling
  • Uncategorized
  • Vlog

Favorite Categories

Subscribe for Weekly Updates!

Favorite Categories

© 2025 Spoonful of Imagination, Inc.