 Over the weekend, we were headed out on a little family walk.
Taking family walks is one of my favorite things to do together.
It’s a time to unplug, enjoy nature, get a little exercise, and connect. As we were headed out, I turned around and saw Caleb had a camera. He wanted to take pictures of this winter walk. I smiled to myself and only said, “very fun!”
What are things that are an easy yes for you? When you think through a situation or a plan and there is an obvious alteration to it, what is an easy yes?
In my situation, getting off technology, a screen, and devices is part of my heart for these walks. Yet, Caleb had a camera and I allowed it.
 One of my family values
As we walked and I thought through why I allowed the camera, it hit me. An easy yes for me is creativity. I will always welcome the creative process.
For example, we can be pulling out of the driveway, running late for something and Reagan asks to run back inside for markers and a notebook….and I stop the car and allow it.
I can have just vacuumed the house and be ok with Reagan pulling out cardboard boxes, hot glue and making all kinds of little shavings on the floor in her creative project.
Jeremiah might ask for chalk markers to use on his chalkboard wall, instead of the messiness of regular chalk, and I add it to my shopping list.
I can have a sewing project out and someone wants to paint and I clear off my whole desk or table to get them started.
Caleb may want to take a camera on a walk to make this reel and in the process give me all these pictures that I have turned into this post, and I am so proud.
The creative process is something I value and always say yes to.


 What is an easy yes for you?
Has something come to mind that is an easy yes for you? Here are a few ideas of things that it could be…
- heart level talks: will you stay up later, if your kids are wanting to talk?
- healthy food: will you say yes to a snack at any time in the day if it is something healthy?
- sports: will you sign your kid up for a travel sport and be ok driving and giving weekend time, if it’s keeps your kid doing a sport he/she loves?
When we normally think of family values, honesty, perseverance, responsibility, character, and kindness might be some that you automatically think about. I think there are also others that you might not realize is also a value. If you start thinking about it, and process through how other families treat that same thing, you can begin to see it as a value.
 These pictures help me see the world like Caleb does. What caught his eye, the angle he captured it, and even the placement of his subject is interesting to me.
I will always encourage the creative process. It’s a value to me. What is a value to you?


It’s important to know your values
Life is going so quickly, and I think it’s important to know your values so you can treat and honor it as one. Just because it’s important to you, doesn’t mean it is to everyone. So, to get you thinking more about what you may value, think through these questions:
- What makes you really happy?
- When are you most proud?
- What do you spend free time doing?


 Maybe you already know what you value and what is an easy yes for you. If you do, I hope this is just an encouragement that it’s good to be YOU, even if you prioritize something others may not treat with the same weight.
If you don’t know what a unique value that you care about may be, I hope it gets you thinking.
Honoring your family values is a form of creating a connection that matters.
**If the idea of forming a deeper connection with those that matter most to you, sounds like something you would be interested in, I’d love to invite you to join my Create More Connection digital course. I will be back to tell more about it soon, but you can enroll today right here!

 Have you ever looked at something and seen it all of a sudden completely different?
 It was such a cool moment to mentally process the margin I was working hard to find-I was finding. If you listened to Matt and I share
 I love to work on our house. It is part of how this blog began 14 years ago, by sharing my projects with all of you. Yet, as running an art studio took over my time, I have found I have not worked on or done a project on our house in a long, long time.


 This room isn’t very big, so I did half the room at a time. Whichever half was not getting worked on, kept all the furniture piled up.

 I then went to shake the gallon of cement stain and the lid wasn’t on all the way. Stain went flying on my freshly painted trim and walls. I wasn’t even mad though. I felt alive.


 This room reminded me that creating is a muscle and it needs practice and margin to grow. We can’t live extremely stressful and busy lives and expect to come up with our best ideas, most creative dreams, and to see everyday things differently. Just like athletes need to rest after a big game, our brains, souls and creative spirits need to recharge as well.
 What about you? Do you need to create margin in your life? You may not need to go as extreme as I did with changing up your career. You can form a new habit by switching out an old one.
 We only have one life. I am encouraged how one of my favorite writers, Bob Goff, said “he choose the life he wanted and placed work around it- rather than choosing a job and trying to squeeze a life into it.”
 Do you ever have natural instincts towards something, but you can’t always fully explain it until you keep learning in towards it!? Whew. That’s a bit confusing. Let me explain.
 I love color, so I gathered my usual color scheme. I used leftover latex paint from when we painted our studio. We had a great selection of samples and colors that we had used to paint the studio’s walls. To use what I had and save money I chose to not use fabric paint. Please note: this did make my curtain more crisp and stiff.

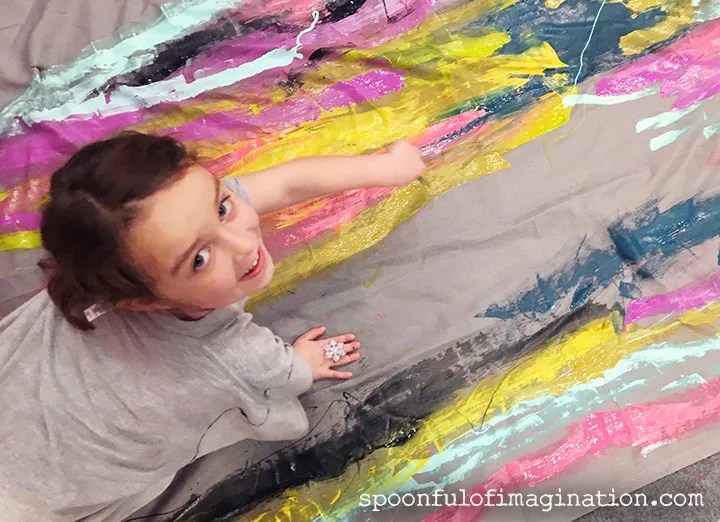

 Oh man. There were so many smiles, laughs and brainstorms as they created side by side. As they filled in the gray…


 The hardest part of this whole project was waiting for it to dry. We might have driven back over to the studio (where we painted it) to pick it up a few hours latter…only to realize it wasn’t dry yet. We ended up letting it dry overnight and then brought our masterpiece home. My girl tried to claim it as a blanket. Haha! It would not be a very good blanket since the material was thin and now also stiff. It was the perfect curtain though.
 I hung it in my room. My husband no longer needs to pin a shirt up to our window. Success! I love how the colors on the curtain add a fun pop of color to my gray walls and light colored bed quilt, yet it combines with my
  What do you think? Do you enjoy the art process too? Would you ever try a large scale abstract process art project like this!? If you don’t want to do it or it feels intimidating, don’t do it…kids will gladly step in and make it happen for you! 😉
 One day I was drinking a tea and started flipping through a book I flip through often for inspiration. It sits on a side table to be a quick read. As I was thumbing through it for the 100th time, I had the thought, “I wish I could see all the pages at once. They are so beautiful.” Almost as quick as the thought came, it was followed by thinking of my accent wall I had been trying to figure out. Could these book pages be collaged in a way to make wallpaper?
 I really didn’t give it any time or research before knowing I wanted to try my idea. I started ripping my beloved book up page by page. Once I had ripped out all the pages, I had a huge stack of beautiful paper. I used scissors and cut off all the frayed edges. I was then ready to figure out the wallpaper method.

 I taped a few pages up in different directions to figure out if I wanted a messy scattered look or if I wanted it to look more like organized rows. I decided I liked the messy look. I went to Lowes and asked where the wall paper paste was located. To my surprise, there was a roller of wallpaper paste made for doing wallpaper boarders. It was the perfect size for my project! It was a small bottle with a roller to easily apply the paste to my book pages.
 Most of the pieces didn’t need to be trimmed. I simply picked a page and decided which side of it I liked best, and rolled my wallpaper paste onto the side that would be up against the wall. I rotated the piece of paper different little angles so it didn’t look perfect and pressed it onto the wall. I then used the smoothing tool and pressed all the wrinkles and air bubbles out.


 A few little things I thought through as I worked…
 It was really messy. I used a huge old sign and placed it on the floor as my mobile work space, and it had gluey wallpaper paste all over it. I probably could have sorted my pages out to have a stack of images vs. a stack of quotes, etc, but I didn’t. The creative in me decided to just go for it. Some of you organized folks will probably have a much more calculated way to go about it, which is great!
 I love how it all came together! It’s so colorful and fun! The book, How to be a Wildflower by Katie Daisy, costs $11.46 on Amazon. I ended up buying two books from there. What an inexpensive way to buy wallpaper we love, to brighten up a small space!
 This door leads into our garage. It is the most used door in our house. We can see this little nook from our kitchen, which is part of why I wanted to brighten up the space! It is also our walk through laundry room into my craft room. This small nook is one high traffic space!
 I love how these beautiful pages are perfect for inspiration and deep conversations. The other day I was sitting at the table with my kids, and I asked them what they thought one of the pages meant when it said, “gather unlikely friendships.” It has led into some of the most real, challenging, and beautiful conversations.

 This little nook is a well used space in our home, and now as we come and go and just live…we can be inspired. It’s a small wall with a huge punch.
