Spoonful of Imagination

Add it to a Family for Something Beautiful

  • Home
  • Our Family
    • Our Home
  • Courses
  • Shop
  • Contact

Recycled Candlesticks From an Old Toy!

October 13, 2022 By Erica Deuel Leave a Comment

recycled candlesticks

Do you have a hard time throwing some things away? There are lots of things I don’t think twice about. Clothes, pillows, dishes are few that I don’t blink an eye at. Maybe one of those are the thing that’s hard for you? For me, I definitely have a hard time throwing wood things away.

Wood seems timeless. It can be painted, stained and built onto and is such a sustainable product. Recently, my Jeremiah was cleaning out his closet and found this wood marble run toy. He didn’t want it anymore, and I kept looking at it thinking there has gotta be something I can create with this old toy!

I looked at the size of wood. They were perfect fun, block size pieces.

I looked at the texture. They were smooth, already sanded, sturdy pieces.

As I stared at the pieces, I realized I could turn them into a recycled candlestick holder.

Recycled Candlesticks Make Fun, Quirky Decor!

I found a wood circle in our garage to be a bigger base and gave that a quick sanding. I then added a little superglue to hold the pieces together and let them dry. I had so much fun moving the pieces around to see what size and angle I wanted them to be. The candlesticks looked really pretty just left as wood, but you know me. I love color, so I added some acrylic paint to jazz them up a bit.

After the recycled candlesticks were dry, I was ready to display them and enjoy! I love mixing homemade decor into our home. These added a fun element to our kitchen table.

recycled candlesticks made from an old toy

I love how they look in my office too, so only time will tell on where they officially end up. How fun are they!? I made something new from something that was almost just trashed or donated away.

My favorite ways to get creative are often to use something that is not expected. I like to use things we wouldn’t find in a craft store.

Being creative is just a process of pairing ideas.

recycled candlesticks

The Creative Process Doesn’t Have to Be Expensive.

We all have things we can repurpose and reuse to make something new.

One way to see things in a new way is to make sure our tanks are full. We can’t be operating on fumes, lack of sleep, deprived of things that bring us joy to have eyes to see things differently. It takes space to have energy or margin to think differently than our auto pilot normal.

That is the most expensive part of the creative process. It requires us to be more whole to think creatively.

recycled candlesticks

I am so excited about my new recycled candlesticks. Now, my mind is going trying to think of other things that would make great candlesticks. Fall is a great time to light some candles to bring some warm and comfort inside as the world is getting colder on the outside.

So, do you have something you can look at with new eyes and make something different out of it? If you need help with this, join us in my 30 Day Imaginative Journey. We are practicing small, quick exercises to get us thinking and practicing growing our creative muscles! Download your free calendar here!

Check out what my Reagan made for her Halloween costume out of trash, which was from one of the imaginative prompts!

Share this:

  • Click to email a link to a friend (Opens in new window)
  • Click to share on Facebook (Opens in new window)
  • Click to share on Twitter (Opens in new window)
  • Click to share on Pinterest (Opens in new window)

Easy DIY Satin Flower

February 26, 2019 By Erica Deuel 2 Comments

Satin-Flower-Featured

As I mentioned in my last post, we are READY for spring around here. Sunshine. Warmth. Color. Anything to get beyond this cold grey reality. While the weather around here isn’t totally cooperating with my desires, I’ll continue to take matters into my own hands and create something to introduce a little warmth and pop of color. Take that Old Man Winter.

If you’ve been around here for a while you know that I love to make flowers out of all kinds of materials for different projects. Burlap. Felt. Chiffon. Today I want to walk you through one of my all-time favorite projects, the Easy DIY Satin Flower.

If you like to read the step by step, carry on, my friend. However, if you’d like to get your supplies and create along with me – you can do that too! Our latest YouTube video is me walking you through this tutorial step-by-step. Enjoy!

Supplies:

  • Your favorite colors of satin fabric. (An 1/8 of a yard will go a long way. The more satin flowers you want to create and the more colors you would like to incorporate, the more satin you should purchase.)
  • Sharp scissors
  • Needle and thread (thread color doesn’t matter because it won’t be seen)
  • A multi-purpose lighter
  • Fun embellishments of your choice, i.e., buttons, beads, scrapbook charms & hardware, jewels, etc.
  • Hot glue and hot glue gun
  • Once you’ve created your flower it can be used in dozens of different projects. In the YouTube video, I use mine for hair bows and headbands. You can get a variety of those from the dollar store.
  • Alligator clips (If you’d like to have a flexible way to attach your flower without permanently connecting it to a hairband.)

Tutorial:

For this tutorial, you are going to cut your satin into 6 circles. When you branch out to make your own, feel free to adjust the number of layers for your own unique look. Before starting on your circles you may want to cut the satin into manageable squares/rectangles to making cutting the circles easier.

satin-fabric

The circles do not need to be perfectly round and you’ll see why in a moment. The first circle should be the largest. You can decide how large you’d like for your flower to be but I’d recommend 3-4″ round for the first one. Now cut 5 more circles making each one a little bit smaller.

satin-circles

satin-circles2

Now being very careful, use your lighter to singe the edges of your satin circles. As the flame is applied to the satin, the heat will cause the edges to begin to curling up. The longer the heat is applied the more the satin will curl. Test it out and find the look that you prefer. This step will also help to seal the edges of the fabric and keep it from fraying in the future. The satin flower should not catch fire. If it does, you are holding the flame to the fabric too long.

burn-satin

Once all of your satin circles have been curled with the lighter, stack them largest to smallest. Get your needle and thread and go ahead and thread your needle. I like to double thread mine to make it extra strong. Give yourself about 18-24″ of thread and double knot it at the end leaving a few inches of slack past the knot.

Now sew your needle through the bottom of your satin flower petals all the way through to the top of the smallest one. Because you are going through 6 layers of satin you may want to use a table or hard surface to help push your needle through. Be careful and watch your fingers! Don’t ask me how I know!? šŸ˜‰ Pull your thread through so that the knot presses against the bottom of the satin petals. Now sew back through the top down to the bottom. Repeat this step 5 to 6 times to make sure that your satin flower petals are securely fastened. Finish by sewing through the bottom. Take the remaining thread and the slack from your first knot and tie them together with another double knot. Your flower is now secure you can cut off the slack, being careful not to cut through the knots.

sew-satin

sew-satin2

Pick out a fun embellishment for the center of your flower. Sew or hot glue it to the center of your flower depending on what you choose.

embellishment

At this point, your satin flower is done. Now the question is, what are you going to do with it?
The possibilities are endless. Make several and sew them to a pillow. Hot glue it to a frame or table display. Sew or clip it to a handbag. Or you can do like I did and incorporate it into a hair bow.

satin-flowers

If you are going to use it in a hair bow for a little one and you’d like to add some flexibility and longevity to your flower, I’d recommend hot gluing one of the alligator clips to the back. That way the flower can be attached to the perfect newborn headband for those itty-bitty newborns… but as they grow, it can be moved to a bigger hairband to grow with them!

alligator-clip

alligator-clips2

reagan-satin-flower

You can do this! This project is easy, fun, and a GREAT way to give an inexpensive but super special gift for a variety of occasions. Share your projects on social media using the #spoonfulofimagination hashtag so that we can be inspired by your creations. Keep checking out our YouTube Channel for new videos and projects. We’d appreciate it a ton if you’d subscribe and share with your followers. Have a great week that hopefully filled with lots of warmth and color!


Share this:

  • Click to email a link to a friend (Opens in new window)
  • Click to share on Facebook (Opens in new window)
  • Click to share on Twitter (Opens in new window)
  • Click to share on Pinterest (Opens in new window)

Colorful Desk Lamp Tutorial

February 7, 2018 By Erica Deuel Leave a Comment

Colorful Desk Lamp TutorialWant to add a pop of color in your house without purchasing anything new? This is a project you can do!

In our last house, we had this small desk lamp in our boys’ bedroom. We haven’t used it in our new house, so its just been sitting in a closet. I loved the shape and it workedĀ so we have just held on to it. If you have boys who occasionally turn the living room into a football field, you know it’s important to keep a few items on the sideline should a picture frame or lamp take a direct hit. Just saying.

Now, that we have the art studio, I am finding a lot of days where I am working on setting up workshops, emailing, and spending more time on the computer. I needed a functioning desk with a lamp.

Colorful Desk Lamp Tutorial

I pulled out my old lamp and put it back to work. The only problem was it had a lot of white on it, and the lamp shade I wanted to use also had a lot of white. It was easier to change the lamp base than to find another lampshade that fit and looked great. Here is what I did to my lamp base.

First, I used painters tape to cover the light bulb socket and switch section of my lamp.

Colorful Desk Lamp TutorialNext, I pulled out a couple of my leftover spray paints that I liked and did a light coat of each color all around my lamp.

Colorful Desk Lamp TutorialI let each color dry completely, before I sprayed the next color. I overlapped the colors a little as I sprayed to create a natural ombre look.

For this project, it was easy to hold the light bulb socket area and rotate the lamp to create the even coat. Please note: To avoid drip downs of paint, it is better to do two light coats of spray paint than to do one thicker/heavier layer.

Colorful Desk Lamp TutorialIt’s always a little more challengingĀ to do spray paint projects during the dead of winter. It’s been hovering around “Brrrr,Ā it’s cold” to “I can’t feel my face” this past month. Which means spray painting is happening in the garage. While it’s certainly warmer than outside it still feels like “I’m losing feeling in my toes” after about 20 minutes. So all that to say, it takes things a lot longer to dry. Be sure to let your lamp dry completely, so you don’t get fingerprints or scratch marks on your new colorful project.

Colorful Desk Lamp TutorialOnce your lamp is dry, add a light bulb and lampshade and you are ready to go! I love the way that my white lampshade looks with this new colorful base. It’s such a fun mix!

Pssstt… did you notice I left the gray layer on the base of my lamp base? I liked that color, so I used it as the first layer and just added more color to the middle and top!

Colorful Desk Lamp TutorialI’m hoping this little desk and lamp helps me toĀ have a focused workspace. Maybe it will help my kitchen counter from becoming an office.

Colorful Desk Lamp TutorialDo you remember when I made these rustic mirrors? They may be one of my favorite crafts of all time.

What do you think? Do you have a lamp, basket, or flower pot that is hiding away in a closet, basement or garage that could be brought back to life with a little color added to it? Have fun! Use your imagination and have fun giving old items, new life. This is also a great way to make someone a special and customized gift without spending lots of money.

Thanks so much for stopping by! If you try this project, tag me on social media with #spoonfulproject so I can see your handy work!

Share this:

  • Click to email a link to a friend (Opens in new window)
  • Click to share on Facebook (Opens in new window)
  • Click to share on Twitter (Opens in new window)
  • Click to share on Pinterest (Opens in new window)

Large Abstract Painting- enjoy the process

January 31, 2018 By Erica Deuel 2 Comments

Large Abstract Painting- enjoy the processDo you ever have natural instincts towards something, but you can’t always fully explain it until you keep learning in towards it!? Whew. That’s a bit confusing. Let me explain.

I have always loved helping people to create. I let my kids paint before they could really talk. I always viewed it as a sensory, exploratory time in letting their imaginations go. Now, that we started and run an art studio in our town it has had me lean further into my philosophy of how we run our classes and workshops. I believe in the benefits of the process. This little phrase “process art” describes a lot of what I have always acted on, but now I can explain it.

There are so many good things that happen in the art process. Kids get to explore, experiment, discover, take risks, problem solve and so much more! While all these things are happening, kids can be developing self-confidence as they make decisions and see what happens. They get to create without worrying about it being right or wrong.

I love all of it.

One day I looked at my bedroom window and realized my husband had pinned up some shirts over the window to be able to have a blackout curtain to take a nap. Well, that’s a no go! I realized we needed a curtain. I didn’t just want any curtain. I wanted a fun, colorful one. These can be expensive. In my attempt to be thrifty and reuse what we already had, I rummaged through our linen closet and found a curtain that we used in our foster care bedroom at our last house…over three years ago. It was time that thing got put to use again.

I combined my love of color + creating + process art and came up with a fun, abstract painted curtain for my bedroom. Here’s how we did it.

Large Abstract Painting- enjoy the processI love color, so I gathered my usual color scheme. I used leftover latex paint from when we painted our studio. We had a great selection of samples and colors that we had used to paint the studio’s walls. To use what I had and save money I chose to not use fabric paint. Please note: this did make my curtain more crisp and stiff.

My goal was to just make something better than a shirt being pinned up to my window. There were little expectations because I knew anything would be better than that. I laid out our old gray curtain on an old rug, poured the paint into small cups that my little artists could easily hold and move around, gave my kids paint shirts and let them have at it. My instructions were simply this, “Ok, two rules! Cover up the gray and have fun. Go!”

Large Abstract Painting- enjoy the processLarge Abstract Painting- enjoy the process

Large Abstract Painting- enjoy the processLarge Abstract Painting- enjoy the processLarge Abstract Painting- enjoy the process
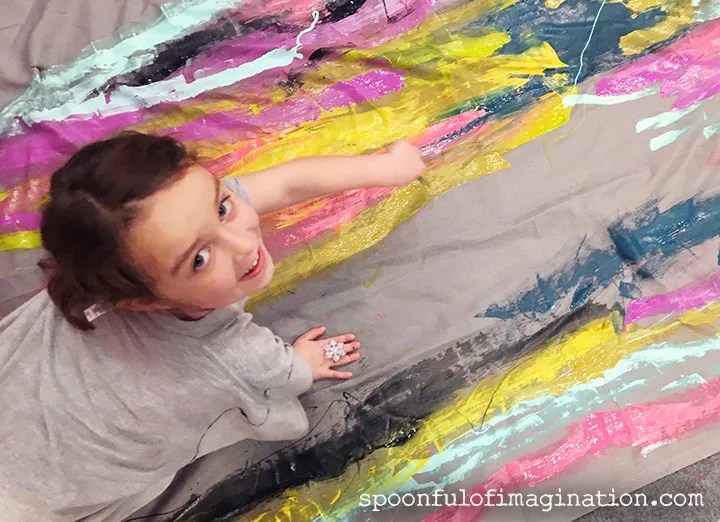
Oh man. There were so many smiles, laughs and brainstorms as they created side by side. As they filled in the gray…

They decided they wanted to paint all the way to the edge.

They wanted to spread out the different colors.

They wanted to all work on it.

They stepped on it.

They never really stood back and analyzed it.

They just kept going.

We instantly loved it. It was so fun to stand back and just enjoy their process as they created. Sure there was the moment, where I had to scurry to wipe up the floor a bit when they walked off of their masterpiece in painted socks, but it was worth it. My kids created a piece, I couldn’t buy and it was an experience we couldn’t replicate if I hadn’t just given them the supplies and stepped back.

But, I wanted in on the fun too. I drizzled a few colors on top to make it a bit messier, and it was complete!

Large Abstract Painting- enjoy the process

Large Abstract Painting- enjoy the processLarge Abstract Painting- enjoy the processLarge Abstract Painting- enjoy the processThe hardest part of this whole project was waiting for it to dry. We might have driven back over to the studio (where we painted it) to pick it up a few hours latter…only to realize it wasn’t dry yet. We ended up letting it dry overnight and then brought our masterpiece home. My girl tried to claim it as a blanket. Haha! It would not be a very good blanket since the material was thin and now also stiff. It was the perfect curtain though.

Large Abstract Painting- enjoy the processI hung it in my room. My husband no longer needs to pin a shirt up to our window. Success! I love how the colors on the curtain add a fun pop of color to my gray walls and light colored bed quilt, yet it combines with my headboard perfectly!

Large Abstract Painting- enjoy the processWhat do you think? Do you enjoy the art process too? Would you ever try a large scale abstract process art project like this!? If you don’t want to do it or it feels intimidating, don’t do it…kids will gladly step in and make it happen for you! šŸ˜‰

If the curtain is a little out of your comfort zone or style, no problem. Here are a few of my favorite kid projects that can really encourage process art:

Painting a ceramic piece (with tips on how to paint with young ones)

Empty Paint Bottle Sign

Paint a Blueprint

I hope you’re having a good week! If you try any of our projects, tag me on social media with #spoonfulproject.

Share this:

  • Click to email a link to a friend (Opens in new window)
  • Click to share on Facebook (Opens in new window)
  • Click to share on Twitter (Opens in new window)
  • Click to share on Pinterest (Opens in new window)
Next Page »
  • Email
  • Facebook
  • Instagram
  • Pinterest
  • YouTube
YouTube-Channel
Erica Deuel

Subscribe for Weekly Updates!


Most Popular Posts

Painting Flower Pot Party Tips
DIY Paper Butterflies- Spring decor for cheap
DIY {easy} Burlap Wreath
The Encanto, Madrigal's House Craft For Kids
Repurpose Old Kitchen Chairs
Cheap lamp to Industrial Beauty
School Desk Makeover
Engraved Wood Sign Tutorial (and Dremel Micro)
DIY King Size Rag Quilt {Repost}
Paint That Captures the Magic and Inspiration of Disney

Categories

  • All About the Kids
  • art journal
  • Blogging
  • Christmas
  • Craft Projects
  • Dancing Zebras
  • DIY
  • Eddy's postcards
  • Embroidery Journal
  • Family
  • Featured
  • Fireside Chat
  • Foster Care
  • Giveaways
  • Guest Posts
  • Home
  • Homeschooling
  • Kid Activities
  • Kid Craft
  • My Heart
  • Our Outings
  • Project Spotlight
  • Send Out Love
  • Shop
  • Sponsored Posts
  • Spoonful Lab
  • Spoonful Tribe
  • Tips + Tricks
  • Traveling
  • Uncategorized
  • Vlog

Favorite Categories

Subscribe for Weekly Updates!

Favorite Categories

© 2023 Spoonful of Imagination, Inc.