Spoonful of Imagination

Add it to a Family for Something Beautiful

  • Home
  • Our Family
    • Our Home
  • Courses
  • Shop
  • Contact

Little Girl’s Bedroom

June 13, 2013 By Erica Deuel 9 Comments

Bedroom makeover

Reagan’s Bedroom is one of my favorite makeovers I have ever done. I think because for half of the creating and planning for it, we were not even in our new house yet. I learned a lot about trying to create for a space that you don’t get to walk by and stand in everyday to imagine and “see” your project come to life. I was stretched and now have made something I am proud of as a result.  If it was my choice, we would play in there all day everyday.

Although she may only be two, it is something Reagan is proud of as well. If you were to walk into my house right now, she would ask you to come upstairs and see her room…even if you have already seen it. It makes my heart so happy. Some work might have been required, but what an easy way for me to show love to my daughter by being able to create something she loves.

Since before we moved, I have been showing tutorials and DIY projects that I have been creating to incorporate in her room. I thought it would be helpful to put all those in one place, so there is a little summary of how create this room. Please feel free to bookmark it, pin it, or share it. It is my hope all these hours of creating can inspire others to create as well.

DIY little girl's bedroom

Minnie Mouse Silhouette

DIY Fabric Bunting

Burlap Lampshade

Refinishing Ikea Furniture

Painted Stool

Stick Heart Wall Art

Teal Rustic Dresser

DIY Painted Striped Wall

It’s so nice to have all these links in one place! Many of these projects are some of my favorites, and I am so glad I can give you this summary. A few other items that I have incorporated into this room are shown below.

Elements for a girls bedroom

Wood Log End Table

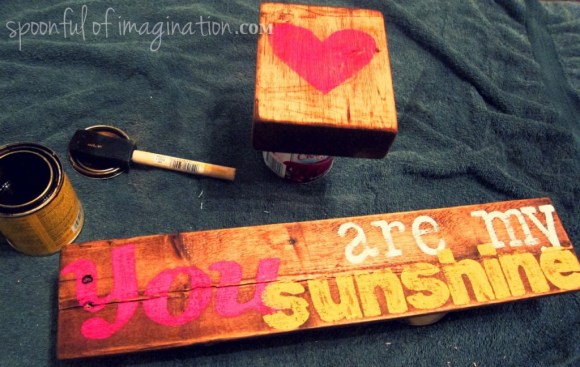
You are My Sunshine Rustic Sign

Hair Bows and Headbands

Thank you so much for checking out my little girl’s bedroom summary! I hope these links and posts can help inspire you. Please feel free to contact me, if you have any questions about how to do any of these tutorials!


signature


Share this:

  • Click to email a link to a friend (Opens in new window)
  • Click to share on Facebook (Opens in new window)
  • Click to share on Twitter (Opens in new window)
  • Click to share on Pinterest (Opens in new window)

You are my Sunshine Wood Sign

February 11, 2013 By Erica Deuel 9 Comments

girl vintage wood signs

Last week, I showed you some pictures of a baby shower/girl’s night that I threw with DIY on the Cheap.  Since that post, I have gotten several comments and questions about the two little vintage wood signs displayed on the food table.

I made those as shower decorations, but they also acted as part of Dana’s shower present.  Today, I thought I would show you how you can make them, so you can make them too.  They were such a cheap way to add a unique touch to our decor and personal touch to her gift.

I started by finding two scrap pieces of wood and giving them each a good sanding.  I then printed off the words I wanted in fun fonts at sizes I thought that would fit best.

DIY You are my Sunshine Sign

The heart block was easy.  I just painted a simple heart on it.  The “you are my sunshine” was a little harder.  I cut out the letters of “you” and “sunshine” and traced the letters on to my sign.  It was a way of making my own stencil.  Once I had them in pencil on my piece of wood, I painted them in, and eye-balled the “are my” font and tried to copy it the best I could in paint on my sign as well.

My spacing did not come out perfectly, but I think the quirkiness of the design (and over lap of words) adds to its unique charm.

painting a wood sign

I then gave the wording a good sanding to take away the “raised paint” (as you can see above in the word “sunshine”) and create a more vintage look.

Sanding a wood sign

I then stained the two pieces.  Please read my DIY Stick Heart Wall Art post for more details on how to stain.

staining wood sign

DIY wood sign

baby girl vintage shower decor

I think they came out so cute.  I almost wanted to keep them.  They looked so cute on the food table, and I know Dana was excited about getting them!

baby shower food table

The beauty of this sign technique is you could personalize it with any quote, word, or shape you want!  I think it would be really cute for name signs in a bedroom too.  I hope you will try this technique, and please let me know if you have any questions!

I hope you had a wonderful weekend!  Things have gotten crazy busy since my Falling into a Hole post around here.  I want to thank you again for all the out pour of love and encouragement to my post on where I am at emotionally.  I’m working on an update post, and I hope to get that to you all this week.  Thank you for walking this life with me!

signature

Share this:

  • Click to email a link to a friend (Opens in new window)
  • Click to share on Facebook (Opens in new window)
  • Click to share on Twitter (Opens in new window)
  • Click to share on Pinterest (Opens in new window)

Girl’s Craft Night + Baby Shower

February 6, 2013 By Erica Deuel 5 Comments

paint chip baby shower banner

The other night I got a chance to throw a little girl’s night + craft night + baby shower all in one event with my friend Erin.

We had a blast planning it together for our good friend Dana, and it ended up being such a fun night.  It was low key, and the perfect blend of girl time, crafts, good food, awesome friends, celebration of life, and pajamas.

Here is a series of pictures from our night with steps on how to make the sweet “girl” banner I made for our party.

erin and me

hosting a baby shower

Erin and I were anxious for our friends to arrive, so we took a few pictures of ourselves while we waited.  This kept us from eating all the pretty food before they arrived.

girl baby shower food table

After everyone arrived, we ate and ate some more, while catching up.  The guest of honor is a candy lover, just like me.  We are kindred spirits with our sweet taste buds, so I loved having the task of bringing the sweets for the party.  I’m not much of a chief, but I can bake some cookies and buy some candy.  Thank you Erin for making the fresh creme cheese and dill dip plus the awesome tortilla roll ups.  She had the hard stuff.

After we ate, Dana opened her presents, and it was so fun to see her reaction to girly items!

opening baby shower presents

Dana has two boys and is pregnant with her little girl, Jane.  We all found out her baby’s name that night, and it was so fun squealing with excitement for her.  I love it.  I love that she has the same gender and close in age kids as me too.

I have been busily making Dana some hair bows, and last week I showed you how to make the DIY Burlap Hair Bow I made for her.  Well, I used that hair bow and others that I had made to form a sweet bouquet to use as a decoration for the shower.

baby shower bouquet

For the shower, we had everyone bring a frame that they would want to turn into a hair bow holder or a memo board.  The bouquet was pretty for the shower, but now that the shower is over all those hair bows needed a pretty way to be stored.

For exact details on how to create one of these chicken wire frames please read about my Pallet Memo Board.  For this night, I brought a series of wire cutters, my staple gun, and the chicken wire and we got to work helping one another.

chicken wire materials

girls craft night

crafters teamwork

girls craft night project

It can be a two person job to hold the wire down (from curling up on you) and stapling.  Courtney (featured on the left in above pictures) was a great assistant to all of us.  This was my favorite part of the night as we all sat around in our pjs and talked, laughed and crafted.  I can’t believe I didn’t get a group shot of us all together, but I did manage to get most of our frames in a shot together.

chircken wire frames

I love creating with friends and I love creating for friends.  It was so fun to craft together, and I also really enjoyed preparing for the night.  I made the fun “girl” banner out of paint chips.

DIY Baby Girl Banner

In short, this is how you too can make this banner!

1.  Gather some supplies

  • paint chips
  • hole/circle punchers
  • stickers to spell “girl”
  • hot glue gun with glue sticks
  • ribbon
  • scissors
  • brown card stock paper

DIY girl banner

2.  Punch circles out of the paint chips.  I used my big circle puncher to punch four large circles out, as those would be the circles I spelled “girl” out on.  I used the smaller circle puncher to punch a lot more circles out to use along the top of the banner (on either side of “girl”).

3.  Glue the four large circles in the center of your ribbon and glue smaller circles up and down the ribbon on either side of it.  I just put a small glob of glue on the ugly side of my paint chips and stuck it on the ribbon.  You don’t need much glue.

4.  I then used white stickers to spell “girl” on my banner, and cut out some big triangles out of the brown card stock and glued them on the other side of my ribbon.

pregant photo shoot with a banner

belly with baby girl sign

That’s it!  The banner is done!  How gorgeous is my model here!?  Dana wears pregnancy so well!

We had such a fun night honoring Dana and her sweet baby and just being with each other.

Have you ever had or been to a more informal baby shower like this one?  I loved being in comfy clothes and having a girls night rather than an early Saturday morning function.

pregnant mommy with shower hosts

I’m so blessed to have these girls in my life!  Now, Ms. Jane!  Hurry up and get here!  We are all anxious to meet you!

The banner you could turn into a birthday banner or really any celebration decoration!  What kid related outing or craft did you do this week!?  I adore all the entries from last week, but the one that had me giggling was the one about fire!  My friend Heather has boys that my boys would adore playing with, if there were not so many miles in between our homes.  Check out her great post on “Why shouldn’t we look at the Sun?” and link up your own post!

cultivated lives sun


signature


Share this:

  • Click to email a link to a friend (Opens in new window)
  • Click to share on Facebook (Opens in new window)
  • Click to share on Twitter (Opens in new window)
  • Click to share on Pinterest (Opens in new window)
  • Email
  • Facebook
  • Instagram
  • Pinterest
  • YouTube
YouTube-Channel
Erica Deuel

Subscribe for Weekly Updates!


Most Popular Posts

Painting Flower Pot Party Tips
DIY {easy} Burlap Wreath
DIY Paper Butterflies- Spring decor for cheap
DIY Outdoor Checker Board
Cheap lamp to Industrial Beauty
DIY Outdoor Table
Chiffon Flower Tutorial
Repurpose Old Kitchen Chairs
Paint That Captures the Magic and Inspiration of Disney
The Way I Thrift

Categories

  • All About the Kids
  • art journal
  • Blogging
  • Christmas
  • Craft Projects
  • Dancing Zebras
  • DIY
  • Eddy's postcards
  • Embroidery Journal
  • Family
  • Featured
  • Fireside Chat
  • Foster Care
  • Giveaways
  • Guest Posts
  • Home
  • Homeschooling
  • Kid Activities
  • Kid Craft
  • My Heart
  • Our Outings
  • Project Spotlight
  • Send Out Love
  • Shop
  • Sponsored Posts
  • Spoonful Lab
  • Spoonful Tribe
  • Tips + Tricks
  • Traveling
  • Uncategorized
  • Vlog

Favorite Categories

Subscribe for Weekly Updates!

Favorite Categories

© 2023 Spoonful of Imagination, Inc.