Spoonful of Imagination

Add it to a Family for Something Beautiful

  • Home
  • Our Family
    • Our Home
  • Courses
  • Shop
  • Contact

You are my Sunshine Wood Sign

February 11, 2013 By Erica Deuel 9 Comments

girl vintage wood signs

Last week, I showed you some pictures of a baby shower/girl’s night that I threw with DIY on the Cheap.  Since that post, I have gotten several comments and questions about the two little vintage wood signs displayed on the food table.

I made those as shower decorations, but they also acted as part of Dana’s shower present.  Today, I thought I would show you how you can make them, so you can make them too.  They were such a cheap way to add a unique touch to our decor and personal touch to her gift.

I started by finding two scrap pieces of wood and giving them each a good sanding.  I then printed off the words I wanted in fun fonts at sizes I thought that would fit best.

DIY You are my Sunshine Sign

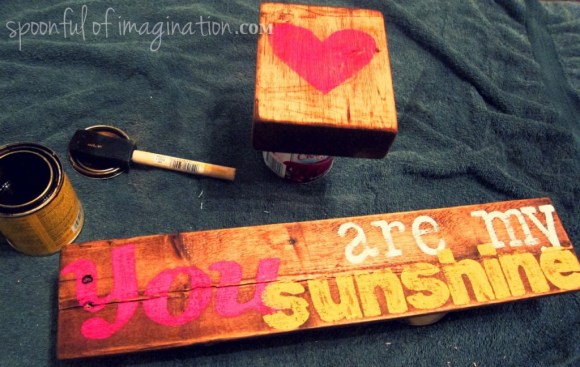
The heart block was easy.  I just painted a simple heart on it.  The “you are my sunshine” was a little harder.  I cut out the letters of “you” and “sunshine” and traced the letters on to my sign.  It was a way of making my own stencil.  Once I had them in pencil on my piece of wood, I painted them in, and eye-balled the “are my” font and tried to copy it the best I could in paint on my sign as well.

My spacing did not come out perfectly, but I think the quirkiness of the design (and over lap of words) adds to its unique charm.

painting a wood sign

I then gave the wording a good sanding to take away the “raised paint” (as you can see above in the word “sunshine”) and create a more vintage look.

Sanding a wood sign

I then stained the two pieces.  Please read my DIY Stick Heart Wall Art post for more details on how to stain.

staining wood sign

DIY wood sign

baby girl vintage shower decor

I think they came out so cute.  I almost wanted to keep them.  They looked so cute on the food table, and I know Dana was excited about getting them!

baby shower food table

The beauty of this sign technique is you could personalize it with any quote, word, or shape you want!  I think it would be really cute for name signs in a bedroom too.  I hope you will try this technique, and please let me know if you have any questions!

I hope you had a wonderful weekend!  Things have gotten crazy busy since my Falling into a Hole post around here.  I want to thank you again for all the out pour of love and encouragement to my post on where I am at emotionally.  I’m working on an update post, and I hope to get that to you all this week.  Thank you for walking this life with me!

signature

Share this:

  • Click to email a link to a friend (Opens in new window)
  • Click to share on Facebook (Opens in new window)
  • Click to share on Twitter (Opens in new window)
  • Click to share on Pinterest (Opens in new window)

Where The Wild Things Are

July 20, 2012 By Erica Deuel 3 Comments

Did you grow up loving the book “Where The Wild Things Are”?  I did not.  I didn’t get it.  To me , it was just a lot of pictures of monsters.  Now that I am a mom, I adore the book!  I love the imagination and can relate as I see my boys create places and pretend daily!  I tell my boys “I’ll eat you up-I love you so”  all the time now.  It’s a daily quote used around here.  In honor of this book and our love for it, I thought I’d paint another famous line.

“Let the Wild Rumpus Start!” is a line I often think of when I think of my little family.  Having a five, three, and one year old makes life a little crazy!  You know life with young kids normally is crazy, but it is so so good too!  I want to embrace our craziness because to me it means we are so so blessed!  I can’t imagine life without my three kids.  Yes, I might get to craft or blog more, but my life would be nowhere near as rich and rewarding.  I love my life, so I choose to say “bring on the crazy” which is what “let the wild rumpus start” means to me.

I started this little sign with an old piece of tongue and groove wood, and you know I love old wood!  I then stenciled my words on with the technique I showed you on my burlap sign.

I probably worked on this sign for 1-2 hours everyday this week to complete it.  My five-year old sat right next to me during most of my painting spells.  Thanks to him there is actually a picture of me here crafting. 🙂

Isn’t he a cute little sidekick?!  One day he painted this big rock.

Another day he wanted to paint the same picture as me 🙂

After I got the words down, I added the trees.

I dream of having an art studio with a huge gorgeous room decorated right off of pinterest.  There is just not a place for that in our little 60+ year old ranch house, so for now…this is where I created this piece.

It works though.  Until I get that studio/craft room, I will just enjoy the creative spot I have!  I slowly added monsters, until I had one on each of my trees!

I was getting close to being finished!  I love to create and craft, but I get “tired” of doing one thing for too long.  Haha! That’s probably why I do a little of it all!!  I can’t master one piece in my store like I wish I could.  I love to make and try new things.  After five days of painting this thing, I was excited for it to be done.  Although I LOVE love painting…and paint bottles and paint brushes.  They just make me feel like creating.  Do you have materials that you just love like this?

I painted some leaves on my trees and outlined them with a small sharpie, and my sign was done!  I love the finished product!

I’m not exactly sure where we will put this sign.  Maybe close to my kids art wall (that’s not yet complete), or above our engagement pictures.

It is not exact, but you can see the picture I was going for and used to model my design.  That fourth monster was the hardest to paint.  I mean, he’s like two colors yet shows contrast and depth!

I hope you enjoyed seeing my sign as the project for my Friday Project Spotlight this week!!  Thank you so much for checking in!  If you haven’t entered my hair bow giveaway yet-be sure to!

This weekend I am heading north to Farmersville, Ohio to help my grandparents auction off their big log/loft house and acreage.  They are down sizing into a retirement neighborhood where the houses are small and they get their grass cut for them.  It makes sense for an older couple, but this place has so many childhood memories for me!  It’s an amazing house that I grew up loving to go to.  I am sad to see it go, but I am also excited to see an auction!  I have never been to one!  I will post about it when I get back!

I hope you have a great weekend!

Let’s Party at One Creative Mommy,

At The Picket Fence,

I Heart Nap Time,

Stuff and Nonsense,

Romantic Home.

Share this:

  • Click to email a link to a friend (Opens in new window)
  • Click to share on Facebook (Opens in new window)
  • Click to share on Twitter (Opens in new window)
  • Click to share on Pinterest (Opens in new window)
« Previous Page
  • Email
  • Facebook
  • Instagram
  • Pinterest
  • YouTube
YouTube-Channel
Erica Deuel

Subscribe for Weekly Updates!


Most Popular Posts

DIY {easy} Burlap Wreath
School Desk Makeover
Cheap lamp to Industrial Beauty
Painting Flower Pot Party Tips
Engraved Wood Sign Tutorial (and Dremel Micro)
DIY Rug
DIY Feather Wreath
For the Love of Color!
Chiffon Flower Tutorial
DIY Flower Name Tag

Categories

  • All About the Kids
  • art journal
  • Blogging
  • Christmas
  • Craft Projects
  • Dancing Zebras
  • DIY
  • Eddy's postcards
  • Embroidery Journal
  • Family
  • Featured
  • Fireside Chat
  • Foster Care
  • Giveaways
  • Guest Posts
  • Home
  • Homeschooling
  • Kid Activities
  • Kid Craft
  • My Heart
  • Our Outings
  • Project Spotlight
  • Send Out Love
  • Shop
  • Sponsored Posts
  • Spoonful Lab
  • Spoonful Tribe
  • Tips + Tricks
  • Traveling
  • Uncategorized
  • Vlog

Favorite Categories

Subscribe for Weekly Updates!

Favorite Categories

© 2023 Spoonful of Imagination, Inc.