Spoonful of Imagination

Add it to a Family for Something Beautiful

  • Home
  • Our Family
    • Our Home
  • Courses
  • Shop
  • Contact

White Cloud Diapers

April 14, 2013 By Erica Deuel 6 Comments

Disclosure: This is a sponsored post written by me on behalf of White Cloud Diapers.

Once upon a time I was a girl who hated to meet new people. It made me nervous, I got extremely awkward (I still can do that), stumbled on my words, and was shy. I look back on those days and it is weird to think of where I am today. I feel like my word for the year is running true. Change. I am changing with the changes going on around me. That’s probably how life is supposed to be, but I am thankful that I have eyes that see and are embracing the change rather than fighting it.

blogger playdate

One of my favorite parts about blogging is the community. It is so fun to meet people with similar interests and hobbies and talk about life together. Last week, I had the opportunity to attend a play date provided by White Cloud Diapers.

Blogger events

It was so fun to meet with other local bloggers and talk about our blogs, kids, play some games, and learn more about White Cloud Diapers. At one point in my life this outing would have freaked me out, but I was so excited to go and had a blast.

White Cloud Diapers

I have been waiting till we are moved to start potty training Reagan.  Although she has shown interest, I just didn’t want to get into that with having to pack and all the other changes that are being thrown her way. Once we are settled, I think we will start. In the mean time it was nice to learn about White Cloud Diapers.  Two points that I took away were:

Savings: They are available at great low prices that help us busy parents stay on budget and keep the cost of raising a child affordable. Which is great to know with approaching becoming foster care parents. Although Reagan may be done with diapers soon, we might still need to be buying them if we get a foster care child in diapers!

Convenience Features: I really like that White Cloud Newborn, Size 1 & size 2 early stage diapers feature a wetness indicator that changes color to help parents know when the baby needs to be changed. This is an amazing feature for when you are changing diapers so frequently when they are young.

Walm-mart White Cloud Diapers

I have been trying them out on Reagan, and I like them!

Diapering can be one of the biggest expenses in a family’s weekly budget and a great performing diaper is a must-have for parents. In order to make this affordable, Walmart has reintroduced their premium line of White Cloud diapers to address the needs of today’s busy parents.

White Cloud Diapers provide your baby the highest quality diaper with superior leakage protection, exceptional softness and great fit. White Cloud Diapers are available exclusively at Walmart, where you can find low prices everyday on all your family’s needs. Check them out today!

Disclosure: This is a sponsored post written by me on behalf of #WhiteCloudDiapers.

signature

Share this:

  • Click to email a link to a friend (Opens in new window)
  • Click to share on Facebook (Opens in new window)
  • Click to share on Twitter (Opens in new window)
  • Click to share on Pinterest (Opens in new window)

Paint That Captures the Magic and Inspiration of Disney

April 3, 2013 By Erica Deuel 10 Comments

Disclaimer: Compensation and products for review were provided by Glidden via MomTrends. The opinions expressed herein are mine and are not indicative of the opinions of Glidden.

I don’t know about your house, but around here Disney is a huge hit. If you’ve followed along for a while, you’ve seen a number of posts where I’m sharing the influence of a Disney character or movie. We’ve had the opportunity to visit both Disneyland and Disney World with the kids, and it truly is the most magical place on earth! As an organization they are just so creative and inspiring to me. So, when I was introduced to a new paint line created by Disney I could not have been more excited!

Disney Paint by Glidden at Walmart

When I was asked to review the paint, I totally flipped out! What an honor!

Here’s the scoop: Disney has partnered with Glidden to create Disney Paint, a new line of paints exclusively available at Wal-mart. They have 112 colors and five innovative specialty finishes that are easy to use and apply. It’s a premium quality and ultra-durable paint that was created with kids in mind. It’s made to withstand wear and tear, as well as repeated scrubs and washes.

Disney Glidden Paint at Walmart

Ultra Durable paint by Disney

As most of you know, we have sold our house and will be moving into our new home soon! While our new house is beautiful, the paint is very basic.

Little Girls Bedroom Makeover

That doesn’t work for me. Color, lots of color, is sort of a big deal to me. To ensure I don’t go too crazy, I’m limiting myself to one room at a time. My daughter Reagan gets the privilege of having her room be the first to be redesigned. So, I headed to Wal-mart to see what Disney Paint had to offer.

Picking out Disney Paint

The first thing that hit me was the depth and variety of choices. There were so many beautiful colors to choose from.  Disney Paint has a distinct collection of colors grouped into palettes designed to give you a lot of options. Because Reagan is only two-years-old, I did the majority of the color choosing. However, if you had an older child I think the display they have created would be very easy and fun to get your child involved in the selections.

Now, if you’ve shopped for other paint colors,  you probably remember seeing the paint chips being arranged by colors. All the blues are together, all the reds are together, all the greens are together, etc. With the Disney Paint display, the colors are arranged by complementary collections. So if you find picking colors and matching accents difficult, this display makes it a very simple process.

Disney Paint Sample paired together

The other thing that really stood out to me was that Disney Paint goes beyond just a selection of colors. They have five specialty finishes to add some extra magic to your paint project. I picked two fun colors out for the majority of Reagan’s walls, but I still wanted to try a fun, specialty finish.  While the glitter finishes were very tempting, I decided to go with a chalkboard option for one of Reagan’s walls. A black chalkboard wall? What’s so special about that, you ask? I’ll tell you, it doesn’t have to be black! The chalkboard paint can be tinted in 20 different colors. How cool is that!?

Disney Paint finishes

Chalkboard Paint by Disney

Aside from the specialty finishes, Wal-mart also carries Disney bedding and Disney room accessories that go right along with the color palettes.  I’m so excited to create Reagan a new room that she will love. It will be complete with a toddler bed and everything. No more crib.

Glidden Paint at walmart

We’ve started packing for our move, and the first box I packed is my new Disney Paint! I can’t wait until we can call our new house “home” and I can start to add some magic and inspiration to Reagan’s new room. I will of course keep you posted on the progress and let you know what I think of the paint once I get to work!

Disney Paint Supplies

signature


Disclaimer: Compensation and products for review were provided by Glidden via MomTrends. The opinions expressed herein are those of the author and are not indicative of the opinions of Glidden.

Share this:

  • Click to email a link to a friend (Opens in new window)
  • Click to share on Facebook (Opens in new window)
  • Click to share on Twitter (Opens in new window)
  • Click to share on Pinterest (Opens in new window)

King Size Rag Quilt

July 6, 2012 By Erica Deuel 20 Comments

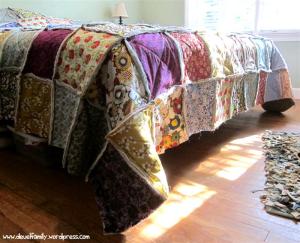
I finally finished the rag quilt for my bed!!!  I am so proud of this project!!  It is by far the biggest thing I have ever sewn!  You might remember  Caleb’s rag quilt I made for his birthday in March.  I have wanted to make one for my bed since then.  It has taken that long  for me to complete this project, but it was worth it!!  I LOVE it!

My bed needed a makeover.  I really wanted a colorful, anthropology type quilt.  Every quilt I looked at online (and really liked) was easily over $300.  I did not want to pay that, so I shopped and shopped for fabric.  I found some at Wal-Mart for like $1 or $2 a yard!   They aren’t the prettiest fabrics, but once they were mixed in with the others…they looked great!  The rest of the fabrics were from Jo Anne’s, Hobby Lobby, and Hancock Fabric.  I couldn’t get them all in one place.  I was searching!  A little window at my crazy side:  I literally shopped for these fabrics for about two weeks.  It took awhile with three kids to get to all the stores…and then back to a store or two :)!  I than let the fabrics sit on my kitchen table for about two weeks and I would walk by and see if I liked them all together or not.  I rotated fabrics in and out until I settled on these.  No joke!!  Does anyone else do that?!

I sat them on my “to do” station in my craft area.  You might remember seeing them in this pic from my creative spot tour.

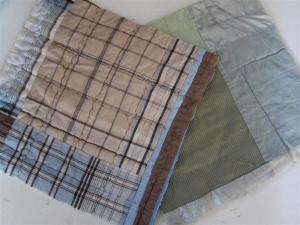
After buying the front fabrics, I realized that this project could still be a bit costly.  I decided to cut up my current quilt and another green quilt we had lying around the house to use in it!  If you have ever made  a rag quilt, you know it takes three layers of fabric to sew together before you start assembly your squares.  It takes the top/decorative fabric, the stuffing insert, and the back fabric.  By using my old quilts, I not only saved money by not having to buy two of the layers (it worked for my stuffing and back fabric)…I also only had to cut TWO layers of fabric rather than three!  This was a huge time saver considering how big my quilt would be.  We have been using just a big brown blanket on our bed while this quilt has been in process (as seen above).  So, we are really excited it is done!

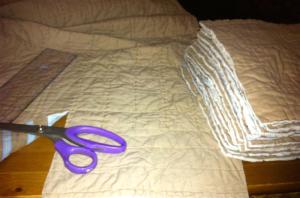
I’m going to try to share with you all how I completed this project!  I’m sorry in advance for the lengthy post, but I hope you find some of my tricks helpful!  The first step was to start cutting up my fabric and old quilts!

There were a lot of nights cutting squares in front of movies.

I finally finished cutting the old quilts and fabrics and thought that alone was a huge accomplishment!!

Next, I sewed my decorative fabric right on top of my old quilt’s decorative side.  I wanted the back/solid colors of the two old quilts to be the back side of my quilt.

I literally took one pice of my fabric and one old quilt square and laid them on top of one another.  I than sewed from corner to corner to join them together and create an “x” across the two pieces in order to make them one.  After I had done this to all my fabric, I laid them out and decided how I was going to attack it.  I got more fabric of some of my favorite pieces than others, so I didn’t have equal amounts of squares to creat a pattern.  I decided to try to do as random as I could.

I made little piles of 10 squares and started sewing those strips together.  I did my best to pick different fabrics to be beside each other in the different strips.  At times I would lay the strips I had completed down to see if I needed to sew a “purple type material” in the middle of or at the end of a strip.  I didn’t want to finish my quilt and all the purple or all the red to by at the end of the rows, if that makes sense.

Once I finished all my strips, I started laying them out one at a time to see which strip looked good next to it.  I tried to prevent two of the same fabrics being directly above/below one another.  You might be able to tell I did a LOT of counting.

I kept sewing the strips together.  I picked up a cute little helper at times during this process.  Sidenote: I LOVE my computerized Brother sewing machine if you all are looking to buy one!!  It was my first computerized machine ever and it’s so much quieter!  I have gotten to where I don’t even use the pedal that came with my machine!  I simply use the gray button to start and stop sewing, as seen in this picture…

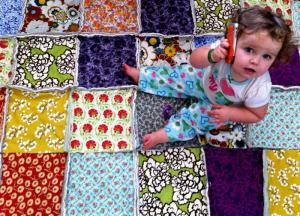
My sweet girl LOVED sitting on the quilt as I laid it out to see which strip should go next.  It is quite colorful and fun.  She was drawn to it, as I am drawn to her!  I can’t help but pull out my camera when she is around!  I think she was talking on an old phone to one of her BFFs in this pic :).

Since I’m using my old quilts, the back looks kind of funky.  It’s a mix of the two back fabrics, but I like it.  No one sees the back!  It just adds some character and story to this new quilt!

In the process of creating this quilt, we bought a new bed.  So my queen size rag quilt…had to also get upgraded to a king size rag quilt.  Luckily, I had not finished the quilt and had enough fabric squares left over to make some more strips.  I just kept adding!

It got quite heavy to keep laying the quilt out and then picking it up to sew on another strip!  Haha plus many a times I would have to stop sewing in the middle of a strip to do something like change a diaper :).

I finally got all my strips sewn together, and I laid it out on my bed to check the size.

I loved it, but I decided to edge it differently than I did Caleb’s.  I gathered all my beautiful scraps (that I couldn’t bear to throw away).

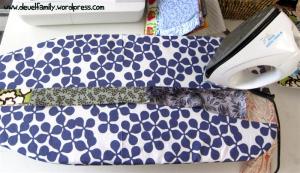
I sewed them together in one really long strip, and than ironed it in half.  This created a flap to lay the edge of my quilt in.

I sewed my edging strips onto the quilt.  In this pic you can see one “downside” of reusing a quilt as your stuffing and backing.  It will show your stuffing in the “rag” look of the quilt.  I am ok with it, but I just wanted to warn you all!

After I edged it, I wanted it to look more “finished”, so I went back and added another row of stitching to the edging.  It was more for decorative purposes than anything else.

Our old quilt was a normal queen size quilt.  It wasn’t a perfect square.  After changing the sheets, we never could easily tell which way the quilt went back on so it fit like we liked it.  I added a special touch to the corner that should be up by my husband’s head to make that process easier!

This little heart helps us easily know which way the quilt lies on our bed.  I love that when you are making something, you can keep personalizing it all the way to completion!!

I love the final product, and I am so proud of it!!  I hope it inspires all you none sewing crafters to maybe want to start sewing!  You can do it!!  Up next on my “to do” list is to make shams and pillows with other scraps I have left over.  I also want to make a ruffled bed skirt.  I’m also counting on my talented husband to make us a headboard.  🙂 I will post a picture when I have it all finished, so keep checking back!

I am totally guessing on all my numbers here, but I am going to give you my best estimate of my quilt’s “facts” incase you want to try to make your own.

Materials:

  • Two queen size quilts (for stuffing material and back material)
  • My squares are 11″x11″
  • My quilt is 10 squares down and 11 squares across in its rows
  • About 15 yards of fabric.  I think that’s about what I cut up.  I got a yard of each fabric except my two favorites ( I got two yards of each of those)
  • Although I bought 15 yards, I have lots of scraps!  I edged with my scraps and I have enough to make the front of shams and probably some creative “scrap pillows”, so you could probably get away with maybe 13 yards?
  • My edging is 3″ by whatever length.  They aren’t the same length all the way around.  The important part is the three inches, so the width is the same folded around your quilt’s edge.  When they were folded in half and ironed to form a flap, that flap was 1.5″ wide.
  • LOTS of thread

I hope this information is helpful for you to start your own quilt!!  If you make a rag quilt, I would LOVE to see a picture!  Thanks so much for checking in on this weeks featured craft project!

Next week’s featured craft is one (or maybe two!)  item(s) I made for a wedding shower we are hosting tomorrow!

I linked this project up to these fun parties…Flamingo Toes, Jennifer Rizzo,  Transformation Thursday, One Creative Mommy, and show me what ya got

Share this:

  • Click to email a link to a friend (Opens in new window)
  • Click to share on Facebook (Opens in new window)
  • Click to share on Twitter (Opens in new window)
  • Click to share on Pinterest (Opens in new window)
  • Email
  • Facebook
  • Instagram
  • Pinterest
  • YouTube
YouTube-Channel
Erica Deuel

Subscribe for Weekly Updates!


Most Popular Posts

DIY {easy} Burlap Wreath
Painting Flower Pot Party Tips
Cheap lamp to Industrial Beauty
Wood Slice Valentine Art
Chiffon Flower Tutorial
Repurpose Old Kitchen Chairs
Engraved Wood Sign Tutorial (and Dremel Micro)
DIY Paper Butterflies- Spring decor for cheap
DIY Valentines Heart Wreath
DIY Bookends (what you can make for being a hoarder)

Categories

  • All About the Kids
  • art journal
  • Blogging
  • Christmas
  • Craft Projects
  • Dancing Zebras
  • DIY
  • Eddy's postcards
  • Embroidery Journal
  • Family
  • Featured
  • Foster Care
  • Giveaways
  • Guest Posts
  • Home
  • Homeschooling
  • Kid Activities
  • Kid Craft
  • My Heart
  • Our Outings
  • Project Spotlight
  • Send Out Love
  • Shop
  • Sponsored Posts
  • Spoonful Lab
  • Spoonful Tribe
  • Tips + Tricks
  • Traveling
  • Uncategorized
  • Vlog

Favorite Categories

Subscribe for Weekly Updates!

Favorite Categories

© 2023 Spoonful of Imagination, Inc.