 Do you ever have natural instincts towards something, but you can’t always fully explain it until you keep learning in towards it!? Whew. That’s a bit confusing. Let me explain.
I have always loved helping people to create. I let my kids paint before they could really talk. I always viewed it as a sensory, exploratory time in letting their imaginations go. Now, that we started and run an art studio in our town it has had me lean further into my philosophy of how we run our classes and workshops. I believe in the benefits of the process. This little phrase “process art” describes a lot of what I have always acted on, but now I can explain it.
There are so many good things that happen in the art process. Kids get to explore, experiment, discover, take risks, problem solve and so much more! While all these things are happening, kids can be developing self-confidence as they make decisions and see what happens. They get to create without worrying about it being right or wrong.
I love all of it.
One day I looked at my bedroom window and realized my husband had pinned up some shirts over the window to be able to have a blackout curtain to take a nap. Well, that’s a no go! I realized we needed a curtain. I didn’t just want any curtain. I wanted a fun, colorful one. These can be expensive. In my attempt to be thrifty and reuse what we already had, I rummaged through our linen closet and found a curtain that we used in our foster care bedroom at our last house…over three years ago. It was time that thing got put to use again.
I combined my love of color + creating + process art and came up with a fun, abstract painted curtain for my bedroom. Here’s how we did it.
 I love color, so I gathered my usual color scheme. I used leftover latex paint from when we painted our studio. We had a great selection of samples and colors that we had used to paint the studio’s walls. To use what I had and save money I chose to not use fabric paint. Please note: this did make my curtain more crisp and stiff.
My goal was to just make something better than a shirt being pinned up to my window. There were little expectations because I knew anything would be better than that. I laid out our old gray curtain on an old rug, poured the paint into small cups that my little artists could easily hold and move around, gave my kids paint shirts and let them have at it. My instructions were simply this, “Ok, two rules! Cover up the gray and have fun. Go!”


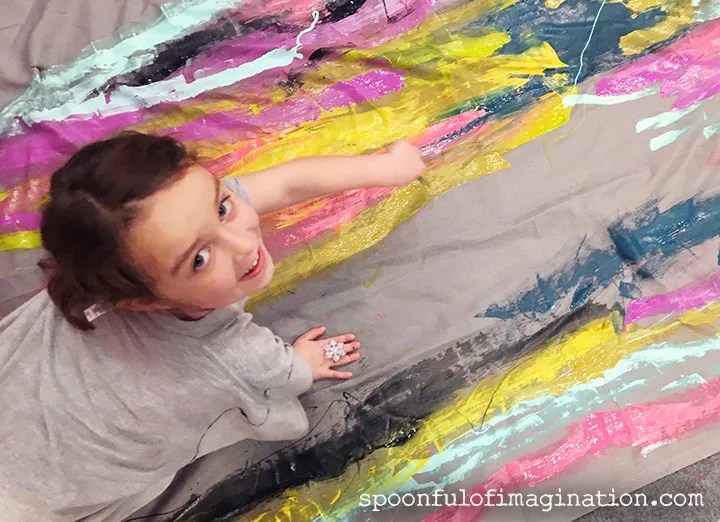

 Oh man. There were so many smiles, laughs and brainstorms as they created side by side. As they filled in the gray…
They decided they wanted to paint all the way to the edge.
They wanted to spread out the different colors.
They wanted to all work on it.
They stepped on it.
They never really stood back and analyzed it.
They just kept going.
We instantly loved it. It was so fun to stand back and just enjoy their process as they created. Sure there was the moment, where I had to scurry to wipe up the floor a bit when they walked off of their masterpiece in painted socks, but it was worth it. My kids created a piece, I couldn’t buy and it was an experience we couldn’t replicate if I hadn’t just given them the supplies and stepped back.
But, I wanted in on the fun too. I drizzled a few colors on top to make it a bit messier, and it was complete!


 The hardest part of this whole project was waiting for it to dry. We might have driven back over to the studio (where we painted it) to pick it up a few hours latter…only to realize it wasn’t dry yet. We ended up letting it dry overnight and then brought our masterpiece home. My girl tried to claim it as a blanket. Haha! It would not be a very good blanket since the material was thin and now also stiff. It was the perfect curtain though.
 I hung it in my room. My husband no longer needs to pin a shirt up to our window. Success! I love how the colors on the curtain add a fun pop of color to my gray walls and light colored bed quilt, yet it combines with my headboard perfectly!
 What do you think? Do you enjoy the art process too? Would you ever try a large scale abstract process art project like this!? If you don’t want to do it or it feels intimidating, don’t do it…kids will gladly step in and make it happen for you! 😉
If the curtain is a little out of your comfort zone or style, no problem. Here are a few of my favorite kid projects that can really encourage process art:
Painting a ceramic piece (with tips on how to paint with young ones)
I hope you’re having a good week! If you try any of our projects, tag me on social media with #spoonfulproject.

 This room just makes me happy.
 Shortly, before we moved to Indiana, I repainted an old dresser to give my J a
  Shortly after we moved into our new house, and started settling in, I remembered my drawers. I dug them out of the garage and gave them a fresh coat of paint. I thought if I added a few little wheels they would make awesome under the bed storage for my boys’ bedroom. This was about 18 months ago…about the time we got our pup. Who is now a full-grown German Shepard mix.
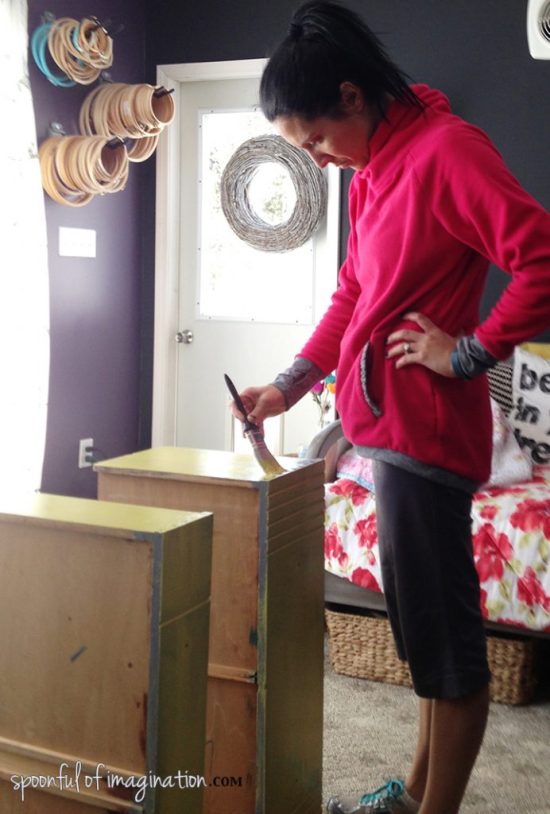

 I ended up paper mache-ing some wrapping paper to the bottom of the drawer and adding new handles, but that’s where the project came to a stall.


 He’s a genius. He placed the shelves right above the screws from the handles so no one would get scraped reaching for something off the shelf. This was a quick project but needed some thought and calculation. He used my Ryobi Nail Brad and whipped this up much quicker than I expected.
 He cut two 14 inch long 1×2’s and attached them to the wall. These provided a sturdy hanging option for the drawer while providing a little bit of space off of the wall. He was able to sink one screw from each of the support boards into a stud in the wall. Since the drawer wasn’t wide enough to span across to studs, he used drywall anchors to attached the other screws.
 Once the supports were in place, I helped him hold the drawer up to the wall. He used the brad nailer to quickly attach the drawer to the supports. Then, he went back and added a few screws for more support.
 Once my drawer was hung, I painted the shelves the same teal as the flowers on the wall for an extra punch of color. I then styled the shelves, replaced my lamp on its new sturdy base, and my nightstand was complete!


 I love how this nightstand is narrow. It doesn’t take up a lot of space between the two beds, which allows for maximum floor space. Yet, it allows for a little lamp to be placed. This is our foster bedroom/guest room, so it is not currently in use. But now we are ready. Guests can place their phone to be charged or a bottle of water right beside their bed at night. I love it.


 Color can move us. It is a reason why it is so hard to pick paint colors for rooms. We want to pick a color that inspires us and creates a certain mood. Rainbows contain so many colors and they all fuze together to be beautiful. It is my Reagan’s favorite color. She might occasionally say purple or pink, but if there is a rainbow option…she picks it. It might be a popsicle. It might be a shirt. It might even be a pair of shoes.
 While the rainbows were drying I broke out my ribbon stash. I wanted these rainbows to kind of have a wind chime or dream catcher feel, so what better way than to add some more textures to them!?
 As well as having pieces of ribbon cut for their rainbows, they were also making ninja masks. It was quite fun to watch them enjoy and be inspired.
 Once they all had a good pile of cut ribbons, I had them line them up in the order they wanted. I then hot glued them in place while also adding a little loop at the top so they can easily be hung.
 They turned out so cute! The kids were so excited about them.
 We hung the boys’ rainbows where we do school, but my little Reagan wanted hers to hang right above her bed! I now ask her every morning if she had rainbow dreams.
 This was such a fun little craft. I love seeing their art around our home!