Spoonful of Imagination

Add it to a Family for Something Beautiful

  • Home
  • Our Family
    • Our Home
  • Courses
  • Shop
  • Contact

Finidng Inspiration & Using It

June 28, 2013 By Erica Deuel Leave a Comment

turn an old door into an art piece

What is inspiring you these days? Are there certain aspects of life and art that are sticking out to you? When I think of things that are inspiring me, I think of things that excite me, give me energy, and keep me dreaming and creating. A few things that are sticking out to me are…

  • Nature: trees, fields, animals…anything outside!
  • Worn or old stuff that most would consider junk or trash
  • repurposing an item for a unusual use of that item
  • Textile combinations: loving the mix of metal with wood or fabrics
  • Signs: i can’t stop making them
  • Inspirational Phrases: can’t stop putting them on embroidered hoop art pieces
  • Color: bright and colorful always catches my eye
  • Wood stain pieces: love the mix of wood and natural elements with my color fascination

When I step back and realize what is inspiring me, I totally see its role in my art and creations. My latest art has all these influential inspiration areas in it. I took an old cabinet door and turned it into functional wall art. This door was able to keep the cost of painting a big piece of art cheaper by re-purposing the cabinet door as a canvas. It has color, stain, and knobs of different textiles mixed with inspirational phrases all centered around a fun illustration of a cow. I love it.

I started by spray painting the old door a fun teal background. I then sketched the head of a cow on top and painted it in.

drawing a cow

colorful cow paintingSince I am loving the worn and rough look, I sanded my painted cow down. While I did this I also sanded the outer edge of my door to get rid of some of the spray paint and make the edges smoother. I then stained the whole piece with my favorite stain.

vintage farm sign

painted cow

I liked my piece so far, but it didn’t seem finished. I started doodling all over it. I don’t think I would ever had the urge to do so if it wasn’t for my new shower curtain that I just adore. Once that was done, I added some fun knobs of all different colors and textures (just trying to keep more of a circle shape in mind) at the bottom. I love that those knobs made this fun, inspirational piece also multi functional as it can also hang stuff.

doodle art

farm house decor
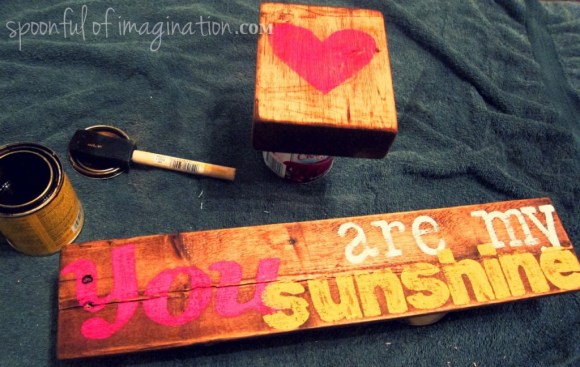
We visited my sister last week in Arkansas. She lives in a cute farmhouse with horses, chickens, loud roosters, kittens, a dog, and milking calves to boot (oh and a cowboy husband and adorable little girl). You might have seen some of the pictures from our time on Instagram. I have a bunch of gorgeous pics coming to share more about our time in the country.  I took this sign as a gift for her. It fit her farmhouse and color scheme perfectly and she loved it. The real gift was being able to give it to someone I love, who loved it.

shine bright art

What is inspiring you? Does your list resemble mine at all? I encourage you to make a list of what is inspiring you. The more we are aware of what excites us, the easier it is to make decisions and choices that build back into us. Thank you so much for checking in! I hope you all have a wonderful weekend!


signature


Share this:

  • Click to email a link to a friend (Opens in new window)
  • Click to share on Facebook (Opens in new window)
  • Click to share on Twitter (Opens in new window)
  • Click to share on Pinterest (Opens in new window)

Disney Bedroom Inspiration

April 19, 2013 By Erica Deuel 9 Comments

Disclaimer: Compensation and products for review were provided by Glidden via MomTrends. The opinions expressed herein are those of the author and are not indicative of the opinions of Glidden.

One week from today we will be closing on our current house. Two days later we will be closing on our new house, and I am ecstatic to get there and start making this new house our home.

Today, I am excited to share with you some of what I have been working on and the plans I have for Reagan’s room. If you missed the first post of this series, click over to learn more about paint that captures the magic and inspiration of Disney with before shots of Reagan’s new room.

I knew I wanted to give Reagan a Minnie Mouse themed room. She is obsessed, and it is one of the cutest things. She was giddy when she opened up her Minnie Mouse comforter. Thank you Disney!

minnie mouse with beddding

Seeing her joy pumped me up even more to make this room so fun for her. It has been so exciting and also frustrating designing and planning a room that I am not currently in (to be able to figure out what would look the best). One thing that has helped me a ton is browsing DisneyPaint.com. I have used the virtual room painter to preview my paint colors and even watched how to videos.

How to paint videos

I didn’t know that the Great Slate paint only had to be painted with two coats until I watched this awesome short video! I highly recommend watching the how-to videos. While you are on DisneyPaint.com I recommend browsing the room ideas. There are several different room layouts per a character that I know can inspire you. They even set you up with a printable paint plan that can include your paint colors, finishes, templates you used, other supplies you’ll need, plus step-by-step instructions on how to use it all!

minnie mouse room

minnie mouse room ideas

After all this browsing and reading about paint, I just couldn’t wait until we moved into our new house to try out my Disney Paint. I busted them open and created this beautiful dresser makeover with two stunning Disney Paint colors.

before and after pictures of painted dresser

I started with an old dresser that was my great grandma’s. It had a rough coat of a basic gray on it from a few years ago that was dull and boring. I thought, what better way to save a special piece of heritage than to give it a makeover with my new paint!?

I started with painting it Disney Paint’s Pluto’s Paws. How amazing of a color name is that?!

yellow dresserI have painted a lot and I was amazed with how easy this paint went on and how thick of a coat it created! I fell in love with it immediately. After Pluto’s Paws dried, I broke out my new favorite color, Cool Marine.

disney paint It is a beautiful soft teal. I am going to paint most of Reagan’s room in this color. I adore it! Because of the small reading nook I showed in Reagan’s room, she has the possibilities of seven walls to paint. All of them will be this color except for one wall of bold stripes with the Fashionista color, and one wall trying out Disney’s specialty finish Great Slate to give her a chalkboard like wall.

painting a two tone dresser

thick coat painting I was really amazed with how easy the Cool Marine covered Pluto’s Paws. One coat of paint could have been enough to cover the dresser like I wanted on this piece, but I have never painted just one coat on a piece of furniture. It is a great paint. I loved it so much, I ended up painting the back of my dresser just to be able to keep painting with it. I love it.

teal dresser makeover

Once Cool Marine dried, I got to try out the idea I had in my head! I loved the two colors (Pluto’s Paws and Cool Marine). I was hoping to get both to show up on this piece. I lightly sanded the Cool Marine on the legs and edges and Pluto’s Paws slowly started to show through!

sanding a dresser

the difference in sanding

disney painted dresser

I love the way it came out! I can see both beautiful colors! It is going to look so good in Reagan’s room! I was so excited with my paint and seeing Reagan’s room coming together in my mind, I went ahead and created some fun accessories with the Fashionista paint color as well.

minnie mouse room decorI painted over a huge paper mache “R” and created the Minnie Mouse silhouette (that I will show you soon how to make step-by-step). After I added some fun knobs to the dresser, it was done!

vintage dresser

disney paint at wal-mart makeover

I am so excited about Reagan’s room. It will have a fun magical vibe. We bought Minnie Mouse hooks to hold her curtains up. Reagan wanted to take the box of them to bed the other day for her nap. She is so excited. We have gotten her a Minnie Mouse doll as a welcome to her new room present. I also have huge ideas with lights and lots of fun fabrics that I can’t wait to show you more of once I pull it off!

Thank you for checking in on Part 2 of Reagan’s room makeover with Disney Paint! I will be back in just over two weeks with the FULL room reveal and showing you what a few of her friends thought when they come see if for a little “room reveal” party.

signature

Disclaimer: Compensation and products for review were provided by Glidden via MomTrends. The opinions expressed herein are those of the author and are not indicative of the opinions of Glidden.

Share this:

  • Click to email a link to a friend (Opens in new window)
  • Click to share on Facebook (Opens in new window)
  • Click to share on Twitter (Opens in new window)
  • Click to share on Pinterest (Opens in new window)

Recycled Old Dresser Makeover

April 12, 2013 By Erica Deuel 67 Comments

vintage recycled dresser

“One man’s trash is another man’s treasure” is exactly the phrase I attach to this fun piece of furniture. I found this pretty wood dresser in my neighbor’s trash. No joke. I wish I had a picture of the sign because it said “take me home” and that is just what I did.

old dresser before

old dresser project

This is a real wood piece. I loved the shape and size immediately, but it needed some loving. The bottom two drawers were broken. I stared it for several weeks trying to decided what I wanted to do with it. I debated colors and if I wanted to fix the drawers or just turn those slots into shelves. I liked the idea of the piece have space to hide a little bit of stuff, so I left one drawer. I kept picturing the other slots holding pretty craft supplies and baskets, so I am glad I took a chance and turned them into shelves. I love what I came up with! I am going to show you exactly what I did step by step, in case you have an old piece that needs some tender loving care as well.

The first thing to do is to give your piece a good sanding and brush off all the saw dust.

sanding a dresserNext, paint the dresser. It was really hard for me to leave the top wood. I knew if I could fight the urge to paint it, I would love the result. And I do. I love the contrast of the dark stain with the teal paint. As for my paint, I didn’t worry about priming or using a paint and primer in one paint. I knew I was going to re-sand the piece, so my paint job didn’t have to be thick or perfect.

painting a dresser

If you are a messy crafter like me, there might be sections of paint on part of the piece where you didn’t want paint.  Simply sand that area again.

touch up sand job

Staining is the next step. You see the piece really come together and the dramatic change. I stained my whole piece. I did the top, all the teal paint, and even the inside of where my shelves would be.

staining woodThere were areas I went back and did a second coat of stain, but the stain color you use will determine a lot of how your piece looks. The stain I used here is called Early American and its a nice deep brown. It’s not too dark nor does it have any shades of red.

Here is where I recruited my awesome husband. Saws scare me. I will use them, but I love it when I don’t have to. Matt cut some 1/8″ panel boards and attached them with wood glue for me. Isn’t he amazing!?!

making a dresser shelf

After the wood glue dried, I stained those boards as well. Note: Be careful with the wood glue! If you get it on your board, it wont stain over that area as well, as you can see below in my picture.

staining dresser shelves

Once the stain is dry, your piece is almost done! I switched out my knobs for some vintage, deep yellow wood ones from Hobby Lobby. I bought them months ago because I loved them, and I have been saving them for a project like this one. It was a perfect match! I love how my piece turned out.

old dresser after

I don’t know where it will end up in our new house, but I am excited about it. Isn’t it funny that you can pick an item out and not know where it will go, but if you love it…you will always find a use or way to incorporate it into your home? That is this piece to me. I hope the teal works somewhere :). It could go in our craft room, the dinning room,  in our foster kids’ room, or maybe even behind a couch? I’m not sure yet, but I will keep you posted on what we do with it.

before and after of old dresserCan you believe this piece that is full of life and fun used to be that old brown dresser? It is crazy what a little paint and time can do. Now I will leave you with some eye candy. Since I can’t stage my shelves for me yet, I staged them up for you to get an idea of how a piece like this can be used. I hope you are inspired!

vintage dresser

recycled dresser

vintage dresser makeover

vintage furniture

Thank you so much for checking in today on one of my favorite furniture makeovers I have ever done! It is Friday, and I hope you all have a wonderful weekend!

signature

Share this:

  • Click to email a link to a friend (Opens in new window)
  • Click to share on Facebook (Opens in new window)
  • Click to share on Twitter (Opens in new window)
  • Click to share on Pinterest (Opens in new window)

You are my Sunshine Wood Sign

February 11, 2013 By Erica Deuel 9 Comments

girl vintage wood signs

Last week, I showed you some pictures of a baby shower/girl’s night that I threw with DIY on the Cheap.  Since that post, I have gotten several comments and questions about the two little vintage wood signs displayed on the food table.

I made those as shower decorations, but they also acted as part of Dana’s shower present.  Today, I thought I would show you how you can make them, so you can make them too.  They were such a cheap way to add a unique touch to our decor and personal touch to her gift.

I started by finding two scrap pieces of wood and giving them each a good sanding.  I then printed off the words I wanted in fun fonts at sizes I thought that would fit best.

DIY You are my Sunshine Sign

The heart block was easy.  I just painted a simple heart on it.  The “you are my sunshine” was a little harder.  I cut out the letters of “you” and “sunshine” and traced the letters on to my sign.  It was a way of making my own stencil.  Once I had them in pencil on my piece of wood, I painted them in, and eye-balled the “are my” font and tried to copy it the best I could in paint on my sign as well.

My spacing did not come out perfectly, but I think the quirkiness of the design (and over lap of words) adds to its unique charm.

painting a wood sign

I then gave the wording a good sanding to take away the “raised paint” (as you can see above in the word “sunshine”) and create a more vintage look.

Sanding a wood sign

I then stained the two pieces.  Please read my DIY Stick Heart Wall Art post for more details on how to stain.

staining wood sign

DIY wood sign

baby girl vintage shower decor

I think they came out so cute.  I almost wanted to keep them.  They looked so cute on the food table, and I know Dana was excited about getting them!

baby shower food table

The beauty of this sign technique is you could personalize it with any quote, word, or shape you want!  I think it would be really cute for name signs in a bedroom too.  I hope you will try this technique, and please let me know if you have any questions!

I hope you had a wonderful weekend!  Things have gotten crazy busy since my Falling into a Hole post around here.  I want to thank you again for all the out pour of love and encouragement to my post on where I am at emotionally.  I’m working on an update post, and I hope to get that to you all this week.  Thank you for walking this life with me!

signature

Share this:

  • Click to email a link to a friend (Opens in new window)
  • Click to share on Facebook (Opens in new window)
  • Click to share on Twitter (Opens in new window)
  • Click to share on Pinterest (Opens in new window)
Next Page »
  • Email
  • Facebook
  • Instagram
  • Pinterest
  • YouTube
YouTube-Channel
Erica Deuel

Subscribe for Weekly Updates!


Most Popular Posts

Wood Slice Valentine Art
DIY {easy} Burlap Wreath
DIY Outdoor Checker Board
The Encanto, Madrigal's House Craft For Kids
Painting Flower Pot Party Tips
DIY Bookends (what you can make for being a hoarder)
Chiffon Flower Tutorial
Engraved Wood Sign Tutorial (and Dremel Micro)
Cheap lamp to Industrial Beauty
Repurpose Old Kitchen Chairs

Categories

  • All About the Kids
  • art journal
  • Blogging
  • Christmas
  • Craft Projects
  • Dancing Zebras
  • DIY
  • Eddy's postcards
  • Embroidery Journal
  • Family
  • Featured
  • Foster Care
  • Giveaways
  • Guest Posts
  • Home
  • Homeschooling
  • Kid Activities
  • Kid Craft
  • My Heart
  • Our Outings
  • Project Spotlight
  • Send Out Love
  • Shop
  • Sponsored Posts
  • Spoonful Lab
  • Spoonful Tribe
  • Tips + Tricks
  • Traveling
  • Uncategorized
  • Vlog

Favorite Categories

Subscribe for Weekly Updates!

Favorite Categories

© 2023 Spoonful of Imagination, Inc.