Spoonful of Imagination

Add it to a Family for Something Beautiful

  • Home
  • Our Family
    • Our Home
  • Courses
  • Shop
  • Contact

Easy DIY Satin Flower

February 26, 2019 By Erica Deuel 2 Comments

Satin-Flower-Featured

As I mentioned in my last post, we are READY for spring around here. Sunshine. Warmth. Color. Anything to get beyond this cold grey reality. While the weather around here isn’t totally cooperating with my desires, I’ll continue to take matters into my own hands and create something to introduce a little warmth and pop of color. Take that Old Man Winter.

If you’ve been around here for a while you know that I love to make flowers out of all kinds of materials for different projects. Burlap. Felt. Chiffon. Today I want to walk you through one of my all-time favorite projects, the Easy DIY Satin Flower.

If you like to read the step by step, carry on, my friend. However, if you’d like to get your supplies and create along with me – you can do that too! Our latest YouTube video is me walking you through this tutorial step-by-step. Enjoy!

Supplies:

  • Your favorite colors of satin fabric. (An 1/8 of a yard will go a long way. The more satin flowers you want to create and the more colors you would like to incorporate, the more satin you should purchase.)
  • Sharp scissors
  • Needle and thread (thread color doesn’t matter because it won’t be seen)
  • A multi-purpose lighter
  • Fun embellishments of your choice, i.e., buttons, beads, scrapbook charms & hardware, jewels, etc.
  • Hot glue and hot glue gun
  • Once you’ve created your flower it can be used in dozens of different projects. In the YouTube video, I use mine for hair bows and headbands. You can get a variety of those from the dollar store.
  • Alligator clips (If you’d like to have a flexible way to attach your flower without permanently connecting it to a hairband.)

Tutorial:

For this tutorial, you are going to cut your satin into 6 circles. When you branch out to make your own, feel free to adjust the number of layers for your own unique look. Before starting on your circles you may want to cut the satin into manageable squares/rectangles to making cutting the circles easier.

satin-fabric

The circles do not need to be perfectly round and you’ll see why in a moment. The first circle should be the largest. You can decide how large you’d like for your flower to be but I’d recommend 3-4″ round for the first one. Now cut 5 more circles making each one a little bit smaller.

satin-circles

satin-circles2

Now being very careful, use your lighter to singe the edges of your satin circles. As the flame is applied to the satin, the heat will cause the edges to begin to curling up. The longer the heat is applied the more the satin will curl. Test it out and find the look that you prefer. This step will also help to seal the edges of the fabric and keep it from fraying in the future. The satin flower should not catch fire. If it does, you are holding the flame to the fabric too long.

burn-satin

Once all of your satin circles have been curled with the lighter, stack them largest to smallest. Get your needle and thread and go ahead and thread your needle. I like to double thread mine to make it extra strong. Give yourself about 18-24″ of thread and double knot it at the end leaving a few inches of slack past the knot.

Now sew your needle through the bottom of your satin flower petals all the way through to the top of the smallest one. Because you are going through 6 layers of satin you may want to use a table or hard surface to help push your needle through. Be careful and watch your fingers! Don’t ask me how I know!? 😉 Pull your thread through so that the knot presses against the bottom of the satin petals. Now sew back through the top down to the bottom. Repeat this step 5 to 6 times to make sure that your satin flower petals are securely fastened. Finish by sewing through the bottom. Take the remaining thread and the slack from your first knot and tie them together with another double knot. Your flower is now secure you can cut off the slack, being careful not to cut through the knots.
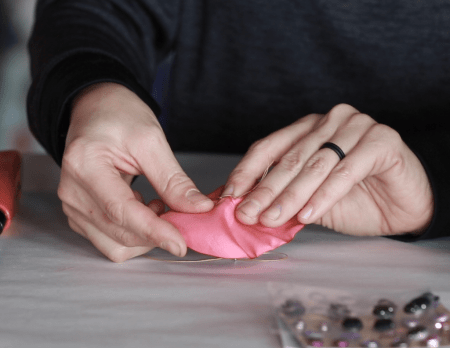
sew-satin

sew-satin2

Pick out a fun embellishment for the center of your flower. Sew or hot glue it to the center of your flower depending on what you choose.
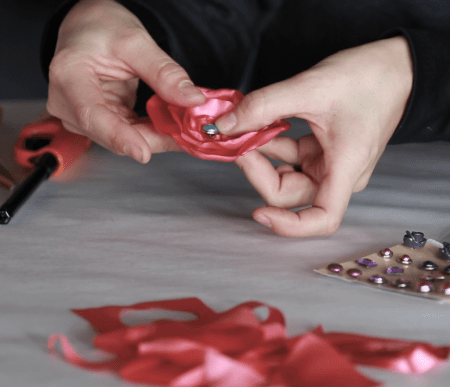
embellishment

At this point, your satin flower is done. Now the question is, what are you going to do with it?
The possibilities are endless. Make several and sew them to a pillow. Hot glue it to a frame or table display. Sew or clip it to a handbag. Or you can do like I did and incorporate it into a hair bow.

satin-flowers

If you are going to use it in a hair bow for a little one and you’d like to add some flexibility and longevity to your flower, I’d recommend hot gluing one of the alligator clips to the back. That way the flower can be attached to the perfect newborn headband for those itty-bitty newborns… but as they grow, it can be moved to a bigger hairband to grow with them!

alligator-clip

alligator-clips2

reagan-satin-flower

You can do this! This project is easy, fun, and a GREAT way to give an inexpensive but super special gift for a variety of occasions. Share your projects on social media using the #spoonfulofimagination hashtag so that we can be inspired by your creations. Keep checking out our YouTube Channel for new videos and projects. We’d appreciate it a ton if you’d subscribe and share with your followers. Have a great week that hopefully filled with lots of warmth and color!


Share this:

  • Click to email a link to a friend (Opens in new window)
  • Click to share on Facebook (Opens in new window)
  • Click to share on Twitter (Opens in new window)
  • Click to share on Pinterest (Opens in new window)

DIY Plank Wall

October 1, 2013 By Erica Deuel 13 Comments

DIY Planked Wall

I am not a professional decorator in the slightest bit. Walking in a store and trying to pick out items for a specific room and putting them all together stresses me out. What about you!? However, I do love to craft, so that takes over in my decor. I usually start with a project that begins to give the room character and I just keep adding (and sometimes subtract) until it feels done.

I have one goal when I work on a room – I try to make it my favorite space in the house. I want to walk in every one of my rooms in our house and be able to think to myself “this is my favorite room.” If that is the case, then I feel my house will be warm and welcoming all over.

Currently, the room in makeover mode has been our foster care bedroom. I showed you the dresser I made over, and today I want to show you how we planked a wall. I wanted a fun accent wall, yet did not want to do another chalkboard wall like we did in Reagan’s room and our boys’ bedroom. While at the Haven Conference this past summer I got to experience a hands on workshop for planking a wall. I also met some kind people representing PureBond Plywood and learned a lot about their product. My mind was made up, a plank wall was exactly what this bedroom needed.

PureBond_Pledge

So, Matt and I took the PureBond Pledge and couldn’t be happier about it. This wood is unlike any plywood we have ever used before. PureBond hardwood plywood is a unique real wood product. It is environmentally friendly, formaldehyde free,  and made right here in America. Matt was skeptical going into this project because he hates plywood, but we finished up this project planning our next PureBond project. Here’s a quick video on the project.

If you’d like more details and tips, you’ll find those after the video!

So if you are ready to give PureBond a try, go to The Home Depot and look for their signs around the finished lumber and paneling area. Be careful, there are other plywoods stacked around the PureBond products. We had the wrong wood on our cart at first, and once we found the right stuff, we could literally feel the difference in the wood. The best way to make sure you have PureBond wood is to look for their name stamped onto the edge of the wood.

buying_purebond_wood

For our wall, we bought four 4′ x 8′ boards that were 1/4″ thick. We had the guys at The Home Depot cut them in half so we could fit them in our mini van to get home. We decided to create 6″ planks so the next step was to measure our boards in 6″ strips and cut them on our Ryobi table saw.

measuring_wood_to_cut cutting_plywood

After our boards were cut, we used a stud finder to locate the studs behind the drywall, and we snapped a chalk line where they were located. Since we were attaching the planks to the wall using 1 1/2″ finish nails, we wanted to nail directly into the studs as much as possible. With the studs chalked and a big stack of 6″ planks waiting, we were ready to start our wall.

preparing_to_plank_a_wall

We did not want our wall to have a uniformed pattern where every board and seam matched from wall-to-wall. We hammered one row of boards across the bottom of our wall. We then staggered boards up to create a stair step look.  This created unique spacing for each row of boards as they were attached.

planked_wallGoing into it, it seemed like creating a plank wall was just nailing boards up onto a wall. It sounded easy. Once we got into it we realized it was like a huge puzzle that we were attaching to our wall. I would not say it was hard, but took a little more thought than we initially gave it from the start. We came up with three tips to help you create this wall with a little more ease.

1. Use a quarter to help space your boards. Instead of having the boards literally rest on top of each other, place a quarter in-between the boards as you hammer the top one in place. This will create a little space to help give your wall a uniformed depth and allow for some forgiveness when it comes to leveling the boards. As we found, it’s hard to perfectly cut dozens of 6″ strips. Combo the quarters with a level (next tip) to help keep the wall pretty square.

planking_wall_tip

2. Use a level on every board to get as level as possible. Again with varying cuts you will need to work with your pieces to try and keep it level and square.  (by the way, The Home Depot guys were willing to cut the strips but encouraged us to do it at home. They said that while their cuts are usually within 1/4″ of being correct their saws are rarely squared-up. At home most of our cuts ranged between right-on to 1/8″ off, with a handful of cuts that drifted 1/4″) When we had a board with a slight angle, we’d add the quarter to one end, and use a level to bring the other end up or down ever so slightly to keep the whole puzzle straight. BIGGEST THING to realize, once everything is pieced together and you back up from the wall you will not be able to see your 1/8″-1/4″ blemishes.

use_a_level

3.  Label the wall and measured board when installing your end peices. We were working with 4ft planks on a 12 1/2ft wall. Depending on your planks, wall size and pattern you will most likely need to custom cut boards to fit the end of your rows. Having our saw downstairs in the shop meant measuring the boards, taking them downstairs to cut, and then bringing them back up and trying to find the right placement for each custom cut board. We saved some time and energy on figuring out where all the cut “puzzle pieces” go by writing a number on the wall with a corresponding number on the back of the measured board. So when we got back upstairs ready to nail the planks in place, it was as simple as matching up the numbers.

adult_puzzle

We love how the wall came out. The beautiful grain on the boards add so much character and charm to the room. Originally we were going to cover the boards with a light coat of paint and stain to give it the rustic look we love so much. However, the natural wood is stunning, so right now we are leaning towards finishing it with a natural stain or satin polyurethane to seal the wall and protect it from the little artists around here.

planking_wall_tutorial

The crazy thing is, after all this I can say I accomplished my goal. I still have a number of things to hang on the wall and few accent pieces to go – but this room is currently my favorite room in the house! Seriously. I love it. The warmth of the daylight coming in on the natural wood has a peacefulness to it that makes me want to go in there and just hang out. I begin these projects stressed out and doubting myself. I’m learning though. If I can just find a spoonful of imagination to get it started and get me in my groove, the rest usually comes together pretty well.

Do you love to decorate or like me, is intimidating to get started? What’s your favorite space in your house and why?

If are in Atlanta and you’d like to hang out with me and some other ladies looking to craft together, make sure to check out my next SpoonfulLab. Thanks for stopping by! Have a great week.

signature

Share this:

  • Click to email a link to a friend (Opens in new window)
  • Click to share on Facebook (Opens in new window)
  • Click to share on Twitter (Opens in new window)
  • Click to share on Pinterest (Opens in new window)

Old Home Tour

February 23, 2013 By Erica Deuel 10 Comments

We laughed with our realtor yesterday about the use of the term “house” versus “home.”  There is a difference between the two words.  One seems matter of fact and the other is personal.  Since we began this house attack process, our living residence was a “house” in most of my frame work.  I had a list of to-dos and I just kept at them.  This week, the list of to-dos got less and less until we were done.  Now that I am not in task mode and breathing (and able to sit once again), I am getting sad about leaving this place that we call home.

Our Home


We changed this old 1952 house from Matt’s bachelor pad to a place where we started our marriage and our family.  So many memories exist here.  Although I am excited for this next phase of life, it will be sad to close a huge chapter here.

Yesterday, I showed you a quick DIY Initial I made to complete one of my staged shelves.  Today, I want to give you the full tour of our house.  Almost the way potential buyers see it…a full video walk thru.  I will be updating our Home Tab at the top with more pictures soon, but I want to get them organized and edited properly first.  Until then, please come see our house!  Welcome in!


If you made it through the whole video, you saw we have two huge beds for these rascals.

My dogs

I don’t talk much about our pups, but they are fun (and trouble) and nervous wrecks right now with all the moving and changes that have been going on.  You also saw in the video I couldn’t take down all my boys’ art in their bedroom.  I took down LOTS of pictures for staging, but I just couldn’t take down all their art.  The video goes from our house to our apartment out back that I have mentioned we rent out to my brother and sister in law.  Tony is the wood worker that I always refer to, hence the big pile of wood at the foot of their bed.  The last thing you see is Matt’s office that Tony and our friend Zach helped create.  Its one of my favorite places on this property.

Well, there you have it!  That is our home!  I will be back soon with lots of pictures and some DIY of items you saw featured.

signature

Share this:

  • Click to email a link to a friend (Opens in new window)
  • Click to share on Facebook (Opens in new window)
  • Click to share on Twitter (Opens in new window)
  • Click to share on Pinterest (Opens in new window)

Our First Vlog

November 8, 2012 By Erica Deuel 11 Comments

Today, I am so excited to share with you my first ever vlog.  To be completely honest, I LOVED the idea of this video and interview, but I felt quite awkward with a microphone clipped to my shirt.  I’m so not good at being the one in FRONT of the camera, so special thanks to my amazing husband for his skills with this piece!!

Please take a look at my interview with two of the inspirations behind a lot of what I do.  Simply click on the video to watch, and afterwards scroll below to find out the winner of today’s burlap table runner.

As you can see, they are pretty cute.  I love their little hearts.  Thank you for checking in to see our first vlog.  I hoped you enjoyed it!  We hope to do those quite often.

Now, today’s giveaway winner (of one of these beautiful table runners) is Sally Peter!  Congratulations Sally!  I will be in touch!

If you haven’t entered the giveaway yet, wait for the Ralfocopter widget to load, and do enter.  This is the last chance to enter the giveaway for tomorrow’s grand prize!

a Rafflecopter giveaway

I leave you with a few “behind the scenes stills” of our vlog experience…

The boys were pumped about their microphones.
This was a wee bit intimidating.

Share this:

  • Click to email a link to a friend (Opens in new window)
  • Click to share on Facebook (Opens in new window)
  • Click to share on Twitter (Opens in new window)
  • Click to share on Pinterest (Opens in new window)
  • Email
  • Facebook
  • Instagram
  • Pinterest
  • YouTube
YouTube-Channel
Erica Deuel

Subscribe for Weekly Updates!


Most Popular Posts

Painting Flower Pot Party Tips
DIY {easy} Burlap Wreath
DIY Outdoor Checker Board
Repurpose Old Kitchen Chairs
Spray Paint Ikea Furniture
School Desk Makeover
Cheap lamp to Industrial Beauty
Why Writing Greeting Cards Still Matters
Easiest Sewn Apron Ever
DIY Feather Wreath

Categories

  • All About the Kids
  • art journal
  • Blogging
  • Christmas
  • Craft Projects
  • Dancing Zebras
  • DIY
  • Eddy's postcards
  • Embroidery Journal
  • Family
  • Featured
  • Fireside Chat
  • Foster Care
  • Giveaways
  • Guest Posts
  • Home
  • Homeschooling
  • Kid Activities
  • Kid Craft
  • My Heart
  • Our Outings
  • Project Spotlight
  • Send Out Love
  • Shop
  • Sponsored Posts
  • Spoonful Lab
  • Spoonful Tribe
  • Tips + Tricks
  • Traveling
  • Uncategorized
  • Vlog

Favorite Categories

Subscribe for Weekly Updates!

Favorite Categories

© 2023 Spoonful of Imagination, Inc.