Spoonful of Imagination

Add it to a Family for Something Beautiful

  • Home
  • Our Family
    • Our Home
  • Courses
  • Shop
  • Contact

DIY Valentines Heart Wreath

February 10, 2019 By Erica Deuel Leave a Comment

It’s the week of hearts.

It’s no secret that we aren’t big Valentines Day people. I believe so much more in sharing that you love all year long in simple, kind, thoughtful ways. BUT, I do love a good heart craft, and with kids it is hard to completely ignore the holiday.

Since I can’t fully ignore it, I just try to keep it cheap and quick. Thanks to cardboard, that is possible!! (What would we do without cardboard around here!?!?! It fuels a lot of creativity.)

You too can make a fun cardboard wreath to use as decor or stay tuned to the bottom of this post to see how it could be a fun, class, collaborative project.

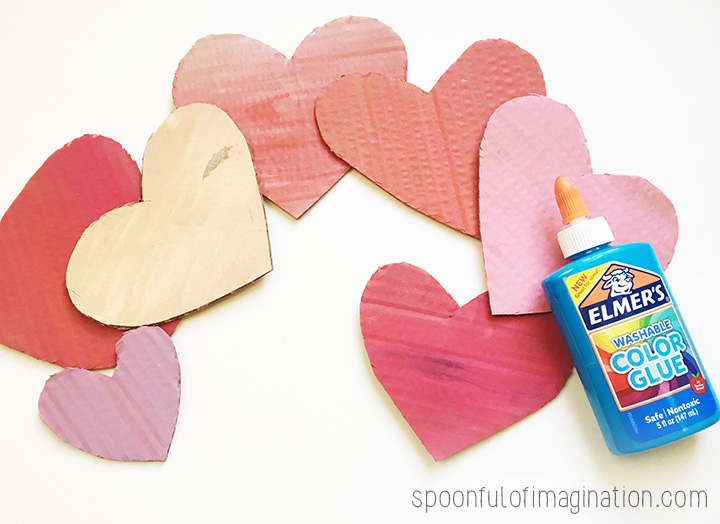
I started with a bunch of cardboard boxes. I cut off the box flaps and use those pieces to then cut into heart shapes.

I tried to keep two sizes. One slightly larger than the other, but I didn’t not trace the heart to make them all exactly the same. I just eyeballed it to keep it close.

Next, I painted the hearts. I picked colors that went with the Valentine’s theme. You could tweak this step to personalize these hearts and their colors to being pinks for a baby shower or maybe blues & pinks for a gender reveal party!

After I painted my hearts and they were completely dry, I used Elmers glue to attach them to one another. I used blue Elmers Glue, only because it was the first glue I found. Any school glue or hot glue would work!

I played around with laying the hearts in a circle, overlapping one another. I tried to split the pinks and reds from being right next to each other. I then added a little glue to the back of the hearts for where they would overlap another heart and press it into place for a few seconds.

You can probably tell by the pictures I created a base with the bigger hearts and then the smaller ones on top. It helps create a thicker, 3d shape and gives it some depth.

It was so quick! It gives my house a little Valentine’s pop without spending money on decorations.

After I made my wreath, I thought this could be such a fun quick class party craft.

Have every child color, paint their own heart. Maybe they just do solid colors and then add their name in a sharpie? Or maybe they write a way they can show love to their classmates? Or maybe they write something they love about their teacher? There’s so many ways you could take this project. It could then be displayed on the classes door or in the room for the rest of the month.

We all need reminders to love one another well, right!? Have fun! If you do this project, I’d love to see it! Share with #spoonfulofimagination on social media so we can cheer one another along in our crafty journeys!

Share this:

  • Click to email a link to a friend (Opens in new window)
  • Click to share on Facebook (Opens in new window)
  • Click to share on Twitter (Opens in new window)
  • Click to share on Pinterest (Opens in new window)

Easy (non-candy) Kid Valentines

January 27, 2016 By Erica Deuel 1 Comment

easy_DIY_kid_valentineAre you still eating Christmas candy around your house?

It’s easy to get sugar overload at the holidays. I happen to love candy, so I gotta be careful or I’ll eat so many sours that my mouth hurts and I get canker sores. Whoa. Not responsible, right?

I am careful with my kids though. My trainer sister helps keep me in check too. When I thought through what kind of Valentines I could make to send my nieces way, I knew they had to be non-candy. Lucky me, they have the crazy crafting gene as well and love all things creative. I thought these little notepads would be a fun option, and maybe they will entertain all the kids for my sis for a little bit.

DIY_valentineYou can really use any kind of little notepad you want. I have a few from Ikea and then others from Walmart. The light colored notepads allowed me to color the kids’ names right on top. The darker pads I used scrap paper and tape to write the kids’ names on.

There are so many options here. You could paint the kids names, use stickers, or even glitter glue.

non_candy_valentine

easy_valentine_tutorial

candy_less_valentinesTo add even a little more fun, you could write a special message on the inside cover of the notepad to that child. I added little Valentine pencils to mine.

non_candy_kid_valentineThis Valentine can be given just like that or add a little bag of candy, flower, or stuffed animal to it. I definitely snacked on candy hearts as I crafted these up.

easy_kid_valentinesDo you know a creative kid that would enjoy his or her own mini journal to doodle in? Try making these Valentines. You really can’t mess them up. Send them in for the class Valentine’s party. I’m sure the teachers and other parents would love a change from candy too.

DIY_kid_valentineIf you like this Valentine you might like my Birds of a Feather Valentine or I’m Your Biggest Fan Valentine I made my kids a few years back.

signature

Share this:

  • Click to email a link to a friend (Opens in new window)
  • Click to share on Facebook (Opens in new window)
  • Click to share on Twitter (Opens in new window)
  • Click to share on Pinterest (Opens in new window)

I Am Your Biggest Fan {Valentines}

February 12, 2014 By Erica Deuel 1 Comment

valentines_for_kidsDo you exchange valentines with your kids? We do. I love helping them make valentines for their friends, but I get really excited to see what they make each other.

You might remember the Birds of A Feather valentines I made for my kids last year. This year I made these little paper fans to say that “I am their biggest fan.”

As parents we should be our kids biggest advocate, supporter, fan, right!? On Valentines, we will have a fun dinner and all place our valentines on one another’s place setting. Because Matt and I are fancy like that and agreed years ago not to celebrate Valentines Day with a big dinner date.

I bet you have most of these supplies already around your house. I used some left over Christmas wrapping paper, scrapbook paper, glue, scissors, and a few popsicle sticks.

valentine_supplies
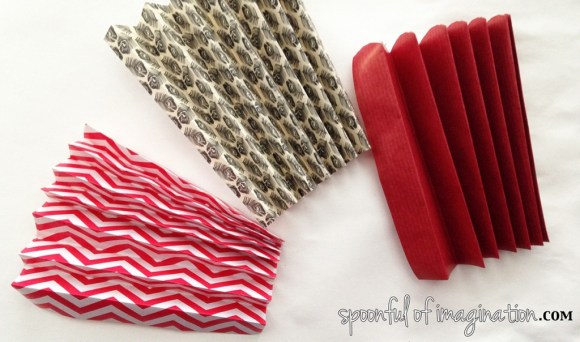
I made a little accordion fan with just plain white paper to test the length of paper I needed to make the size fan I wanted. After I cut my paper to size, I folded them into accordion fans.

paper_fan

scalup_edge

Paper_fan_tutorialI then glued popsicle sticks on the inside flaps of my fans to give them a little weight and stability.

Paper_fans_tutorial

kid_valentinesNext, I placed drops of glue in the folds at one end of the fan and used a clothes pin to hold the folds in place while the glue dried. This allowed for my fan to always look like a fan, even when it’s not being used.

acordian_paper_fan

creating_paper_fanWhile the glue was drying, I printed out a little message and used my 2″ hole puncher to cut them out. The final step was using some string to attach my cards to the fan.

They were so simple, yet I know my young kids will love them. You can embellish them as much as you want! I think ribbon glued around to give them more of a handle would be pretty cute too!

im_your_biggest_fan

DIY_valentines_for_kidsDo you celebrate Valentine’s Day or keep it simple, and more kid centered too!?

We are having crazy ice/snow storms where we live. I hope you are staying warm and safe! Thanks so much for stopping in!

signature

Share this:

  • Click to email a link to a friend (Opens in new window)
  • Click to share on Facebook (Opens in new window)
  • Click to share on Twitter (Opens in new window)
  • Click to share on Pinterest (Opens in new window)

DIY Stick Heart Wall Art

January 18, 2013 By Erica Deuel 10 Comments

heart stick art

I had this idea last week while playing with my kids at a local playground.  As I chased my kids on the playground, I kept seeing these smooth short sticks and wondering what I could do with them.  I came up with this DIY Stick Heart Wall Art.

It really wasn’t hard.  It has several different steps, but don’t worry, I am going to show you how to do it!

First off, my parents gave me some tongue and groove bead board they had left over from completing their porch ceiling.  I knew it would come in handy for something!  I had enough boards to cut them in half (about 20″ long) and make two square pieces that I am going to refer to as my wood canvases.

crafting with bead board

If you have used tongue and groove boards, you know they fit together like a puzzle piece.  In order to have them stay together more permanently, we used wood glue and scrap wood strips to create a permanent bond.

Do this by cutting some small scrap pieces of wood just a little shorter than the length of your wood canvas.  To be like mine, use wood glue to attach to these scrap pieces to the “shiny” side of the tongue and groove boards.  I wanted the rougher  side to use for my project, but you can do it which ever way you like best.  I really liked how the grooves are much more narrow on the rough side of the boards.

Simply put a strip of wood glue along each scrap piece of wood and use clamps to keep them pressed tightly together.  We used four pieces of scrap wood per my wood canvases.  Three across the center to secure the boards, and one strip of scrap across the top to serve as an easy wall hanger.  (See picture further down)

Once our boards were clamped and the glue was drying, we let them sit that way for over 24 hours before we messed with them.

wood glue process

After the wood glue was good and dry, we released the clamps and sanded the edges of the square wood canvases so they were ready to be painted.   

I painted my two wood canvases (one pink and one teal) and let them dry.  Once they were dry, I gave them each another good sanding to add the vintage effect that I love so much.  Depending on how aged/vintage you want your canvas to appear, there’s no need to make sure your paint job is thick and even, because that will make the sanding job harder.

1painted wood

IMG_5329

I went ahead and painted the back of my piece as well. I had enough paint and because this piece sticks out from the wall a little bit I wanted to make sure all the visible sides and edges would appear finished.

Once they were sanded, I was ready to stain.  I hate staining.  My brother is a wood worker and does it by profession right now, and I don’t know how he does it everyday! I love the results of staining, but the process drives me crazy.

wood stain

First, you have to cover your canvas with a pretty heavy coat of stain.  I have found that a sponge brush does the best job of retaining the stain for an even, heavy coat. Note:  Because I used beadboard the small indentions in my canvas were hard to make sure the stain got fully down in the grooves.  I pressed my brush down and let the “excess” stain run into the groove.

how to stain wood

The longer you leave the stain on, the darker your results should be (depending also on the base paint color you choose).  I let my stain sit on until the whole board was covered with stain. Probably a little over 5 minutes. Using an old t-shirt or rag go back to the area you stained first and start wiping the stain off.

how to stain

All that is not a big deal and is quick and easy.  Here is the step that makes me hate staining.  One wipe of the stain is not enough. You have to keep wiping until there is no more stain “seeping” up and leaving ring marks.

staining

This process can take a while.  Once I wipe and think it is done, I come back ten minutes later and there is more seepage.  It probably took about a dozen wipes to fully catch all the extra stain, so it didn’t leave rings or spots on my piece.  This piece had more wipe downs than most projects because of the grooved wood that had excess stain collected in it.  It’s more annoying than hard, especially if you are like me and struggle with patience!  Once the seepage stopped, I let my wood canvases sit for about 24 hours just to let everything completely dry.

stained wood

If you are wondering if this staining step is worth it, look at the difference in these two pictures.

why stain wood

stained painted wood

To me the depth and beauty is worth it, and that my friends is why I do that annoying step.  I love the deep darker tone it adds to a piece.  Staining makes a piece look more finished or professional.  It is more timeless in my opinion.

Next, it was time to start assembling the stick heart. I plugged in my hot glue gun and started laying out my sticks in what looked like a heart on my wood canvas.

making a heart of sticks

After I had what seemed like a good size heart, I used my ruler to center the first stick in the middle of my canvas.  I also used it to measure the open teal space between the first stick and the edge of the wood.  It measured to be three inches.

perspective

I wanted my heart to be centered, so I made sure the top had a three-inch margin as well.

measuring

The next step was to start gluing the sticks down.  On each stick, I put a strip of hot glue and then pressed the stick down for a few seconds to allow it to set on the wood.

hot glue project

hot glueing sticks

This step was kind of tricky because the sticks are not perfectly round.  The bumps and different widths mattered. Do the best you can to put the glue on the side you think will sit the most flushed against the beadboard.

Once your heart is created, stand back and take a look.  My heart seemed to have lots of holes and be a little distorted.  I decided I would go back and add more sticks into the cracks and openings to create a more filled in, sold heart.

refining process

I really like the more solid look of the heart, but I ran out of sticks.  It has been raining like crazy here in the ATL.  You might have seen on twitter that I was going to gather more sticks yesterday.  They were still drenched last night.  So, I am currently drying sticks out on a towel in my house.

wet sticks

Once the sticks are done drying, I will go back and add even more to my heart.

finshing touches to a project

I think this piece will end up in my daughter’s room at some point, but for now it is hanging out in my living room.  I love it and the simple heart is such a huge symbol of love, and that is what we want our family to be all about.

heart wall art

I love the contrast between the grooves in the wood being perpendicular to the way I layed my sticks.  I love all the texture and the difference in the stark teal paint color with the natural wood sticks.  What do you think?  Can you see yourself making this Stick Heart Wall Art?

Thank you so much for stopping by today!  Have a great weekend!

signature


P.S. Are you wondering about my pink version?  It is not done, but I am going to finish it and it will be for sale in the coming weeks.  You might remember I had a little art show at Roux on Canton last year.  They are too kind and have asked me to come back and do another sale.  I will be giving more details soon.  If you are in the ATL area, Roux is a really fun place to eat and maybe my craft sale will put you over the edge to stop by.  🙂

Linked up at Nest of Posies

Share this:

  • Click to email a link to a friend (Opens in new window)
  • Click to share on Facebook (Opens in new window)
  • Click to share on Twitter (Opens in new window)
  • Click to share on Pinterest (Opens in new window)
Next Page »
  • Email
  • Facebook
  • Instagram
  • Pinterest
  • YouTube
YouTube-Channel
Erica Deuel

Subscribe for Weekly Updates!


Most Popular Posts

Painting Flower Pot Party Tips
DIY {easy} Burlap Wreath
Cheap lamp to Industrial Beauty
Engraved Wood Sign Tutorial (and Dremel Micro)
Repurpose Old Kitchen Chairs
The Encanto, Madrigal's House Craft For Kids
DIY Outdoor Checker Board
DIY Bookends (what you can make for being a hoarder)
The Way I Thrift
Chiffon Flower Tutorial

Categories

  • All About the Kids
  • art journal
  • Blogging
  • Christmas
  • Craft Projects
  • Dancing Zebras
  • DIY
  • Eddy's postcards
  • Embroidery Journal
  • Family
  • Featured
  • Foster Care
  • Giveaways
  • Guest Posts
  • Home
  • Homeschooling
  • Kid Activities
  • Kid Craft
  • My Heart
  • Our Outings
  • Project Spotlight
  • Send Out Love
  • Shop
  • Sponsored Posts
  • Spoonful Lab
  • Spoonful Tribe
  • Tips + Tricks
  • Traveling
  • Uncategorized
  • Vlog

Favorite Categories

Subscribe for Weekly Updates!

Favorite Categories

© 2023 Spoonful of Imagination, Inc.