I have one goal when I work on a room – I try to make it my favorite space in the house. I want to walk in every one of my rooms in our house and be able to think to myself “this is my favorite room.” If that is the case, then I feel my house will be warm and welcoming all over.
Currently, the room in makeover mode has been our foster care bedroom. I showed you the dresser I made over, and today I want to show you how we planked a wall. I wanted a fun accent wall, yet did not want to do another chalkboard wall like we did in Reagan’s room and our boys’ bedroom. While at the Haven Conference this past summer I got to experience a hands on workshop for planking a wall. I also met some kind people representing PureBond Plywood and learned a lot about their product. My mind was made up, a plank wall was exactly what this bedroom needed.
So, Matt and I took the PureBond Pledge and couldn’t be happier about it. This wood is unlike any plywood we have ever used before. PureBond hardwood plywood is a unique real wood product. It is environmentally friendly, formaldehyde free, and made right here in America. Matt was skeptical going into this project because he hates plywood, but we finished up this project planning our next PureBond project. Here’s a quick video on the project.
If you’d like more details and tips, you’ll find those after the video!
So if you are ready to give PureBond a try, go to The Home Depot and look for their signs around the finished lumber and paneling area. Be careful, there are other plywoods stacked around the PureBond products. We had the wrong wood on our cart at first, and once we found the right stuff, we could literally feel the difference in the wood. The best way to make sure you have PureBond wood is to look for their name stamped onto the edge of the wood.
For our wall, we bought four 4′ x 8′ boards that were 1/4″ thick. We had the guys at The Home Depot cut them in half so we could fit them in our mini van to get home. We decided to create 6″ planks so the next step was to measure our boards in 6″ strips and cut them on our Ryobi table saw.
After our boards were cut, we used a stud finder to locate the studs behind the drywall, and we snapped a chalk line where they were located. Since we were attaching the planks to the wall using 1 1/2″ finish nails, we wanted to nail directly into the studs as much as possible. With the studs chalked and a big stack of 6″ planks waiting, we were ready to start our wall.
We did not want our wall to have a uniformed pattern where every board and seam matched from wall-to-wall. We hammered one row of boards across the bottom of our wall. We then staggered boards up to create a stair step look. This created unique spacing for each row of boards as they were attached.
 Going into it, it seemed like creating a plank wall was just nailing boards up onto a wall. It sounded easy. Once we got into it we realized it was like a huge puzzle that we were attaching to our wall. I would not say it was hard, but took a little more thought than we initially gave it from the start. We came up with three tips to help you create this wall with a little more ease.
1. Use a quarter to help space your boards. Instead of having the boards literally rest on top of each other, place a quarter in-between the boards as you hammer the top one in place. This will create a little space to help give your wall a uniformed depth and allow for some forgiveness when it comes to leveling the boards. As we found, it’s hard to perfectly cut dozens of 6″ strips. Combo the quarters with a level (next tip) to help keep the wall pretty square.
2. Use a level on every board to get as level as possible. Again with varying cuts you will need to work with your pieces to try and keep it level and square. (by the way, The Home Depot guys were willing to cut the strips but encouraged us to do it at home. They said that while their cuts are usually within 1/4″ of being correct their saws are rarely squared-up. At home most of our cuts ranged between right-on to 1/8″ off, with a handful of cuts that drifted 1/4″) When we had a board with a slight angle, we’d add the quarter to one end, and use a level to bring the other end up or down ever so slightly to keep the whole puzzle straight. BIGGEST THING to realize, once everything is pieced together and you back up from the wall you will not be able to see your 1/8″-1/4″ blemishes.
3. Label the wall and measured board when installing your end peices. We were working with 4ft planks on a 12 1/2ft wall. Depending on your planks, wall size and pattern you will most likely need to custom cut boards to fit the end of your rows. Having our saw downstairs in the shop meant measuring the boards, taking them downstairs to cut, and then bringing them back up and trying to find the right placement for each custom cut board. We saved some time and energy on figuring out where all the cut “puzzle pieces” go by writing a number on the wall with a corresponding number on the back of the measured board. So when we got back upstairs ready to nail the planks in place, it was as simple as matching up the numbers.
We love how the wall came out. The beautiful grain on the boards add so much character and charm to the room. Originally we were going to cover the boards with a light coat of paint and stain to give it the rustic look we love so much. However, the natural wood is stunning, so right now we are leaning towards finishing it with a natural stain or satin polyurethane to seal the wall and protect it from the little artists around here.
The crazy thing is, after all this I can say I accomplished my goal. I still have a number of things to hang on the wall and few accent pieces to go – but this room is currently my favorite room in the house! Seriously. I love it. The warmth of the daylight coming in on the natural wood has a peacefulness to it that makes me want to go in there and just hang out. I begin these projects stressed out and doubting myself. I’m learning though. If I can just find a spoonful of imagination to get it started and get me in my groove, the rest usually comes together pretty well.
Do you love to decorate or like me, is intimidating to get started? What’s your favorite space in your house and why?
If are in Atlanta and you’d like to hang out with me and some other ladies looking to craft together, make sure to check out my next SpoonfulLab. Thanks for stopping by! Have a great week.


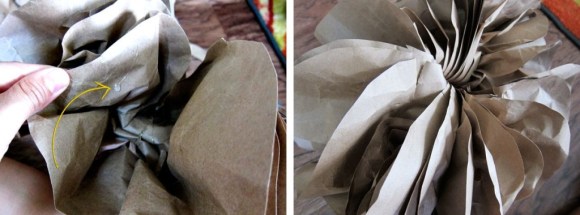
 Slowly, I started to pull the different pieces of paper out away from one another. This is a step that forces you to be some what patient. The moving paper is so thick that if I pulled to quickly the paper would rip.
 Once the paper pumpkin is fluffed, I glued the two end pieces (on either side) of the paper fan together to make the pumpkin hold shaped. I didn’t want it to separate back into a fan type shape, but I wanted it to hold the circle/pumpkin shape.
 Our kids were really excited about seeing the pumpkins coming out, and they wanted to help in this project. I let them help fluff the pumpkin and to find a good stick
 Once I had a good stick for a pumpkin stem, I glued the stick and a small piece of felt (that I cut to look like a leaf) into the center of my pumpkin. My paper pumpkin was than complete!


