Spoonful of Imagination

Add it to a Family for Something Beautiful

  • Home
  • Our Family
    • Our Home
  • Courses
  • Shop
  • Contact

Turkey Table Runner

November 15, 2017 By Erica Deuel Leave a Comment

Turkey Table Runner CraftThis table runner is one of my most sentimental mom projects we’ve done to date. Those little hands grow so quickly, and having something that captures all the stages is pretty special. Let me tell you how to make your own turkey table runner keepsake.

Once upon a time, I shared this Thanksgiving playdate we had with friends. Over the years, I’ve had numerous messages and emails asking questions about how I did it. I’m pretty sure that original post was two computers ago, and I can’t find the original pictures. I hope this tutorial post helps YOU be able to create your own tradition with your kids.

Start your project by getting a basic, plain table runner. You can buy these anywhere. Mine is from Ikea. It doesn’t even have to be new. Mine had stains, and I’ll show you how that’s ok.

Turkey Table Runner CraftStart by painting your kid’s hands. I use a foam brush because it absorbs the paint quickly and gets it on pretty evenly. My kids are a bit older this time around, so they were able to paint their own hands. Mamas of littles, just have your baby wipes ready to start grabbing and cleaning their hands after you get their hand painted and stamped onto your table runner. Turkey Table Runner CraftTurkey Table Runner CraftPart of the fun of using an old table runner is you can place your handprints right on top of the stain to cover it up. Once your hand is painted and stamped onto your table runner, press on each finger to make sure the paint transferred to the runner well.

Turkey Table Runner Craft

turkey table runnerSome ideas for your turkeys:

  • You can add a new turkey every year to the table runner. With this idea, you will see how their hands (ahem…turkeys get larger every year)
  • You can color code each child their own color or you could have them choose their favorite color that year to use for their turkey. This is fun because you can see their interests as well.

turkey table runnerOnce your handprints are down, you can embellish your print to look like a turkey. Use any colors or design that you like! I painted my kid’s turkeys this time, but your kids might have fun adding onto their handprint by themselves. This is the season of smears and some imperfections. It’s part of the beauty. ENJOY it! They will be grown before we know it.

turkey table runnerturkey table runnerAfter your turkeys are complete, you can have your child write their name beside their turkey. Make sure you date your group of turkeys. If you add on to your table runner the following year, you can clearly see the changes in years. (At the end of this turkey craft, you can see my table runner with 2011 and 2012 handprints). I will be going back and adding the year to this table runner.

turkey table runnerWhat do you think!? Can you see yourself making a table runner keepsake!? I recommend spot cleaning these. If you want to be extra protective, maybe you display it on a buffet or somewhere away from the primary food table.

Let me know, if you have any more questions and I will try to clear those up!

Share this:

  • Click to email a link to a friend (Opens in new window)
  • Click to share on Facebook (Opens in new window)
  • Click to share on Twitter (Opens in new window)
  • Click to share on Pinterest (Opens in new window)

Stick Turkey (Thanksgiving Decoration from your back yard)

November 8, 2013 By Erica Deuel 2 Comments

thanksgiving_table_decorCan you believe Thanksgiving is just a few weeks away!?

I cannot.

Christmas is on my mind. I have been crafting for it and preparing my Handmade Christmas party (that you are invited too!), but I don’t want to skip Thanksgiving in the process. Fall is one of my favorite times of year. I love the changing colors and the special time it is to reflect on all we have to be thankful for.

I made this simple, rustic stick turkey as an easy decorative element to add to my Thanksgiving decor. It cost me less than $3.00 (since I had all the supplies but the wood egg) and was so easy! If you would like to make one too, here are the supplies you will need:

Materials:

  • Wood sticks
  • Wood Egg
  • Hot glue gun with glue sticks
  • Rust-oleum Paprika Spray paint
  • Felt scrap (for beak)
  • Two beads (for eyes)
  • Feathers (add for decorative)

stick_craftsI started by spray painting my wood egg a really pretty fall color with Rust-oleum’s Paprika. After it was dry, I lightly sanded it to give the wood egg a little beat up more rustic charming look.

Fall_spraypaintI then searched through my sticks to find a good round one that would work as the head. I liked the stick I found because it was flat at one end to hot glue tightly on to the egg. I placed a little hot glue  to the back of the stick and stuck it in place about two-thirds down the egg. I held it in place while the glue set and then hot glued a small thin stick on either side of it to create a fuller round turkey head.

wood_turkey

wood_turkey_craft

The next part was to turn the egg around and start on the tail. I put a strand of hot glue down the middle of the egg and stuck one of my taller sticks on it. I used that stick as the middle stick and started placing sticks (going smaller in size) down on either side of it. Note: Make sure to not glue the sticks too far down towards the base of the egg that would prevent the turkey from sitting upright.

hot_glue_sticks

wood_thanksgiving_craft

wood_craft_turkey

DIY_thanksgiving_decorOnce you have a wide tail that you like, it is complete! I used 11 sticks to create the width tail I liked. Depending on your size stick and wood egg you might want more or less.

Next, I used a small felt scrap and two beads to embellish my turkey’s face. I just used a little hot glue to hold them in place. I decided to add a few feathers to my tail to make it a more obvious turkey. You, of course, don’t have to do this and can keep the tail more rustic by just using the sticks. Once all of these elements were on, my stick turkey was finished! I added him to my table’s centerpiece and love how he sits all proud and happy on it!

turkey decorI think the natural wood elements in the turkey look so good with the pine cones and real fall leaves we gathered on a hike this week. You add in my hand print table runner, burlap strips make shift table-cloth, and Happy Thanksgiving banner, and we have a really simple pretty fall display. I love it.

thanksgiving_centerpiece

Happy_thanksgiving_bannerWhat about you? Do you love Thanksgiving too or is Christmas already on your mind?

Is it possible to decorate for BOTH holidays at the same time. I need tips since we are having a Thanks-mas (Thanksgiving + Christmas celebration) at my house with my whole family. So, please tell me how you do this month’s decor!

Happy Friday! I hope you all have a great weekend!

signature

Share this:

  • Click to email a link to a friend (Opens in new window)
  • Click to share on Facebook (Opens in new window)
  • Click to share on Twitter (Opens in new window)
  • Click to share on Pinterest (Opens in new window)

Feast with Friends

November 21, 2012 By Erica Deuel 19 Comments

Last week we enjoyed doing a lot of fun Thanksgiving activities as part of our school days.  We did fun crafts, continued to talk about things we were thankful for, and even had a Thanksgiving Day feast with friends.

We have continued to do our thankful tree, and it’s been such a joy to capture their little hearts as they share what they are thankful for.

Our tree has really filled out, and Reagan loves to stare at it and rearrange the Give Thanks blocks under it.

You already saw one of our crafts we did this week, when I showed you our Thanksgiving banner, with the kids’ cute little turkeys.  I am obsessed with hand prints and wanting to capture all the cute “little-ness” of this time in paint.

We updated our Thanksgiving table runner with new turkeys.

We also did another cute turkey paint activity.  This one involved only their finger prints.

It was so fun to have my niece, Charleigh, in town to do this craft with us.  I used the kids’ fingerprints to stamp out the turkey’s feathers.  The kids were so excited to run off and play together, that I got to finish the turkeys on my own. 🙂  I glued some little wiggly eyes and painted on a beak and legs.  I then cut out the turkeys and added some fun stickers with them to a piece of paper.  I love to have framed “seasonal” art in my kitchen during each holiday.  It is almost time to make our Santa Clauses!

I think the highlight of our thanksgiving school activities was having a feast with our sweet friends that we do a co-op with.

We read a thanksgiving book, talked about things we were thankful for, learned what a “cornucopia” is, played bingo on thanksgiving images with candy corn, and made sweet little indian headdresses.

We talked about symbols and how Indians used pictures to tell stories.  Each child drew symbols on their headdress to represent themselves.  Both my boys might have drawn the transformer symbol on their headdress.

No one wanted to be a pilgrim, so we had a table full of little Indians at our feast.  It was not the perfect example of the first thanksgiving feast, as two groups of friends came together, but we had a blast!

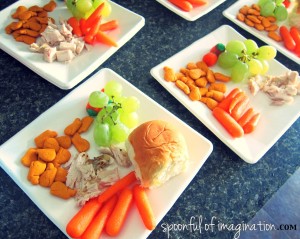
We came up with a meal that seemed like traditional food.  A rotisserie chicken was our turkey.  They ate a lot of fish at the first thanksgiving, so we had some gold-fish.  We threw in the pumpkins as a fall food, and the carrots as a crop they would have grown.  The grapes were just an added touch because let’s face it…they are a good kid food.

I love that in the midst of having six young kids together, this feast was loud and fun (probably how MOST Thanksgiving meals are) and even entertained some “superheros” at our table.  We are so thankful for these sweet friends to do life with!

I’m pretty sure Caleb was already running around as a superhero, when I went to take the individual shots.  Life with boys on the move!  🙂

We have enjoyed fall break this week and have done NO school.  I hope you are having a wonderful week and Happy Thanksgiving!!

I linked this project up at: DIY Showoff


Share this:

  • Click to email a link to a friend (Opens in new window)
  • Click to share on Facebook (Opens in new window)
  • Click to share on Twitter (Opens in new window)
  • Click to share on Pinterest (Opens in new window)

Happy Thanksgiving Banner

November 17, 2012 By Erica Deuel 3 Comments

Yesterday, I whipped up a quick Happy Thanksgiving banner.  I wanted to share it with you all, so you too could make one!  I started by printing two letters per a piece of paper.  I simply picked a font I liked and picked a size that allowed two letters to print per a page.

I cut each letter out by cutting a triangle shape around it.  I didn’t measure or worry about each triangle being the same.  I think the difference and variety adds character!

I have been holding onto our old bed skirt from when we upgraded our bed to a king and got new bedding.  It is a dark corduroy skirt, so the use of it on my Thanksgiving banner was perfect!  It adds a fun fall touch.  I simply cut out enough triangles (also not measured or exact), so that each letter had a corduroy triangle to go behind it.

I had some fun trim that I used to sew the letters to the corduroy triangles.  I love the gold contrasting on the creme paper and dark fabric.  After I sewed them all together, this banner was done!  It was so quick and cheap, and it will add a fun festive decor element to our thanksgiving celebration this next week!

I love how it came out, but I decided to add some turkeys we created this week in our homeschool.  The kids stamped their hands, cut out their hands, and painted eyes and legs to make their hands turkeys.  They then went back and glued feathers onto their hands to create a more artsy/realistic turkey.  They had a blast making them, and I thought they added a special touch to our banner.  I used clothes pins to attach the turkeys to our banner, so the banner can be recycled next year, and we can replace the turkeys with “new” turkeys.  These turkeys can retire to my kids’ scrapbooks.

I loved how it looked outside hanging in the trees, but we opted to hang our banner in our kitchen where we can enjoy it all week long.  Have you made a thanksgiving banner?  We are hosting Thanksgiving for the first time ever this year.  Would you rather host or go to someone’s house for the holidays?  I hope you are having a good weekend!

Share this:

  • Click to email a link to a friend (Opens in new window)
  • Click to share on Facebook (Opens in new window)
  • Click to share on Twitter (Opens in new window)
  • Click to share on Pinterest (Opens in new window)
Next Page »
  • Email
  • Facebook
  • Instagram
  • Pinterest
  • YouTube
YouTube-Channel
Erica Deuel

Subscribe for Weekly Updates!


Most Popular Posts

DIY {easy} Burlap Wreath
Painting Flower Pot Party Tips
Cheap lamp to Industrial Beauty
Engraved Wood Sign Tutorial (and Dremel Micro)
DIY Bookends (what you can make for being a hoarder)
Repurpose Old Kitchen Chairs
The Encanto, Madrigal's House Craft For Kids
DIY Yarn Picture Frame
School Desk Makeover
DIY Paper Butterflies- Spring decor for cheap

Categories

  • All About the Kids
  • art journal
  • Blogging
  • Christmas
  • Craft Projects
  • Dancing Zebras
  • DIY
  • Eddy's postcards
  • Embroidery Journal
  • Family
  • Featured
  • Fireside Chat
  • Foster Care
  • Giveaways
  • Guest Posts
  • Home
  • Homeschooling
  • Kid Activities
  • Kid Craft
  • My Heart
  • Our Outings
  • Project Spotlight
  • Send Out Love
  • Shop
  • Sponsored Posts
  • Spoonful Lab
  • Spoonful Tribe
  • Tips + Tricks
  • Traveling
  • Uncategorized
  • Vlog

Favorite Categories

Subscribe for Weekly Updates!

Favorite Categories

© 2023 Spoonful of Imagination, Inc.