 This room just makes me happy.
There is color EVERYWHERE!
I’ve never been afraid of color, but lately I am having more and more fun going bold and mixing prints and styles to create something of my own. In this room, we have handmade and store-bought. There is new and rustic. There is color and then neutrals (or a color that acts as a neutral), and somehow it all works together to create a beauty that I love.
This room’s finishing touch was actually started years ago. Let me explain.
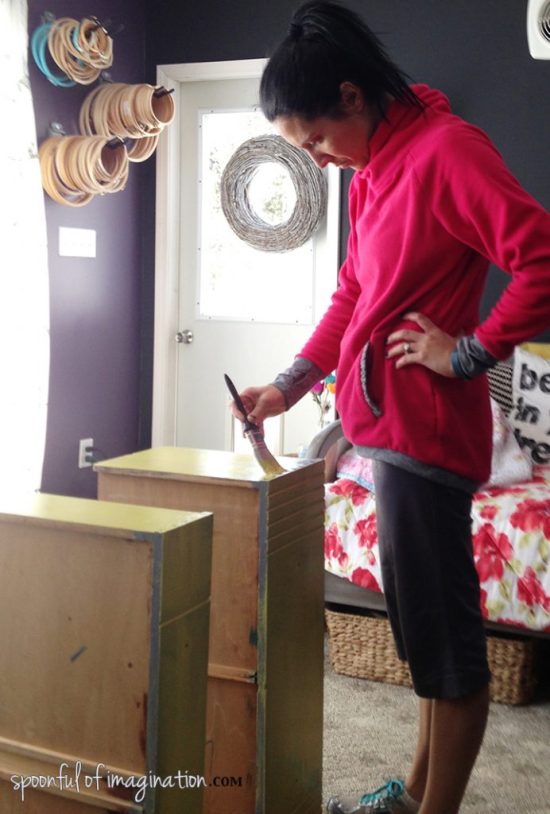
 Shortly, before we moved to Indiana, I repainted an old dresser to give my J a new dresser. As I was getting ready to throw his old busted dresser out, I just couldn’t part with the drawers. It was an old really heavy, painted too many times dresser that needed to go, but the drawers seemed like good boxes. I knew I could use them for something someday. So, as we moved to Indiana, we loaded up these empty, someday project drawers to come with us. Can we say hoarder!?
It was worth it.
 Shortly after we moved into our new house, and started settling in, I remembered my drawers. I dug them out of the garage and gave them a fresh coat of paint. I thought if I added a few little wheels they would make awesome under the bed storage for my boys’ bedroom. This was about 18 months ago…about the time we got our pup. Who is now a full-grown German Shepard mix.

 I ended up paper mache-ing some wrapping paper to the bottom of the drawer and adding new handles, but that’s where the project came to a stall.
My drawers did go under the bed, but they weren’t being used. It was more of just a new, clean place to store my someday project (rather than the garage). They sat here until a few weeks ago when a new inspiration struck. I needed a small, narrow nightstand to go between the twin beds. I wondered, “could I use one of these old drawers as a nightstand?!” I hurriedly pulled one out and placed it between the beds. The size was perfect. But since there is a vent in the same spot, the nightstand couldn’t get pushed up against the wall and be a snug fit. It fell and the lamp broke (nothing a little super glue couldn’t fix). This is where I roped in my talented husband. He added shelves to the drawer and hung it up on the wall for me. 


 He’s a genius. He placed the shelves right above the screws from the handles so no one would get scraped reaching for something off the shelf. This was a quick project but needed some thought and calculation. He used my Ryobi Nail Brad and whipped this up much quicker than I expected.

 He cut two 14 inch long 1×2’s and attached them to the wall. These provided a sturdy hanging option for the drawer while providing a little bit of space off of the wall. He was able to sink one screw from each of the support boards into a stud in the wall. Since the drawer wasn’t wide enough to span across to studs, he used drywall anchors to attached the other screws.
 Once the supports were in place, I helped him hold the drawer up to the wall. He used the brad nailer to quickly attach the drawer to the supports. Then, he went back and added a few screws for more support.
 Once my drawer was hung, I painted the shelves the same teal as the flowers on the wall for an extra punch of color. I then styled the shelves, replaced my lamp on its new sturdy base, and my nightstand was complete!


 I love how this nightstand is narrow. It doesn’t take up a lot of space between the two beds, which allows for maximum floor space. Yet, it allows for a little lamp to be placed. This is our foster bedroom/guest room, so it is not currently in use. But now we are ready. Guests can place their phone to be charged or a bottle of water right beside their bed at night. I love it.
This room has so many surprising fun elements from the wood chairs hanging on the wall all the way to the huge painted flower mural. Having a drawer converted to a nightstand just completes the look. Yes, it might have been cheaper to just find another drawer in Indiana rather than fill up more space in our moving truck from Georgia, but then I wouldn’t have as good of a story.
Have you repurposed anything recently!? I love to repurpose items. Turning our kitchen chairs into a bench is one of my favorite projects to date. I really loved this little dresser that had broken shelves that I turned into a fun piece too.
There are so many possibilities, if we use our imaginations! I’d love to chat with you about your projects! Find me on Instagram, @ericadeuel, and say hi!
Thank you so much for checking in! I will be back with a room round-up post full of links to the various projects soon!

 It is easy to fall into a birthday buying rut…especially for your husband. Do you know what I mean?

 After I had cut all the wood, we started playing with the best way to attach our side boards to the 12″ squares. Those squares were going to act as our top and bottom of the table, so in short we were building a box.


 We used my Ryobi Brad Nailer. It’s my absolute favorite tool. You may remember it from our
 After our box was complete, Jeremiah came in and sanded it down. He used a rough grit sandpaper and went to town on that thing. This boy of mine loves working with his hands. He often sands scrap wood next to me as I paint signs. He will be some kind of artist someday.
 After the box was sanded, we screwed on four little wheels we got at our local hardware store for a couple bucks. I marked a spot on the bottom of the box, and Caleb used the screwgun to get the wheels in place.

 Once our box was turned right side up and looked more like an end table, we decided it needed a little shelf in the middle to make it more practical. Caleb measured the wood and Jeremiah painted it. We used scrap wood to help give the shelf a little ridge to rest on and used the brad nailer to hold them in place.
 Here is the part Reagan was dying for. She got to paint the whole thing. She got quite messy and painted herself in large parts too by bending every which way to cover her project. She had a blast.
 Once the paint was dry, we gave it a light sanding job and then stained it.
 At times I wanted to jump in and remove a paint drip or wipe off the stain a bit better, but I refrained. I wanted it to be their piece, and it really does look more vintage-y, quirky fun for it. I just love it, and Matt did too!
 Here you can see it with his yellow chairs. It fits right in the middle of that nook to hold a coffee, but it can be wheeled out to hold a laptop for a quick meeting as well. Reagan got to paint a frame too 🙂
 This was a gift that had time and thought…and it’s practical! I don’t know how much it ended up costing since we had some of the supplies. You can use scrap wood-even for the top and bottom square pieces! Take this idea, modify it to make it your own (in size, style, etc), and have fun!
 We have been eating outside more than inside most days thanks to my amazing husband.
 The poor guy worked in what was our garage that had turned into a left over moving boxes storage unit and work shop mess.

 I jumped in when I could, but Matt did this table pretty much by himself at night after work or on the weekends. I’m so thankful for this man of mine.
 After one coat of wood conditioner, one coat of stain, and three coats of indoor/outdoor spar urethane, the table was complete! We were thrilled to start using it!
 I can’t count how many meals we’ve eaten on this table already. I will often work on something at it as well, while the kids play in the yard. It’s perfect.
 We are so thankful for our
 This is the best time of year to be outside in my book. I literally find myself wanting to take a picture every day of the clouds. You know I love fall, so I won’t gush too much. Something key to enjoying the outdoors is having a comfortable space to watch the kids, relax, sit, and just be.
 Pretty plain right? Not a mess, but definitely not inviting. We have had amazing feedback on our house. If there is a complaint it is the size of the backyard. I am hoping this little makeover helps it sell.
 I had an old bench and chair sitting in my basement gifted from a friend who knew I could do something with them. I used a beautiful color of Rustoleum spray paint and went to town on them. It took less than two cans of paint with a few light layers drying complete between each coat.
 Please forgive me for not wearing a mask, we were outside and it was quick light coats, but you should wear a mask. Let’s not even mention that I’m doing this in my PJ’s… thanks!


 I had a log that I had taken from my parents’ wood pile sitting in the garage. My initial idea was to create a little wood log end table with it, like the one I did for
  I bought a few plain boring planters, primed them, and then spray painted the bottom half hot pink. I intended to go back and paint the tops black, but I forgot about that until seeing these pictures. 🙂 Opps!
 Mums do a lot to make a space feel happy and friendly. I love the color they add as well! Next, I bought a few hanging plants on clearance at Wal-mart for $2.50 each. Matt rigged up an old yellow chain, and we hung them up from our deck. If you are wanting some fun white lights for outdoors, run to Wal-mart. I bought four boxes for $5.00 each. They are fun, white lights that can be used indoors or outdoors. I want to go back and get more. They are in the Christmas section. I’m not being paid to say this at all. What a great deal though, right!? My last set of white lights I bought for
  I found this cute kitchen rug at Wal-Mart as well. You might remember I bought a few when I made
  I’ve made a lot of wreath’s, but this cute one for $3.00 at Target got me. It was cheap, cute, and I don’t care if it gets rained on and ruined. It didn’t take me any time.
 We are loving our new area. It is so bright and cheerful. It’s a much better seat to enjoy looking out at the woods and watching my kids play.

 Of course this makeover got me thinking bigger. I’d love to put a big wall art to hang above the bench and some metal sheets to cover the under deck to make it waterproof. Hopefully though someone else will fall in love with this house (including this area) and I will be blessed to not have to keep creating at this house.
 We were pretty sad that no one at the open house fell in love with this space and gave us an offer. I know God has a plan, and we are trying to persevere until we know it. What is the craziest thing you have ever done to sell a house? Did you ever makeover a space quickly too!?
 I hope I can keep these flowers alive until the house sells. Otherwise everything else created here, can go with us to Indiana. I did this in a about 8 hours with four kids in tow. You can do so much more than you think, if you just go for it.