Spoonful of Imagination

Add it to a Family for Something Beautiful

  • Home
  • Our Family
    • Our Home
  • Courses
  • Shop
  • Contact

A Paint Project For All Ages: Painting Sticks

January 16, 2018 By Erica Deuel

A Paint Project For All Ages: Painting SticksIs it cold where you are? Its been in the negative degrees and snowing off and on for weeks in Indiana. We are getting crafty and creative up in here to keep these kids happy, content, and add some color to our world. Cause let’s be honest if it isn’t snowing and white outside it is gray.

One day while we were all hanging out, I was staring at my favorite wall and the sticks stood out. I loved the size, character, and texture of these sticks. So, one day while picking up the yard in the fall, I didn’t add these to the burn pile. I brought them inside. I didn’t know what I wanted to do with them, so I just stuck them in the turtle shell so my husband didn’t think the kids brought them in and throw them back outside. The look grew on me though. I kind of liked them there! Except for one thing…that wall needed a punch of color. The whole wall was in the rustic, gray scheme too much for my liking. I had an idea.A Paint Project For All Ages: Painting SticksLet’s paint the sticks! I picked out some of my favorite colors and roped in one of my artists to help me out.

A Paint Project For All Ages: Painting SticksMy Jeremiah was eager to help. I gave him the sticks and the colors and told him to paint them however he wanted. We used acrylic craft paint and a 1″ wide brush. He did one solid and then stripes on the others. I loved the colors he paired together.

A Paint Project For All Ages: Painting Sticks

Once he was done painting the sticks, I loved them. I loved the colors and you still caught the texture, but they didn’t seem quite finished. I wrapped some yarn around the tops of a couple, and that was exactly what they needed. I love texture and color and it’s so fun to mix contrasting elements. The sticks are rough and hard. The yarn is soft and light. They look awesome together.

A Paint Project For All Ages: Painting SticksThis craft was practically free! I had all the elements already on hand. What a fun, inexpensive craft to do with the kids. You could even turn your sticks into the ends of flags and tie some fabric on with your yarn. The sky is really the limit if you use your imagination!A Paint Project For All Ages: Painting SticksDo you like color too!? I always like to think my style is rustic-bohemian. I love rustic, natural elements paired with bright pops of color and patterns. What is your style? I’d love to know!

A Paint Project For All Ages: Painting Sticks

A Paint Project For All Ages: Painting SticksThanks so much for checking in and following along with my projects! If you end up painting some sticks, do please share with me! Tag me on social media with #spoonfulproject so I can see it!

Share this:

  • Click to email a link to a friend (Opens in new window)
  • Click to share on Facebook (Opens in new window)
  • Click to share on Twitter (Opens in new window)
  • Click to share on Pinterest (Opens in new window)

A Handmade Christmas

November 22, 2013 By Erica Deuel 5 Comments

Christmas_craze_prepWhat is it about the Holidays that seems to get earlier and crazier every year!? Don’t get me wrong, I love this season. The colorful decorating, the swarms of family, the Christmas movies, the delicious food, hearing “Baby It’s Cold Outside!” 400 times. It really is a fun time. But it can also be so busy and stressful. I work so hard to not let it go there, but I inevitably have a meltdown or two during this season.

I’ve found that if I can carve time out of the rush and find ways to create I can recapture some of the peace and joy that I think the Christmas season is actually supposed to be about.

What about you? Could you use a night away from the craziness? What about a relaxed night to sit and create with some other ladies? Some of your creations could even cross off a few items from your gift or decor list!?

That’s why I’ve created my next Spoonful Lab – A Handmade Christmas. It may sound like just another thing to do in the midst of a busy time. It’s actually designed to be a really chill environment for you to catch your breath and have fun crafting with some other girls.

Handmade_Christmas_SpoonfulLab_signYou deserve a night out. Grab this one before it slips away!

Some of the ladies from my last Lab were kind enough to share a few words about their experience:

“Already looking forward to the next one!”

“A great way to stir your creative juices in a fun and intimate setting.”

“I had a fabulous time doing something I really love with the best host EVER!!!”

“This would make a great Girls Night Out!”

“Very fun, inspiring and very well-organized, every detail was taken care of and paid attention too! I am sure it made everyone feel very special.”

“Favorite part of the night was the freedom to create after the instructions were given and seeing all the different ideas.”

“I thought it was going to be too much time, but I could have stayed longer because it was so fun.”

“It is a great tutorial for non creative people longing to be crafty.”

“The most fun I have had crafting with new friends and finding old ones there too.”

Spots are limited and we already have a great group of ladies coming to join us. So what are you waiting for? Reserve your seat at Spoonful Lab – A Handmade Christmas today!

Action_ButtonI’m busily making some fun SWAG for you and my friend Sheila at Plum Doodles has contributed something as well. Check out her fun blog for more crafty inspiration! I hope to see you some of you soon!!

stick_star_ornament

signature


Share this:

  • Click to email a link to a friend (Opens in new window)
  • Click to share on Facebook (Opens in new window)
  • Click to share on Twitter (Opens in new window)
  • Click to share on Pinterest (Opens in new window)

Christmas Joy {Stick Sign Tutorial}

November 15, 2013 By Erica Deuel 13 Comments

DIY_Christmas_signImagine a mom out in the backyard playing with her kids.  As she is noticing the change of color in the trees and enjoying the cool breeze, she can’t help but keep gathering sticks and throwing them in a pile. To do what with them she does not know, but she has to save them.

That mom is me a lot of days. You have seen my stick obsession in my stick heart wall art and in my stick Thanksgiving turkey. Today, I want to show you my latest stick creation. My Christmas Joy sign!

I started with a piece of scrap Purebond wood from my planked wall. I sanded it and sprayed it with a really pretty green spray paint called Eden from Rust-oluem. It’s perfect for Christmas!

Green_spray_paintI then sanded the corners briefly with a heavy 60 grit sandpaper to round them. From there it got a bit crazy, and I retaught myself a lesson that I’ve learned the hard way like five other times now.

I stained my piece, but I forgot that stain eats at spray paint. Using stain over spray paint causes the spray paint to start disappearing and makes the stain hard to wipe off as it gets sticky. I quickly finished staining the board (to keep it all uniform) and wiped it off as much as I could, as soon as I remembered my mistake. For this project, I liked the look this mistake caused in creating a worn green board. I wish I had gotten more pictures, but I was in panic mood.

Next, I used some of my collected sticks to create a Christmas tree. I made the tree next to my board so I could configure the height and order placement I liked of sticks to transfer onto my board.

stick_christmas_treeI then picked one stick up at a time and hot glued a strip of glue along it ad placed it onto my green board. I simply kept doing this method, so my tree grew taller and taller till I had transferred all the sticks.

hot_glue

stick_christmas_sign

wood_stick_christmas_tree
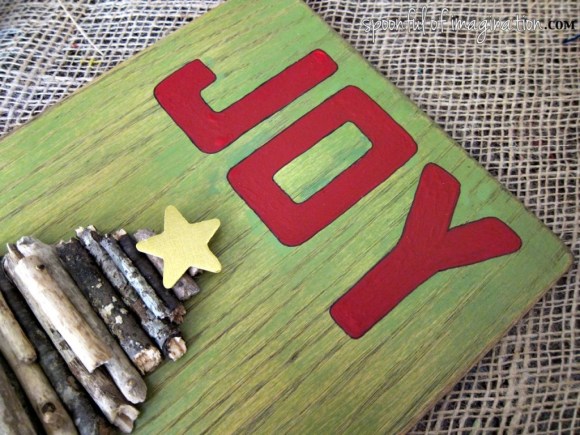
Next, I took extra sticks and filled in gaps and holes in my tree. This step created a more dimensional, layered, and full tree.

fill_gap_holeI really like the simplicity of this tree. I didn’t want to dress it up much, since it was pretty obvious it was a tree. I simply glued a little yellow, wood star at the top and my tree was done.

DIY_christmas_treeMy last step was to add JOY to my Christmas sign. What is Christmas without joy, right!? I picked out the letters from one of my stencils, and I dabbed red paint to paint the letters onto my board. I then decided to paint the letters in solid and outlined them with a thin Sharpie to give the joy a small pop.

JOY

Christmas_JOYMy Christmas sign was then complete! I love how it turned out. It was free to me, since I had all the supplies. I think this simple craft makes a great Christmas decor item.

christmas_joy_signHave you started decorating or creating for Christmas yet?

I don’t usually start this early, since I love Fall and my Jeremiah has a birthday Thanksgiving week. This year is different though. I have big plans coming. I’m brewing something fun for my out-of-state readers. Those that are close though, this little sign will be a giveaway at my next Spoonful Lab. Yay! Do you want it!? Sign up for my next lab here.

signature

Share this:

  • Click to email a link to a friend (Opens in new window)
  • Click to share on Facebook (Opens in new window)
  • Click to share on Twitter (Opens in new window)
  • Click to share on Pinterest (Opens in new window)

Stick Turkey (Thanksgiving Decoration from your back yard)

November 8, 2013 By Erica Deuel 2 Comments

thanksgiving_table_decorCan you believe Thanksgiving is just a few weeks away!?

I cannot.

Christmas is on my mind. I have been crafting for it and preparing my Handmade Christmas party (that you are invited too!), but I don’t want to skip Thanksgiving in the process. Fall is one of my favorite times of year. I love the changing colors and the special time it is to reflect on all we have to be thankful for.

I made this simple, rustic stick turkey as an easy decorative element to add to my Thanksgiving decor. It cost me less than $3.00 (since I had all the supplies but the wood egg) and was so easy! If you would like to make one too, here are the supplies you will need:

Materials:

  • Wood sticks
  • Wood Egg
  • Hot glue gun with glue sticks
  • Rust-oleum Paprika Spray paint
  • Felt scrap (for beak)
  • Two beads (for eyes)
  • Feathers (add for decorative)

stick_craftsI started by spray painting my wood egg a really pretty fall color with Rust-oleum’s Paprika. After it was dry, I lightly sanded it to give the wood egg a little beat up more rustic charming look.

Fall_spraypaintI then searched through my sticks to find a good round one that would work as the head. I liked the stick I found because it was flat at one end to hot glue tightly on to the egg. I placed a little hot glue  to the back of the stick and stuck it in place about two-thirds down the egg. I held it in place while the glue set and then hot glued a small thin stick on either side of it to create a fuller round turkey head.

wood_turkey

wood_turkey_craft

The next part was to turn the egg around and start on the tail. I put a strand of hot glue down the middle of the egg and stuck one of my taller sticks on it. I used that stick as the middle stick and started placing sticks (going smaller in size) down on either side of it. Note: Make sure to not glue the sticks too far down towards the base of the egg that would prevent the turkey from sitting upright.

hot_glue_sticks

wood_thanksgiving_craft

wood_craft_turkey

DIY_thanksgiving_decorOnce you have a wide tail that you like, it is complete! I used 11 sticks to create the width tail I liked. Depending on your size stick and wood egg you might want more or less.

Next, I used a small felt scrap and two beads to embellish my turkey’s face. I just used a little hot glue to hold them in place. I decided to add a few feathers to my tail to make it a more obvious turkey. You, of course, don’t have to do this and can keep the tail more rustic by just using the sticks. Once all of these elements were on, my stick turkey was finished! I added him to my table’s centerpiece and love how he sits all proud and happy on it!

turkey decorI think the natural wood elements in the turkey look so good with the pine cones and real fall leaves we gathered on a hike this week. You add in my hand print table runner, burlap strips make shift table-cloth, and Happy Thanksgiving banner, and we have a really simple pretty fall display. I love it.

thanksgiving_centerpiece

Happy_thanksgiving_bannerWhat about you? Do you love Thanksgiving too or is Christmas already on your mind?

Is it possible to decorate for BOTH holidays at the same time. I need tips since we are having a Thanks-mas (Thanksgiving + Christmas celebration) at my house with my whole family. So, please tell me how you do this month’s decor!

Happy Friday! I hope you all have a great weekend!

signature

Share this:

  • Click to email a link to a friend (Opens in new window)
  • Click to share on Facebook (Opens in new window)
  • Click to share on Twitter (Opens in new window)
  • Click to share on Pinterest (Opens in new window)
Next Page »
  • Email
  • Facebook
  • Instagram
  • Pinterest
  • YouTube
YouTube-Channel
Erica Deuel

Subscribe for Weekly Updates!


Most Popular Posts

Painting Flower Pot Party Tips
DIY {easy} Burlap Wreath
DIY Outdoor Checker Board
DIY Burlap Flowers
Cheap lamp to Industrial Beauty
Chiffon Flower Tutorial
DIY Paper Butterflies- Spring decor for cheap
DIY Outdoor Table
DIY King Size Rag Quilt {Repost}
Engraved Wood Sign Tutorial (and Dremel Micro)

Categories

  • All About the Kids
  • art journal
  • Blogging
  • Christmas
  • Craft Projects
  • Dancing Zebras
  • DIY
  • Eddy's postcards
  • Embroidery Journal
  • Family
  • Featured
  • Fireside Chat
  • Foster Care
  • Giveaways
  • Guest Posts
  • Home
  • Homeschooling
  • Kid Activities
  • Kid Craft
  • My Heart
  • Our Outings
  • Project Spotlight
  • Send Out Love
  • Shop
  • Sponsored Posts
  • Spoonful Lab
  • Spoonful Tribe
  • Tips + Tricks
  • Traveling
  • Uncategorized
  • Vlog

Favorite Categories

Subscribe for Weekly Updates!

Favorite Categories

© 2023 Spoonful of Imagination, Inc.