Disclaimer: The wall stencil and stencil brush I received for free. Thank you Royal Design Studio Stencils for so generously gifting them to me. All opinions are very much my own.
 When I started dreaming of how I wanted to create my Reagan’s new bedroom, I knew I wanted lots of color, texture, patterns, and fun. I pictured fun color with pops of natural elements and black and white contrasts thrown in. What I did not take in account was my daughter having an opinion, and she had one.
She wanted a pink room.
What!? Everything in me screamed “nooooooooo!” I am much more a purple mom for a girl. I wanted to fight her, but it’s her room. I love her more than my hatred for pink. Together we decided one purple wall would be fun. So, I painted some samples on her wall and they lived like that for a couple months while holidays and other rooms were completed. Finally it was time to paint her room. She was THRILLED to see that pink go on the wall. I held my breath.


 It was really bright. I had to try to envision the end result. I kept thinking this seems like a nursery for a pink ballet themed room. I just kept playing in my head “I love my daughter, I really love my daughter” as I painted every stroke. I fought that picture in my head with what I knew the end result could be.
I loved the purple wall, but it didn’t seem quite right. It was definitely a punch of color, but it was also a little just like a purple wall. I wanted it to have more jazz and fun. I knew I needed to stencil it up, just like I stenciled my boys accent wall.
 I was so excited when I saw that Royal Design Studio Stencils had so many fun, girly stencils. I fell in love with the Petal Play Floral Damask Wall Stencil. It was the perfect mix of fun and beauty without being a cartoon flower or a formal old floral.
When this stencil arrived, I was thrilled to see that there was a special ceiling stencil included that helped fill in the pattern at the top of the wall. You may remember on my boys wall, I simply cut the stencil to create that piece, but this was all ready for me!
I used what I learned from stenciling my boys wall and just went at it. No fear this time!


 This stencil was so simple in the fact that I did not worry about it looking slanted when I stood back. Based on the pattern there was no fear of my stencil going crooked. What was a little more tricky was lining up the stencils, and that was only because the connecting pieces (petals) were smaller.
I ended up drawing a sharpie arrow on my stencil to a few bigger, stand out petals. This helped spot the connecting place quicker.
 I decided to use gold as the accent color for this stencil because it’s fun and also subtle. I wanted the wall to ultimately look purple but also fun and a true accent wall. The stencil created that look!
I did the stippling effect again. I loved it with the gold paint because it created a gold leaf look with shimmering highlights of metallic gold.
One thing that I did not realize until this project was what a difference the stencil brush makes! My boys room was the first wall stencil I have ever done, so I just used the same stencil brush I use to create little wood signs. Big mistake. I got my hands on on the 2″ All Over Stencil Brush from Royal Design Studio Stencils, and it made all the difference. This project flew in comparison to my boys room.
 The process wasn’t fast enough for this sweet, exited girl.
It was worth it though! The wall came out better than I expected. I love it. It is that punch of fun, whimsical, pattern, and color that I was hoping to create in this room.
 I love how this room can grow with her. It’s so fun now, but it can also last for years. I joke with her now about trading rooms. What I love most though, is she loves it as much as me. She calls her wall her golden flowers.
 As I painted this room, I realized I really didn’t want to spend the paint or time to paint her closet. It was a clean light gray. It looked fine and was in good shape. There was really no need to paint it except that it would have this harsh line that might look like I took the lazy way out in not painting it, whenever the closet doors were open.
Let’s be honest.
They are open most of the time too. I toy with taking the sliding doors off at some point, but for now they are there. I decided to just make this element creative as well. I used some painters tape and added some jagged lines into the closet to paint the wall.
 By doing this technique the wall looks intentional (not like a lazy mom), and it’s also a fun element all on its own! I really love it, and now I want to go back and do the same thing in my boys’ bedroom.
Reagan’s room is so close to being done. I have a window treatment idea still to do, and I also want to sew her a rag quilt like I did for my bed and then I will be ready for a full room tour!
 What do you think of all the color and splashes of fun? Does it make your heart go pitter patter as well?
I hope you feel brave and try going for it with color or some other crazy element in your life and home this week. The more I go with my gut and be bold with color…the braver I get to keep trying new things! Who knew you could find such bravery in you by a fresh coat of paint!?

 Painting is therapeutic to me, but I usually do have to do a big build up to start a room. There is something about just getting over that hurdle that is hard for me. I often joke with Matt that I would pay someone to tape off the room and prep it for me. I don’t mind the actual painting, but the prep work is what takes more time and is harder for me. I’m messy, so I have to tape and lay a little paper. Otherwise I’m scrubbing carpet like crazy. I’ve done that in two rooms so far in this house :). Whoops!
 When my stencil arrived, I was impressed with the awesome directions it came with. They gave tips on how to stencil, which end was the top of it, and what pieces of the stencil were your connection pieces to build on when you have to move it. The directions broke it down for me, so literally my fear started to melt. They were great.
 I got that stencil taped up and just went for it! I choose to go with a stippling effect that is much like my
 My hand got so tired. It started slow because I was really cautious to exam every little insert to see if they had the same “heaviness” of paint. It got faster as I became more confident. I got the hang of how much paint to put on the brush, how much looked right in a section, how to dab in the middle and then move out the sides with lighter dabs (so there was less likely a chance of paint oozing below the stencil). It got faster. My technique was to do about three or four stencil placements, before I would take a break. Usually at that point my kids needed me and my hand could use a break. This process took a couple of days. I didn’t work non stop on it because of life and the size of my wall, but I did want to get it done quickly, so my boys could stop camping out on the living room floor.
 One thing that I learned towards the end of my project was to just make it my own. The directions were so helpful, but at the end of the day this was my wall. Well, really it is my boys wall but you know what I mean. I cut my stencil up. I hated to do so, because I knew I loved the wall before it was even done-but it helped!
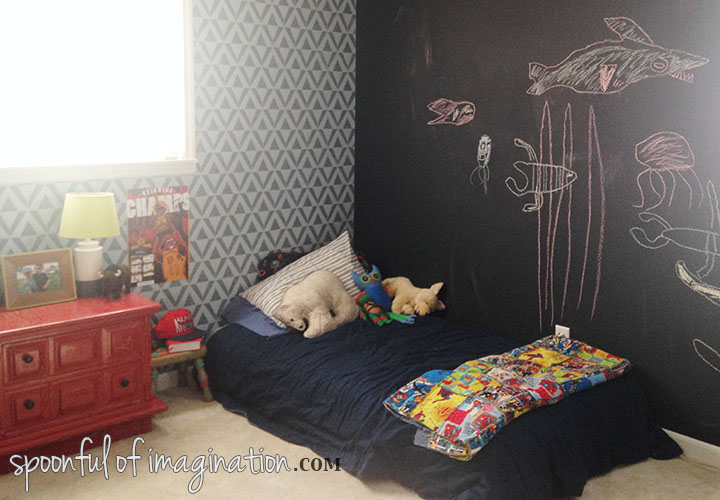
 This wall was so worth it. I absolutely love it. My boys do too. It really has me rethinking our loft bunk bed idea. I wonder if I can convince them that twin beds are cool after the
  I did go back with a small acrylic paintbrush and touch it up in a few places, but other than that I wanted it to look more stamped, rustic and I think we pulled that off. The boys love playing in their room.
 Have you ever stenciled a wall? I am so glad I tried this. I am now dreaming up Reagan’s bedroom and already have a stencil picked out for it. I can’t wait to start it!
 Thank you so much for checking out my boys bedroom stenciled wall! Please feel free to share a picture from here on Pinterest and be sure to stop by
  Do you ever just have the extreme urge to pull into a thrift store? Almost like the thrift store is calling to you? I get that craving. The other weekend my husband had to work late, and the kids and I had to get out of the house for a bit.
 I had so many ideas on different ways to make over this little desk. I decided to just start with a base color and do one step at a time to see which direction to continue going with it as I worked on it. I’m going to show you step by step how I revamped our school desk, so you can do it too! Switch out the colors or fabric (yes fabric!?) to make it more personal to you and your taste.
 I loved the old wood look right from the start, so I thought I was just going to paint the metal, but as I started working, the wood got covered up as well.
 I used Kilz and painted over every part of the desk but the top (writing surface area). I felt this would clean it and would be the best way to make sure that whatever design I came up with would last for a long time without chipping.
 I knew I wanted it to be a fun, statement piece so I grabbed my Rustoleum hot pink spray paint and sprayed all the metal and underside of the desk with it. After spray painting it hot pink, my son was sad because it was so “girly” so I grabbed a deep red and spray painted over it again. It turned out that base hot pink coat probably was good for our red spray paint. The red stuck with one coat. Make sure to spray light coats, so the spray paint doesn’t start to drip.
 After the red spray paint dried, I used a little acrylic teal bottle paint and squirted some in the cubby hole and spread it all around to paint the inside a fun pop of a new color. I ended up painting one of the back rest panels the same color.
 I wanted a couple of colors that worked and popped with one another. Once the teal paint was dry, I worked on the seat of my chair. I started with painting it a simple mustard yellow and then created my own tribal pattern on it. You can read the full tutorial on how to
  I love how it all came together and how my new friend Heidi said, the desk has personality. It sure does. It is hanging out in our living room and will be where Caleb probably does most of his school work from now on. I see a cleaner kitchen table in our future as a result! Yes!
 Have you seen see any fun vintage school desks makeovers? Would you use crazy fun paint colors and fabric on it too? Or keep more of the natural rustic charm?


