 Are you ready for spring?
I don’t mind the winter, as long as there is snow and it’s pretty! Sometimes the pretty is just the trees’ silhouette outline on a colorful sky, since we haven’t had as much snow this winter. There have been a lot of gray, wet days. It has me itching to bring back color, so the other day, I took down all the winter decorations at our art studio and started creating some spring ones. Let me show you how I came up with my foliage!
As the founder of a non profit art studio, we get a good amount of local craft donations from other artists or businesses in town. Recently, we got some fabric samples from a home designer and it got me thinking if I could turn those into some inexpensive green, spring foliage.
 I loved how there were different patterns, texture of fabrics and shades of colors. I started by cutting about 3″ long leaves. I didn’t measure or worry about the exact width or shape. This is a great activity to do during a movie or couch lounging one night.

Once I had a huge stack of leaves, I simply started hot gluing and folding them around some wire stems.
You can use whatever wire you have or you can pick some up in the craft floral section at your local craft store like I did. I added a dab of hot glue on the wire and kind of folded one end of the leaf around it. I don’t have any pictures of this step, but if you look closely you can see what I am saying.
 I worked in about 3′ long pieces of wire and made a stack of this foliage as I went. I made 8 separate pieces, but you could make as many as you wanted. I intended for my foliage to hang like a garland, but you could create yours on dowel rods for a sturdy base to stick in a vase as well. There are lots of possibilities!
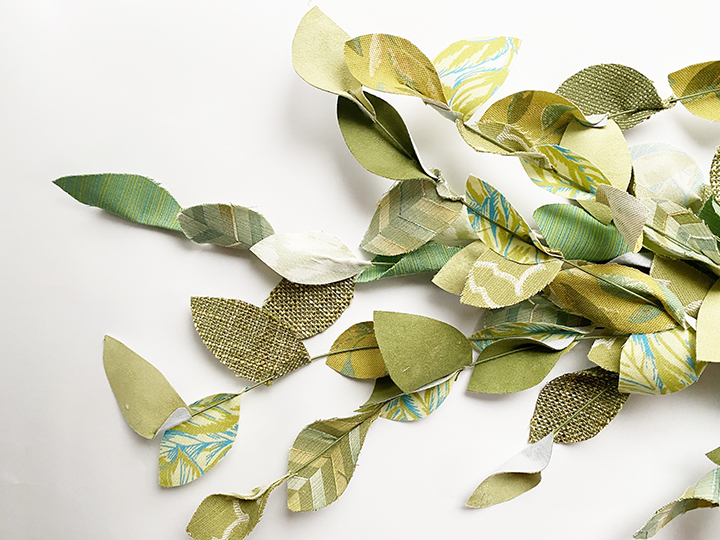
 I love how the fabric creates a soft leaf and foliage look. It really makes it more believable by how it moves and does not have a harsh fold. I took my foliage to the studio and hung it down in our faux fireplace.
I love the natural, yet creative pop of inspiration it gives in the space.
It was a perfect way to add some spring decorations in an inexpensive way to our space. What do you think?
 So, are you ready for spring? Or, do you want to will it into existence by creating spring looks too?
Creating doesn’t have to be expensive. Use what you have. If you have some old green Christmas decorations, you can cut that up for some leaves. Do you have some green shirts with a stain? You can use that too! On those little leaves, you can’t tell where they came from or what they use to be. When they are all strung up together though, they create a beautiful look!
Have fun and imagine the possibilities! If you create some inexpensive foliage, tag us on Instagram or Facebook so we can see!

 Who is ready for winter to be over!?
 I went straight to warm colors, softer textures, and crafty bits for spring. It was inspired by these two baskets I found thrifting last weekend.
 I wanted to use the baskets as little shelves to hold a vase of flowers in our new mantel display. Although I had this idea, I knew the vases needed to be light since the baskets are thin.

 I stuck some fake flowers in the can, and my light vase to go in my basket was complete. I wrapped some wire around my new vase and stuck it through the basket and twisted the wire behind the basket to get my vase to stay in place.


 I ended up putting the vases in the middle of the baskets, so the baskets look more like a frame than a shelf. It looked better to scale this way. If I had bigger “vases” I might have kept with the shelf idea. I like this process of creating where an idea might start as one thing, but as you create, you take it somewhere else.
 I strung up a clearance banner I found at Target for $0.50, put some Dollar Tree succulents in some wood pots we sell at the studio for people to paint, and hung up two umbrellas (for that spring rain) that I found at Hobby Lobby for $7.00 each and my spring mantel was complete.
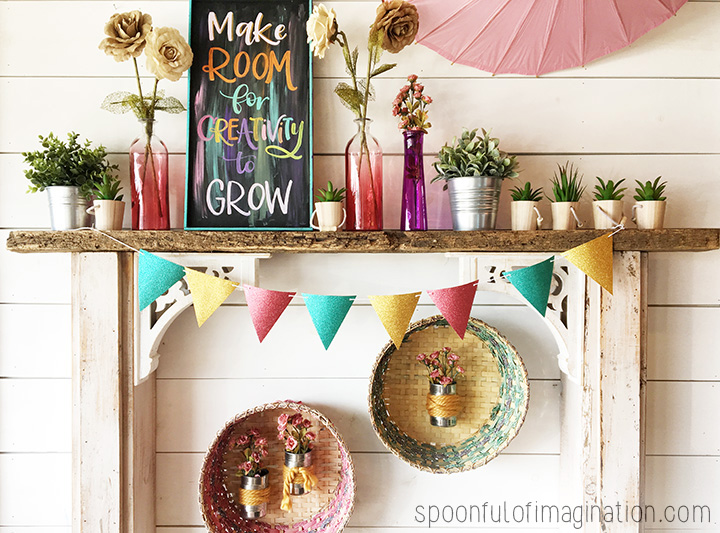 Do you ever find one item that inspires a look? I had a bunch of random ideas in my head for this new mantel, but once I found the baskets- it all came together!
 Do you have spring fever?
 What’s cheap? Paper can be the most inexpensive way to decorate. I saw these butterflies in the school section of my local Dollar Tree. I snatched up several bags as soon as I saw them. An idea clicked, and luckily they had the butterfly net in stock too for my idea.
 For every one of my butterflies, it took two pieces of paper. I simply folded one butterfly in half, placed a little hot glue on another butterfly down it’s center, and then pressed the folded butterfly into the glue on the fold line. Check out these pictures to see what I mean.

 That was it! I just used a little tape to put the butterflies in place on my wall.
 Are you ready for spring too!? Maybe you live more in the south and it’s already spring where you live. Have you pulled out spring decor??
 These paper butterflies were so cheap. The project could even be cheaper if you hand cut butterflies or have a die cut machine of your own. For me, I don’t have a machine and 32 butterflies for a $1 was so worth it.
 Spring is finally showing its beautiful self in Indiana. We’ve had trouble getting all our school work done because WE. JUST. WANT. TO. BE. OUTSIDE.
 I then did a quick stitch with my sewing machine, but I left an opening at the base of my bunny. If you don’t have a sewing machine, you could do a simple blanket stitch by hand like I did on this
 Next, I stuffed the bunnies with some
  I decided to not try to stick the stuffed bunny back into my sewing machine, but I instead used some embroidery floss and hand stitched the bunnies close.
 The final step was to hot glue a little felt ball onto the bottom to act as a tail. I toyed with sewing buttons on or embroidering a face on the front of the bunny. In the end, I decided I liked the simple look. You could also paint faces on your bunny or even give them away plain, and let your kids decorate them!
 Has spring sprung where you are? I have heard we might get another snow storm and aren’t in the clear of cold temps yet, but for now, we are loving the sunshine! I hope you too are being able to get outside, create, and imagine the possibilities!