Spoonful of Imagination

Add it to a Family for Something Beautiful

  • Home
  • Our Family
    • Our Home
  • Courses
  • Shop
  • Contact

DIY Paper Pumpkins

September 9, 2013 By Erica Deuel 8 Comments

welcome_to_fall

I can’t believe fall is here. Although the “official” first day of fall isn’t till later this month, I am so excited to start decorating for my favorite season. This weekend I pulled out my bucket of fall decor and happily started placing my collection of pumpkins around the house. I love fall.

As I was in the basement getting my bucket of fall stuff, I saw my huge box of left over moving paper. When we moved in, I had a hard time throwing out the paper we used to wrap some of our breakable stuff, so I saved a bunch of it.

uses_for_moving_paper

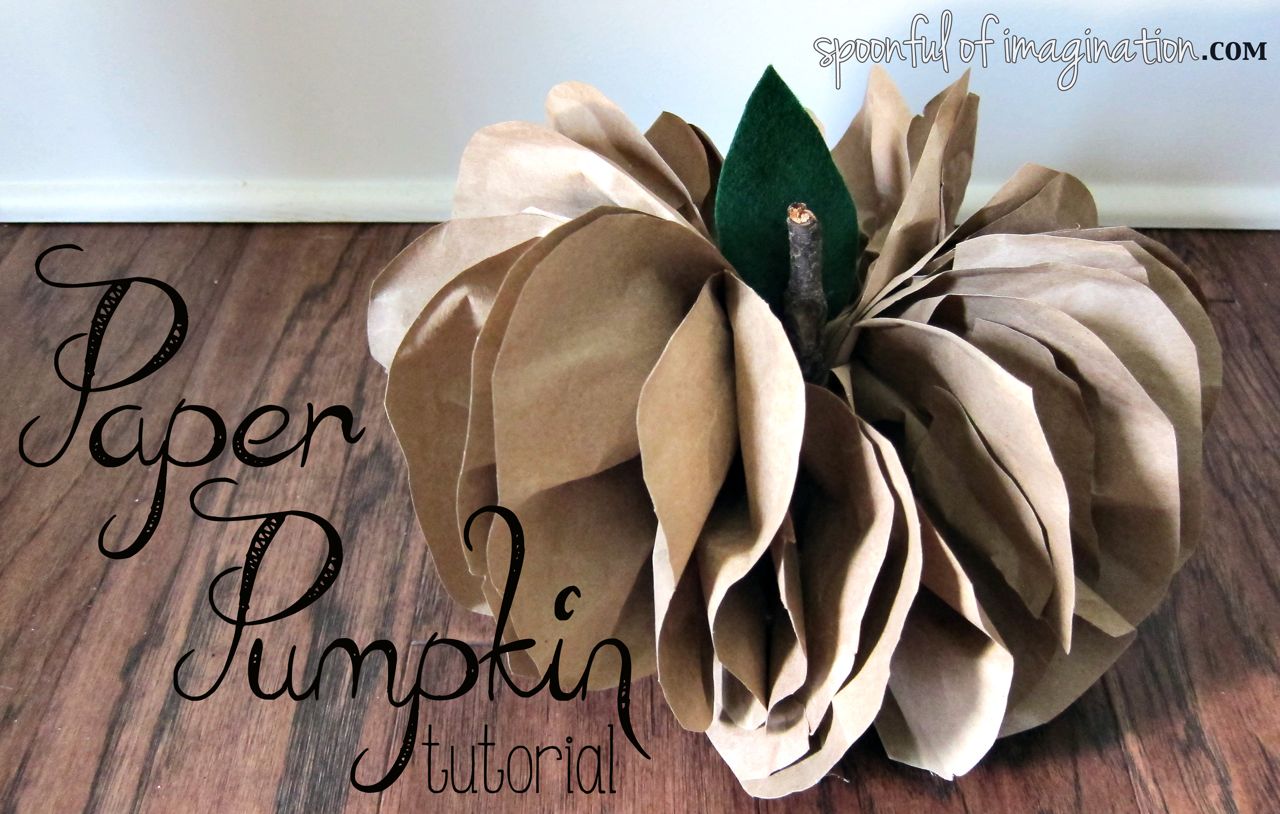
We have been using it for painting projects. I let the kids paint on it, or I put it under other things we are painting to protect the surface. I decided to try to make a paper pumpkin with some of it.

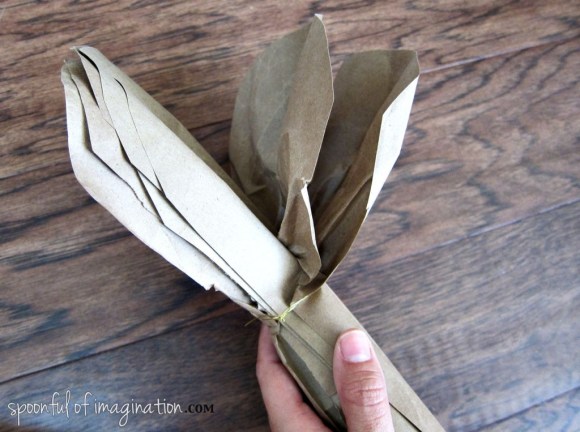
I started by cutting a bunch of paper pieces the same size. Next, I cut the ends of my paper strips to be rounded. Once I had a stack of rounded edged paper pieces, I folded the paper into one big fan and wrapped it with a thin piece of wire.

making_a_paper_pumpkin
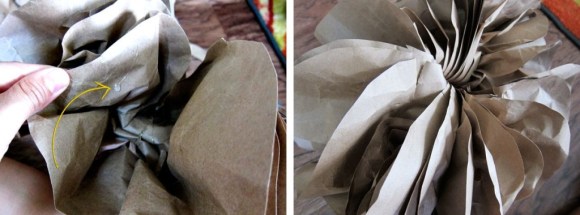
Slowly, I started to pull the different pieces of paper out away from one another. This is a step that forces you to be some what patient. The moving paper is so thick that if I pulled to quickly the paper would rip.

making_paper_pumpkinOnce the paper pumpkin is fluffed, I glued the two end pieces (on either side) of the paper fan together to make the pumpkin hold shaped. I didn’t want it to separate back into a fan type shape, but I wanted it to hold the circle/pumpkin shape.

DIY_paper_pumpkin
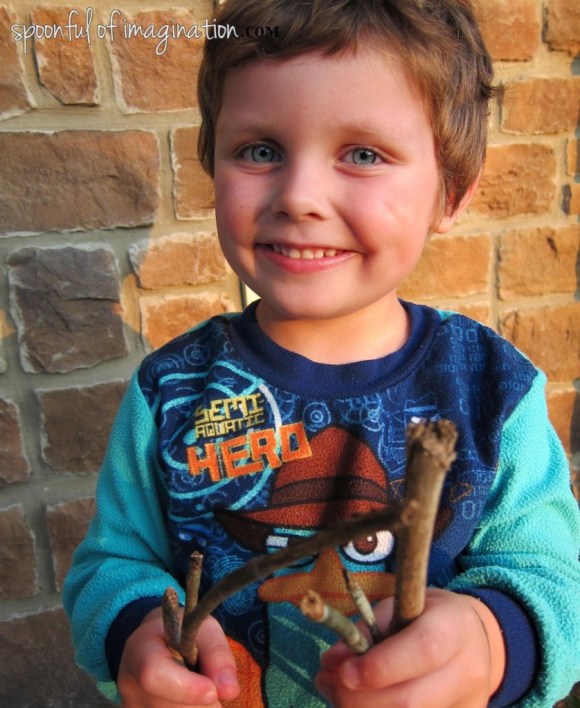
Our kids were really excited about seeing the pumpkins coming out, and they wanted to help in this project. I let them help fluff the pumpkin and to find a good stick or six of them to act as its stem.

Fall_kid_pumpkin_craft

boy_with_sticksOnce I had a good stick for a pumpkin stem, I glued the stick and a small piece of felt (that I cut to look like a leaf) into the center of my pumpkin. My paper pumpkin was than complete!

fall_craft

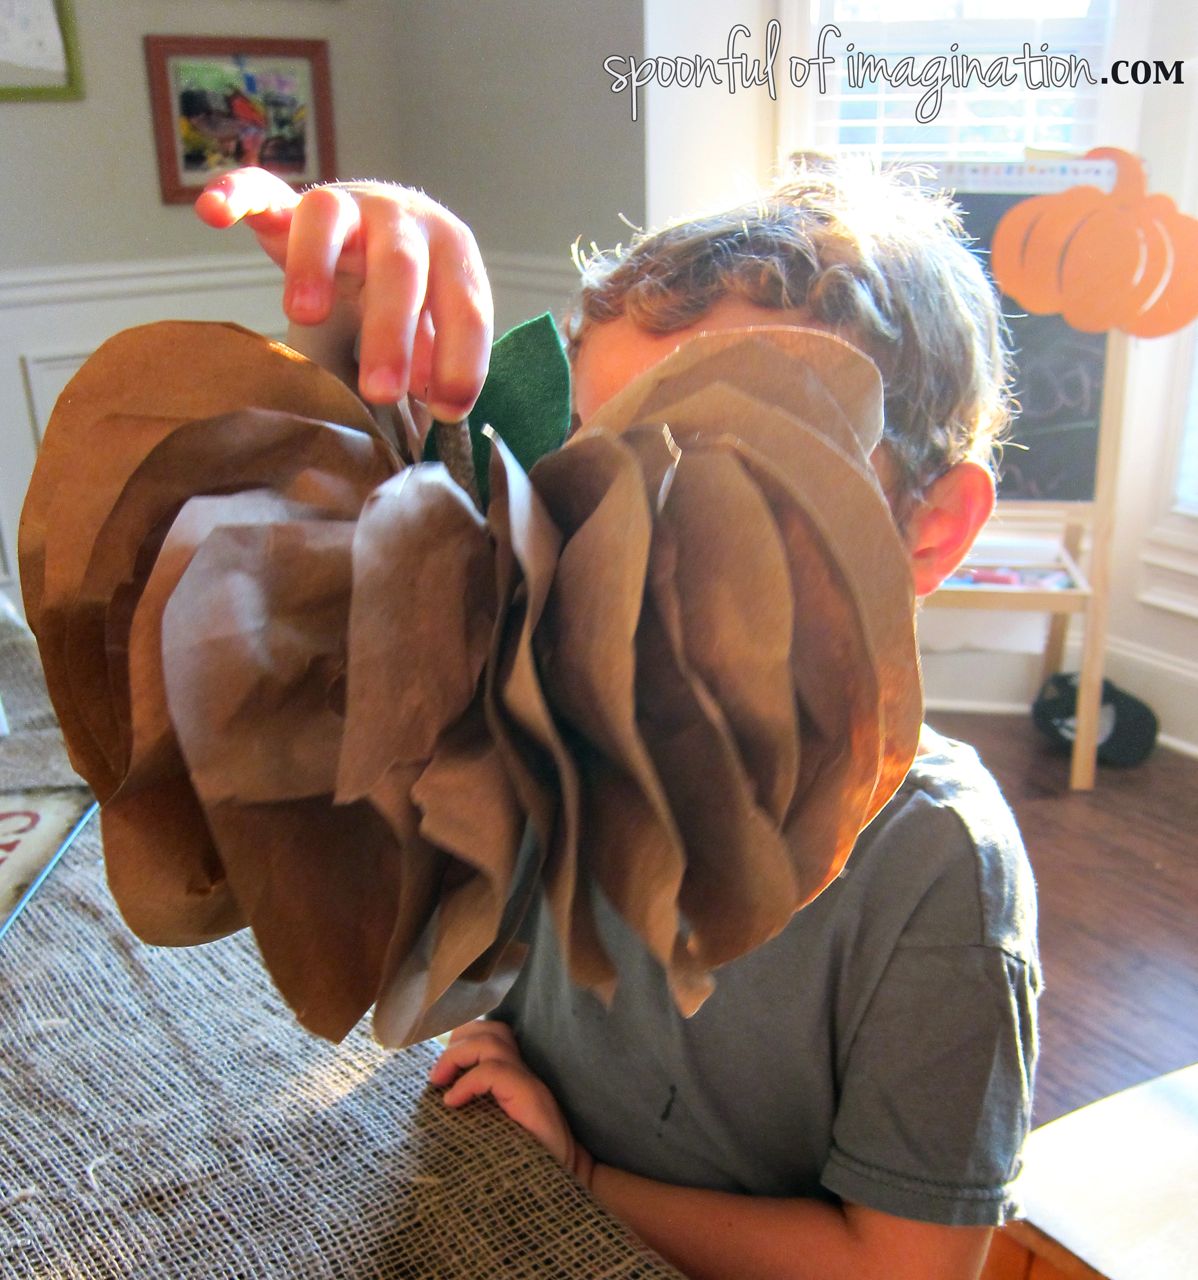
I’m pretty happy with this rustic paper pumpkin. I love that it was made with recycled materials and that it brings a little rustic charm to our decor.

paper_pumpkin_tutorial

Have you started decorating for fall? I hope you had the chance to incorporate a spoonful of imagination into your weekend!

A special shout out to L. Thompson for winning a set of my Burlap Greeting Cards. I will be in touch!
Thank you so much for stopping in! I hope you have a blessed day!
signature

Share this:

  • Click to email a link to a friend (Opens in new window)
  • Click to share on Facebook (Opens in new window)
  • Click to share on Twitter (Opens in new window)
  • Click to share on Pinterest (Opens in new window)

The Corn Maze

October 25, 2012 By Erica Deuel 5 Comments

Yesterday, I showed you a glimpse of our corn maze adventure.  The boys loved going down the slide that was at this farm.

Today, I have part two of this “family date” post to share with you.  I don’t know what we are going to do with all the pictures from this outing, but I can’t stop looking at them!  Please enjoy this photo book below :).

We all started really, really excitedly going through the corn maze.  It was an adventure.  This was a perfect environment for my little independent toddler as well.  She loves to walk, and we could just let her GO here, with all her walking going in the right direction.

I don’t normally make my kids wear “dressy, church” clothes as they like to refer to them.  Knowing we could get awesome pictures, I laid out special outfits for them.  Nothing against the usual wardrobe revolving around Superheroes.  I like that too.

She melts me and totally has me around her little finger.  My best girl is my daughter.  What a gift!!!

As our time frame in the maze got “lengthened” by our wrong turns, the boys got hot and started shedding some layers.  It became like an episode of Survivor as we got hot and ran out of water.

We call this J’s “million dollar smile”.  When he smiles with those big blue eyes, you can’t help but smile back!

This son of mine is hilarious and a complete blast.  He’s got a sense of humor that could land him a stand up comedy job (we think) anytime he wanted one! 🙂

There was a little game throughout the maze about a mystery to solve.  Every sign gave you some clues, and if we made it to the end, I’m sure we would have figured it out.

They are best friends!  It is a completely beautiful thing as a mom to see.

After a few “self-made paths,” we finally emerged from the maze.  There is nothing wrong with the entrance also acting as the exit, in our case.

We got on the wagon ride, and took it around the property to their little farm.

On the farm there were live animals that you could pet and feed.

There was also a pumpkin patch!  You could pick pumpkins right off the vine to buy.

As part of your entry fee to this corn maze adventure place, you got to pick a free small pumpkin to take home.  Reagan was thrilled!

After the farm and wagon ride, we went back to the entrance where the big slide was and enjoyed some of their other activities.  One of which were these stacks of hay to jump on and from.

It was a boy’s paradise!

Reagan was obsessed with this “cow train” and might have ridden it a couple of times in a row.  She even got her own ride when other children choose to get off and do other activities.  She was obsessed!

There was a big corn silo that you could climb in and play with all the dried corn kernels.

Boys will be boys and find a good fight at all times :).

The boys got a kick out of shooting corn stalks at wood cows as well.

As you can see, we are a fan of this place!  We had so much fun, and we stayed the whole four hours it was open on Sunday!  Now do you want to know where it is!?!

It is at Mitcham Farm which is located just 30 miles east of downtown Atlanta in Oxford.  If you go to this link you will find it at on Half off Depot.  This coupon is for $5.00 admittance for everything I have talked about!  That is a great deal for a corn maze, hay ride, farm experience, free personal pumpkin, cow ride, slide, corn shooter, and corn barrel!  Reagan and J were both free too, so it only cost us $15.  We were thrilled!

If you go and try this place out, I’d love to hear about your experience!  Remember, pay attention to your map in the maze.  You could get lost.  It happens.

I hope you are having a great week!  It is almost the weekend!   If you haven’t entered my giveaway yet, there is still a small window!  You have till midnight tonight!

**Neither Half Off Depot nor Mitcham Farm has compensated me in any way for writing this post. Neither one even knows I exist.  I paid for my coupon like everyone else.  We just had a great time, and I wanted to share it with you.

Share this:

  • Click to email a link to a friend (Opens in new window)
  • Click to share on Facebook (Opens in new window)
  • Click to share on Twitter (Opens in new window)
  • Click to share on Pinterest (Opens in new window)

Painting: Tips for letting young kids paint!

September 23, 2012 By Erica Deuel 9 Comments

This week we did LOTS of fun things.  We got to have two play dates, a park outing with their grandma, and even a zoo visit with friends.  We only had one day this week where we didn’t have anything on the calendar, and it just so happened to be the “rainy” day.  We loved it!

In our school days, we have been talking about fall and the changes that come with this season.  Having a rainy day at home, was the perfect time to paint our ceramic pumpkins!

They did an awesome job, and I absolutely adore them!!  I know they will be a decor item I save and use for years and years!

I got these little ceramic pumpkins at Hobby Lobby last week and they were on sale for 40% off.  I think the small pumpkins ended up costing about $1.70 and the large one was about $2.80.  They cost SO much less than going to a paint your own pottery place, but I think the effects and look is the same!  Thanks to one little tip at the end that I will share with you!

We talked about fall colors and which colors they would like to use on their pumpkin.  I said they could use any “fall” color.  They said they wanted to use only orange and brown.

I let my little girl paint!  She’s about 20 months old and loves to paint!  She kept squealing with delight, smiling, doing a bouncy dance in her seat, and laughing.  While I watched her with so much joy, I had the thought that many people might not try this with a child her age.

It can be a little scary and hard, but it is worth all the work.  We are building memories!

I came up with ten tips to help make painting with young kids less intimidating and easier to do.  I hope you find them helpful!

1.  Strip your kids down.  🙂  They can wear an old shirt or paint smock.  We have both, but I usually just have my boys take off their shirts.  It’s so much easier and then you aren’t pulling wet paint over their heads, when they want to remove that shirt afterwards.  For my little girl, I had her wear an apron to stay “modest” for these pictures. 🙂

2.  Use a big tarp or old table clothe to cover your table/painting area.  I tend to use big sheets of paper or old newspaper because I can just bawl it up and throw it away afterwards.  It helps keep it simpler if you don’t have to wait for the table cloth to “dry” and worry about where to store them, so you find them next time.

3.  Use paper plates as your paint pallets!  Although those cute plastic pallets that are sold in art stores are cute with the divided out areas for different colors, they are just one more thing to clean. I stopped using them because they always had dried paint on them and were a pain to scrub clean.  We just squirt some paint on to paper plates and throw them away afterwards.

4.  Paint in steps!  If your child tends to “quit” quickly, you can let them paint till they want to be done.  If you want them to “cover” more of their area say “you can let that dry and come back later and work on it”.  It’s ok, if it isn’t completed in the first sitting.  Hardly any of our projects are, right!?

5.  Go with their creativity!  This is so important!  Let them dream and design it as they want!  I fight the urge in me to at times want to “touch up” their work.  You want THEIR work not YOURS, so let them create it as they want.

6.  Do not have a “time” crunch or crazy busy schedule where you are trying to “squeeze” this activity into a tight window frame.  The best projects are when they are the only “to do” and you aren’t rushing to just get it done, so you can go to the next project.  Any easy tip along these lines is to have a cup of water for the older kids to clean their brushes (before changing colors) on hand.  When we are done painting, I throw all the brushes into the cup, so I can walk away and help the kids get cleaned up.  I can come back and clean up the mess later, without worrying about the brushes having dried out.  Also, use a plastic/throw away cup here!

7.  Let them explore!  It might end up the little one starts painting her belly.  I go with it.  She is exploring and learning so many things (cause & effect, sensory elements, and fine motor skills are just a few).

8.  I always plan for a bath to be needed afterwards, so it’s a nice surprise when that is not needed.  After our pumpkins were painted, the rain started pouring!  I let them run and splash, so they were gonna need a bath anyways.

9.  Let them admire and show off their artwork.  They will be so proud of it, if you encourage and praise them and their work!  They will want to touch it and show it to others!  Let them.

10.  Have fun with it, and have the mindset you are making memories!

That is it!  There are ten tips to help you paint with your little ones!  I hope it helps and doesn’t make painting with “babies” so intimidating!  Our last step for this project was to give our pumpkins a thick coat of Mod Podge.  This created a shine finish to the pumpkins that makes them look like they are fresh from a ‘do it yourself pottery place’.

An easy way to incorporate step 9 being “letting your kids show off their art work” is to display it around the house.  I put my kids’ pumpkins on my mantel, and they are so proud of them.  My three-year old goes over to look at his pumpkin several times a day and says proudly “look!  It’s dry now mom!  I can touch it.” as he scoots a chair over. 🙂

I hope this post helps you tackle a painting project with your kids and gives you some tips on how to do it, and it to be a cheap and fun memory!

Later in the week, I will be sharing more with you about this pretty fall wreath!

Thank you so much for checking in and reading this little blog of mine!  I hope you all had a relaxing weekend!

Linked up at: At Home Take 2, Centsational Girl, The Inspired Room, and Hip Homeschool Moms

Share this:

  • Click to email a link to a friend (Opens in new window)
  • Click to share on Facebook (Opens in new window)
  • Click to share on Twitter (Opens in new window)
  • Click to share on Pinterest (Opens in new window)
  • Email
  • Facebook
  • Instagram
  • Pinterest
  • YouTube
YouTube-Channel
Erica Deuel

Subscribe for Weekly Updates!


Most Popular Posts

Painting Flower Pot Party Tips
DIY {easy} Burlap Wreath
DIY Outdoor Checker Board
DIY Burlap Flowers
Cheap lamp to Industrial Beauty
Chiffon Flower Tutorial
DIY Paper Butterflies- Spring decor for cheap
DIY Outdoor Table
DIY King Size Rag Quilt {Repost}
Engraved Wood Sign Tutorial (and Dremel Micro)

Categories

  • All About the Kids
  • art journal
  • Blogging
  • Christmas
  • Craft Projects
  • Dancing Zebras
  • DIY
  • Eddy's postcards
  • Embroidery Journal
  • Family
  • Featured
  • Fireside Chat
  • Foster Care
  • Giveaways
  • Guest Posts
  • Home
  • Homeschooling
  • Kid Activities
  • Kid Craft
  • My Heart
  • Our Outings
  • Project Spotlight
  • Send Out Love
  • Shop
  • Sponsored Posts
  • Spoonful Lab
  • Spoonful Tribe
  • Tips + Tricks
  • Traveling
  • Uncategorized
  • Vlog

Favorite Categories

Subscribe for Weekly Updates!

Favorite Categories

© 2023 Spoonful of Imagination, Inc.