Spoonful of Imagination

Add it to a Family for Something Beautiful

  • Home
  • Our Family
    • Our Home
  • Courses
  • Shop
  • Contact

DIY Headboard

October 5, 2012 By Erica Deuel 12 Comments


I have been wanting to create a new headboard for our bed ever since I finished my king sized rag quilt.

It has been a long time coming, but we finally created one!  (I say “we” because Matt was largely involved.  My projects often involve him.  What an awesome man.)

I love how it turned out and I can’t wait to hang it in our room!!  Would you like how I came up with this piece?  Stayed tuned!  First off, I did lots and lots of scouting on Pinterest for inspiration.  Out of everything I saw, here are four of my favorite boards…

I love the simplicity of this look with the sweet branches.  I thought the stained wood would look good with my bright quilt too.

I loved the way “love” was painted with the stain look, but I couldn’t decide if I wanted it to be such a bold piece.

I loved the way this “love” was painted smaller, but then it seemed like “not enough” for my taste.

So, I was a mess wanting something “simple” and yet “striking”.

I loved this rustic door and “love” mix.  We looked for a while and couldn’t find an old door for cheap.  Junk places realize what they have and price crazy old doors starting at $100?  You can buy new doors cheaper.  I didn’t want to pay that (cheap I know!), and I didn’t have an old barn in the back yard that I could “stumble” across such a treasure.

We have been getting caught up on How I Met Your Mother.  Amazing show if you have not watched it!  Every time I saw Marshall and Lilly’s bed, I wanted it.  I loved the bold color.

I ultimately decided I am a “color” kind of person.  Why not have a fun headboard to go with a fun bed quilt!?!  So, this is what I came up with…

I mixed the simple branches with the word “love” on top of a fun color.  I love the result!  The only thing is my room is currently painted green.

This beauty totally clashes.  🙂  Hence, it gave us another “project”.  We have already bought the paint.  My room is getting a makeover little by little!

Would you like do to this too?  Here are the steps…

We bought six boards at Home Depot – (4) 1×6 and (2) 1×4 .  I laid them out in the order I wanted.  I didn’t want the two smaller boards together.

We measured and trimmed off some of the ends.  We wanted our headboard to be about 80 inches long once we were done.  We cut the boards a little shorter than that, since they are overlapping each other to create the overall 80 inches in length.

We then chiseled, chipped, sanded and hammered to create a rustic, ripped look on the ends of the boards.

Our boys love “project days” and jump right in on their own creations!

Reagan loves all the commotion and everyone hanging out.  It is a blast these days.

Once the boards were roughed up we laid them back down and drew a chalk line, so we would know how to line them back up while attaching them.

Matt attached them with lots of screws and wood glue.  We don’t want any part of this falling on us during the night.

Here is where I got to start playing.  All that hard labor stuff led to the fun stuff.  Life.  I painted a light coat of my teal blue.  Don’t worry about covering it evenly.  It makes sanding later much easier!

I then used a burnt orange acrylic paint to paint the word “love”.

I then painted the branches in a creme acrylic.  This is where I left it for a couple of days.  I had to decide if I liked it, by staring at it.  This occasional walk by and stare session was to make sure I didn’t want to add or subtract anything.

This can be the hard part for an impatient craft-er like me, but it is so valuable.  There would be nothing worse than to totally finish this project and not love it by always “regretting” one step.

I decided I loved it, so I sanded it down.  I wanted the newly painted touches to look more rough like the teal background.

Don’t you love seeing how we work outside in our car port in these pictures?!  My professional wood working brother is usually right there with us, which we take full advantage off to ask all our questions.

Next, it was time to stain!  I love this step.  It’s so quick, yet the effects are huge!

Doesn’t the stain just finish it off?  Check out the sanded image verse the stain image up close…

It makes it look complete in my book.  I can’t wait to hang this up above my beautiful bed!

Up next, we have to paint our room.  This weekend’s project, Matt???

Thank you so much for checking out my Friday Project Spotlight!  I hoped you enjoyed seeing how we created our headboard, and you might be inspired to try it yourself!

We had all the materials except for the wood which was about $50.  Cheap for a headboard!

Let me know if you have any questions we can help you with!

I hope you have a wonderful weekend!

I linked this project up at:  One Project Closer and The Ugly Duckling.

Share this:

  • Click to email a link to a friend (Opens in new window)
  • Click to share on Facebook (Opens in new window)
  • Click to share on Twitter (Opens in new window)
  • Click to share on Pinterest (Opens in new window)

Where The Wild Things Are

July 20, 2012 By Erica Deuel 3 Comments

Did you grow up loving the book “Where The Wild Things Are”?  I did not.  I didn’t get it.  To me , it was just a lot of pictures of monsters.  Now that I am a mom, I adore the book!  I love the imagination and can relate as I see my boys create places and pretend daily!  I tell my boys “I’ll eat you up-I love you so”  all the time now.  It’s a daily quote used around here.  In honor of this book and our love for it, I thought I’d paint another famous line.

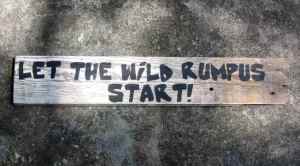
“Let the Wild Rumpus Start!” is a line I often think of when I think of my little family.  Having a five, three, and one year old makes life a little crazy!  You know life with young kids normally is crazy, but it is so so good too!  I want to embrace our craziness because to me it means we are so so blessed!  I can’t imagine life without my three kids.  Yes, I might get to craft or blog more, but my life would be nowhere near as rich and rewarding.  I love my life, so I choose to say “bring on the crazy” which is what “let the wild rumpus start” means to me.

I started this little sign with an old piece of tongue and groove wood, and you know I love old wood!  I then stenciled my words on with the technique I showed you on my burlap sign.

I probably worked on this sign for 1-2 hours everyday this week to complete it.  My five-year old sat right next to me during most of my painting spells.  Thanks to him there is actually a picture of me here crafting. 🙂

Isn’t he a cute little sidekick?!  One day he painted this big rock.

Another day he wanted to paint the same picture as me 🙂

After I got the words down, I added the trees.

I dream of having an art studio with a huge gorgeous room decorated right off of pinterest.  There is just not a place for that in our little 60+ year old ranch house, so for now…this is where I created this piece.

It works though.  Until I get that studio/craft room, I will just enjoy the creative spot I have!  I slowly added monsters, until I had one on each of my trees!

I was getting close to being finished!  I love to create and craft, but I get “tired” of doing one thing for too long.  Haha! That’s probably why I do a little of it all!!  I can’t master one piece in my store like I wish I could.  I love to make and try new things.  After five days of painting this thing, I was excited for it to be done.  Although I LOVE love painting…and paint bottles and paint brushes.  They just make me feel like creating.  Do you have materials that you just love like this?

I painted some leaves on my trees and outlined them with a small sharpie, and my sign was done!  I love the finished product!

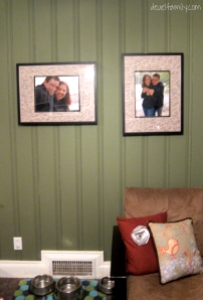
I’m not exactly sure where we will put this sign.  Maybe close to my kids art wall (that’s not yet complete), or above our engagement pictures.

It is not exact, but you can see the picture I was going for and used to model my design.  That fourth monster was the hardest to paint.  I mean, he’s like two colors yet shows contrast and depth!

I hope you enjoyed seeing my sign as the project for my Friday Project Spotlight this week!!  Thank you so much for checking in!  If you haven’t entered my hair bow giveaway yet-be sure to!

This weekend I am heading north to Farmersville, Ohio to help my grandparents auction off their big log/loft house and acreage.  They are down sizing into a retirement neighborhood where the houses are small and they get their grass cut for them.  It makes sense for an older couple, but this place has so many childhood memories for me!  It’s an amazing house that I grew up loving to go to.  I am sad to see it go, but I am also excited to see an auction!  I have never been to one!  I will post about it when I get back!

I hope you have a great weekend!

Let’s Party at One Creative Mommy,

At The Picket Fence,

I Heart Nap Time,

Stuff and Nonsense,

Romantic Home.

Share this:

  • Click to email a link to a friend (Opens in new window)
  • Click to share on Facebook (Opens in new window)
  • Click to share on Twitter (Opens in new window)
  • Click to share on Pinterest (Opens in new window)

An AMAZING gift!

May 29, 2012 By Erica Deuel 4 Comments

I showed you all what I MADE for my mom and mother-in-law for Mother’s Day, but I have not shown you what my AMAZING husband made me.  Brace yourself for this amazing-ness. 🙂

I saw a pin of a large mirror in a gorgeous wood frame on Pinterst forever ago, and I fell in love with it.  Since we have been married, we have just had a big plain mirror leaning up against my dresser in our room.  It was definitely NOT baby proof, but since is  was the only body length mirror we had, we just kind have dealt with it. At times I have had to steer all my kids away from it as they were banging on it, with fear that it could have fallen on them.  During these seasons of our lives, my bedroom door has remained closed all day…everyday.

Here are pictures of baby CALEB playing with our mirror…

For Mother’s Day, I asked Matt if he would make me some version of the pin I had seen.  He FAR out did himself!!  I not only got a safe mirror…it is stunning and oh so beautiful.  The best part would have to be my husband’s heart behind it.

He wanted to make it perfect for me, and he did.  There were many a steps, where I was ready for him to cut corners.  For instance, when the mirror didn’t fit into the frame (one of the two was slightly warped or something from being a perfect rectangle), I was ready for him to just glue another piece of wood behind the mirror.  I thought it could just sit on top.  He wanted it to rest inside the frame, so he hand carved and chipped at the trim until the mirror fell into place.  LOVE.

He designed it.  He bought supplies.  He measured and constructed it. He went back and bought more supplies.  He painted it.  He sanded it.  He stained it.  He chizzeled it.  He touched up painted it.  He touched up stained it.  He waxed finished it.

I am one blessed girl!  Thank you boo for this amazing gift, but more importantly…thank you for the gift of YOU!

He would say it’s not perfect, but to me…it couldn’t be any more perfect!  I am in love with it and my husband!

Share this:

  • Click to email a link to a friend (Opens in new window)
  • Click to share on Facebook (Opens in new window)
  • Click to share on Twitter (Opens in new window)
  • Click to share on Pinterest (Opens in new window)

My Creative Spot (part 2)

May 8, 2012 By Erica Deuel 2 Comments

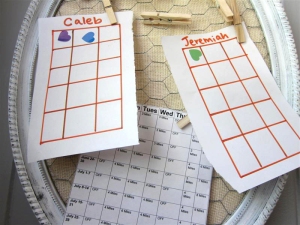
As promised, here is what is currently clipped to my memo board.

The two charts are a behavioral system we picked up from Caleb’s teachers at school.  They use it in the classroom.  When our kids are obedient on the first request, do something unusually nice/thoughtful, are encouraging, or have good “quiet times” we give them a sticker.  (Waking up with dry pullups/underwear is also a current sticker get-er) Once their chart is full of stickers they get to pick something out of my prize box.  I also take stickers away for being rude, disrespectful, not obedient, etc.  They HATE to lose stickers.  This has really helped our family.

It has eliminated some of the asking for things at stores.  If they see something they like, I sometimes buy it and stick it in my prize box, so they have to “earn” it.  It has really helped with nagging/ begging for things.  They know they get prizes by earning them.

I am constantly adding new dollar store/Target dollar section stuff to the box so they never know what is inside.  It’s exciting.  I also am VERY tempted to buy stuff out of the dollar section that I want to do with my kids and just give it to them.  I think, “its only a dollar”, but that was rearing some spoiled attitudes.  This has been good for me too.  I  can still buy the items I want too, but it holds me back from giving them away for just any reason.

Our charts change sizes.  It makes it fun for me :).  Some times they are longer than others.  Some days I am more pron to give lots of stickers than others.  Either way though this is something that we constantly have going on and it has helped us.  Thank you to Caleb’s amazing teachers for this gold nugget!!

My half marathon training sheet might also be hanging here.  I was going to train for the Alien Roswell run on August 18.  It’s at night and looks amazing!  Its now looking like we might do a family trip over that time, so I probably wont be able to do it.  I might still train for it anyway.  I turn the big 3-0 this year, and I would really like to run a half marathon before 2013.  It’s a goal.

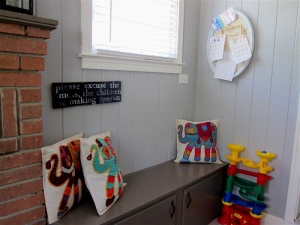
Our house is almost 70 years old, so it’s small and has lots of fun “characteristics” as in this built-in bench.  I think it’s suppose to hold firewood, but it definitely holds paint cans for us.  I love these three pillows my sister-in-law brought back for me from her World Race.  My house is all about color.  It’s my box of crayons!

That sign I made off one I saw on Pinterest.  As much as my OCD sometimes struggles with letting the house “go”  it’s a needed part of being a good mommy. This sign is a good reminder to me!

Thanks for checking out my creative corner!

Share this:

  • Click to email a link to a friend (Opens in new window)
  • Click to share on Facebook (Opens in new window)
  • Click to share on Twitter (Opens in new window)
  • Click to share on Pinterest (Opens in new window)
Next Page »
  • Email
  • Facebook
  • Instagram
  • Pinterest
  • YouTube
YouTube-Channel
Erica Deuel

Subscribe for Weekly Updates!


Most Popular Posts

Painting Flower Pot Party Tips
DIY Paper Butterflies- Spring decor for cheap
DIY {easy} Burlap Wreath
The Encanto, Madrigal's House Craft For Kids
Repurpose Old Kitchen Chairs
Cheap lamp to Industrial Beauty
School Desk Makeover
Engraved Wood Sign Tutorial (and Dremel Micro)
DIY King Size Rag Quilt {Repost}
Paint That Captures the Magic and Inspiration of Disney

Categories

  • All About the Kids
  • art journal
  • Blogging
  • Christmas
  • Craft Projects
  • Dancing Zebras
  • DIY
  • Eddy's postcards
  • Embroidery Journal
  • Family
  • Featured
  • Fireside Chat
  • Foster Care
  • Giveaways
  • Guest Posts
  • Home
  • Homeschooling
  • Kid Activities
  • Kid Craft
  • My Heart
  • Our Outings
  • Project Spotlight
  • Send Out Love
  • Shop
  • Sponsored Posts
  • Spoonful Lab
  • Spoonful Tribe
  • Tips + Tricks
  • Traveling
  • Uncategorized
  • Vlog

Favorite Categories

Subscribe for Weekly Updates!

Favorite Categories

© 2023 Spoonful of Imagination, Inc.