 Do you have an artist who loves to create with friends! It’s my bet that he/she would LOVE this collaborative art party game!
Over the years our art studio was in business, we hosted hundreds of birthday parties. We found that even after the individual projects were done- the artists would want to keep creating. We always had a coloring station, magnets and play-dough available, but we quickly became known for this fun art game that we held at the end of each of our parties.
 We would play an art version of i-spy
Have you ever sat in a restaurant or a doctor’s office and needed a way to entertain kids, while they are waiting? I-spy is a classic game and one you have probably turned to in a moment like that.
Kids get into it and have fun-without even realizing you may just be making the most of some idle time. It’s fun. It forms a connection and you learn a lot about how your child thinks, what he/she notices, and enjoy each other’s company in the process.
We would create a recycled art collage to use for our art version of i-spy. If you want to learn more about how we created this collage, you can view the 5 Reasons Why Creating With Trash Matters post or this quick video lesson from Erica.
 How to play i-spy as an art game
I always demonstrated a couple of rounds of leading/playing i-spy first. The idea is you call out things you spy, and they can only be on the i-spy board. The importance is to have a creative collage that is full of different items to make a well rounded, entertaining game. A few idea categories to think through and call out as you play…
- shapes
- colors
- item’s uses
- item’s location
- funniest
After I did a few rounds, I would let any artists who wanted to think of one to call it out. If everyone was excited to call an “i-spy” item out, we would just take turns going around the table with everyone getting a chance.
We would play this for as long as kids were really interested. Want to see this game in action? I convinced two of my kids to play with me in this video, so we could demonstrate it to you! They are getting a little old for it, but once they were playing, they still had fun!

 Paint that i-spy board
When the fun in the i-spy game is winding down, you can breath new life into the game by allowing the artists to paint the board together! We always just gave out the leftover paint from individual projects and each child a brush. We tried to encourage that teamwork happens in art too. They could each start by painting what stood out to them.
It was so fun to watch the artists paint such unusual items. They’d paint in the items, on the items, around the items and get to see how the paint moves, absorbs, and takes to each item.
We use tempera paint, just in case paint gets on clothes, as hands start reaching. I promise you will know the moment the game is ready to end. You simply say, “on the count of 3, it is time to end and then brushes need to be placed down. 1-2-3 brushes down!” and then it’s time to wash hands. Your artists run off laughing and talking about the fun they just had.
 It’s not everyday that artists get to paint a bottle cap, straw or broken shell. Let alone do it with friends after talking, studying and playing i-spy with those items. This i-spy game really is the perfect collaborative art party game. From creating the i-spy board to playing with it and then painting it, you breath a lot of extra life, engineering and fun into those recycled materials.
Sometimes the birthday child would want to take his/her collage home and sometimes we would share the picture and kindly toss the piece.

Isn’t that the beautiful thing about the process being the focus of creating and playing in the arts? If the focus is to have fun, play, and learn as you go then there is no pressure to save the final product. It can just be tossed!
I hope this game inspires you to play a creative art game at your next party or artist has a slumber party. If you need a little extra encouragement, check out this 5 minute video demonstrating a game in action. Let me know, if you try this fun!

 Do you have any emoji fans in your family?
 The first step is to turn one plate over on top of another and staple around the edges to attach the plates to one another.
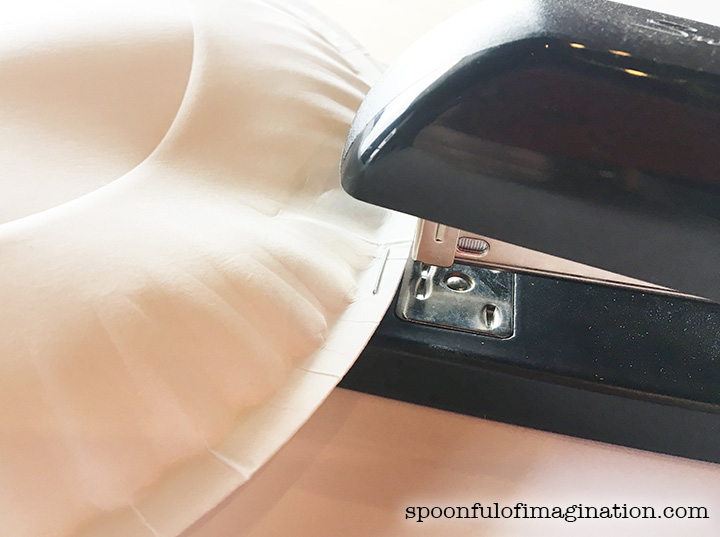
 After you have a face form, I used a little hot glue to attach my craft stick inside the plates. There was enough room between the stapled areas to stick a glob of glue on one of the plates, place a craft stick on top, and hold the sides of the plate together until the glue holds and hardens.
  After you have attached your stick, your emoji is ready to be created. This is where you can use whatever you have on hand! Markers, crayons, colored pencils, and even construction paper would be great tools to use to create your classic emoji face.

 It was so fun to see the artists laugh at one another’s creation as they guessed which face they were making. These were quickly used as puppets or props as kids talked and acted out little skits with them. It’s a magical moment to watch a creation turn into inspiration for more fun!
 This is such a simple project that you can personalize however you want! Maybe you want to paint your face-that’s great too!
 What little girl doesn’t love fairies?
 Next, come up with your activities and crafts. This was my schedule.


 I painted my guests each a little wooden butterfly name tag. They were pretty cute and would make great bookmarks after our event.

 As my guests arrived, we started creating our fairy wands. I had attached a painted wood heart to a dowel rod prior to the event and placed them around the table, so every guest could find a seat and have a wand ready to go. It was so fun to watch the kids personalities come out in how they decorated their wand. Some made patterns with the different colors and others tried to get as many sparkly things on it as they could.

 Once we had finished with the wands, we talked about fairies. How beautiful they are…how small they are…how colorful they are…what movies they are in, etc. They girls were really animated and excited. It was so fun. We then painted their fairy houses (small craft bird houses) and fairies that they would later use for their fairy gardens.
 While we waited for the paint to dry, we had a snack and played some fairy games. We created an obstacle course that the girls had to run through to “earn” their own fairy wings. We also squeezed in a few rounds of fairy-fairy-fly (which was simply a remake of duck-duck-goose). They were excited to run around, and it was fun to see them cheer one another on.
 Finally, I showed them an example of a fairy garden creation that my Caleb had made for the party. We talked about how the rocks could be used to create paths, the moss to create a forest, and so on. They were all so eager to start. I then showed them all the materials I had out and they went at it.


 Each girl was so proud of her garden. It was so fun to watch them carry them around and keep adding to them but also proudly show them off. I loved watching their imaginations come alive. One little girl thought to sprinkle glitter over her rocks like fairy dust. Another girl made a pool of blue sequins for water. How creative is that!? I have so much to learn from these girls.

 Each of their creations was so beautiful and fun. These girls had a blast, and I had a blast helping them have a fun afternoon. At one point I asked my Reagan if she was in her happy place and she smiled proudly and said yes. There is something truly special about creating and hanging with friends.
 While the girls waited for their parents to pick them up, the played with their gardens and it made my heart want to explode. I mean seriously. How cute is this!?
 You too can host a fairy party and make some girls’ days. The feedback from this event has been so fun.
 Do you live with some master builders?
 Once the spray paint was dry, I cut slits down the side of the box. This took away a little of the box’s sturdiness, so it would break like a typical piñata.
 I then recruited some cute helpers to help me stuff candy. Once the candy was in, I simply used some tape to seal the top closed.
 The next step was cutting up a bunch of tissue paper into little square pieces. We used school glue to attach the tissue pieces to the box. There was no special rhythm to how we did this. We placed a bunch of glue drops all over the box and simply started sticking tissue pieces on them.
 In order to get the raised connector part of the Lego brick to look right on the piñata, I used six bathroom drinking cups. I sliced around the top of each cup a couple of times and used my hot glue gun to glue the cups to the box.
 Next, I added some more tissue paper and it was done!
 I love how it came out! It was hard to get a really good picture based on all the texture, but after the tissue paper dries, if you press your hand down to pat the tissue paper closer to the box, that will help the shape. I think the size of your tissue paper squares helps hold its shape better too. I used pretty big squares since my “helpers” got burned out pretty quick and we were short on time. The smaller your squares, the more shape your pinata will hold tight. Just beware it will take longer to complete as well if your tissue paper squares may be bigger.
 My kids had a lot of fun destroying this piñata. Do you have some Lego builders that would have fun with one of these too!?