Spoonful of Imagination

Add it to a Family for Something Beautiful

  • Home
  • Our Family
    • Our Home
  • Courses
  • Shop
  • Contact

Emoji Party Craft

January 23, 2019 By Erica Deuel 1 Comment

Emoji kids craftDo you have any emoji fans in your family?

We do. My daughter will often want to use my phone to text extended family and she will type one sentence but then use like 20 emojis. She will giggle as she selects each one. It’s pretty funny.

Today, we have a quick and easy craft for you to pull out for your emoji fan to enjoy! Use it as a party craft, as a life saver for a snowy day, or just for a fun weekend project. It’s low mess and sure to bring smiles!

This is how you do it…

Grab a stack of paper plates, some craft sticks and a stapler to start. The first step is to turn one plate over on top of another and staple around the edges to attach the plates to one another. paper plate craft
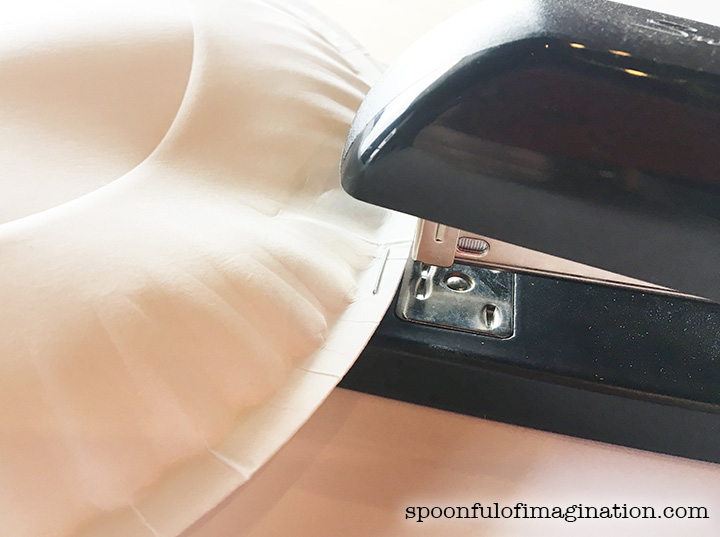
After you have a face form, I used a little hot glue to attach my craft stick inside the plates. There was enough room between the stapled areas to stick a glob of glue on one of the plates, place a craft stick on top, and hold the sides of the plate together until the glue holds and hardens. After you have attached your stick, your emoji is ready to be created. This is where you can use whatever you have on hand! Markers, crayons, colored pencils, and even construction paper would be great tools to use to create your classic emoji face.

We used pastels and leftover party photo booth cut outs (minus their stick) to create our faces. We placed all the tools out on the table and watched to see what inspired our artists and which face they created. Emoji kids party craftEmoji kids party craftEmoji kids party craftIt was so fun to see the artists laugh at one another’s creation as they guessed which face they were making. These were quickly used as puppets or props as kids talked and acted out little skits with them. It’s a magical moment to watch a creation turn into inspiration for more fun!

What do YOU think!? Will you make some emoji face puppets this week?Emoji kids craftThis is such a simple project that you can personalize however you want! Maybe you want to paint your face-that’s great too!

Maybe you don’t have an emoji fan but you have an LOL Doll fan!? I’m sure you can take the idea of creating a face and turn it into an LOL doll. Maybe you add hair cut outs for your artists to glue on!? There are so many possibilities on how you can take this project and make it yours!

Have fun! If you create some puppets, we would love to see! Tag us on social media with #spoonfulofimagination so we can see your masterpieces!

Share this:

  • Click to email a link to a friend (Opens in new window)
  • Click to share on Facebook (Opens in new window)
  • Click to share on Twitter (Opens in new window)
  • Click to share on Pinterest (Opens in new window)

DIY Transformer Necklace and Game

November 28, 2012 By Erica Deuel 12 Comments

On Saturday, my sweet Jeremiah turned four years old.  That morning I posted a picture collage which listed things he likes.  If you still want to know even more about my sweet boy, read his BIO on our “Our Family” tab at the top.  I don’t think it came as a surprise to you to see Transformers at the top of the list.  Transformers have been the “thing” around here since the end of the summer, which led Matt to making them their transformers school desk.

As his birthday approached, J kept talking about how he wanted to have a Transformers party.  The poor guy has a birthday that always falls right around Thanksgiving, if not ON Thanksgiving, so we opted to keep it small and just invite our families over for this shin dig.  Which you know my family alone is a party waiting to happen.

We took last week off school, yet with three kids in the house, we are always learning.  They assisted me in making this DIY Transformers necklace that I am going to share with you today.

We first picked out a bunch of bottle caps (and practiced counting them as we made sure we had enough for each of our party guests to have one).  The boys were sure to point out which bottle caps there were more of, so we must like that beer more and which bottle caps there were few of, so we must not like that one.  Aren’t they smart?

Next, we chose a pretty color of spray paint from our vast collection.  J liked blue the best, so we went with it for his birthday.  I spray painted the bottle caps on the backside to cover up the logos.

Waiting for these guys to dry was hard for the boys, so I let them hammer flat the “extra” bottle caps.  We will be using these on another project soon.

Those last three pictures were a rabbit trail, but all of you with active young boys like me would appreciate this news.  That activity kept them busy for an hour!  They loved it!  Boys with hammers and destroying stuff.  It was a perfect activity.  Ok, now back to the necklaces.  🙂

Once they were dry, my amazing husband helped us by using a nail and hammering a hole into each of the tops of the bottle caps.

I then printed really small pictures of Autobots off the computer.  The boys spent a long time with me looking at images and telling me which ones were good and which were not.  We had to talk about “pixels” and other new terms with this part of the project.  It was really fun to have them involved and excited.

It took some perfecting and printing of different sizes to find the size that could be cut close enough into a circle with seeing the image as big as it could be.

Once all our bottle caps had an images, we threaded them with a cord or string.  We used whatever we had.  Once there was a string (that would allow the Transformer “charm” to go around our necks) we glued the images on top.  By doing the thread and gluing of the image in this order, we got a bigger image and covered up the hole, so our “charm” would not move around on the string.  It made it a more permanent piece, which is what I wanted.

I then painted the images with a thick coat of mod podge to make them shiny.  Once they were dry, they were all done!

We laid them out, and the boys loved giving all our guests one as they arrived for J’s party.

They were SO cheap to make.  If you are not into collecting your own bottle caps, you can order brand new ones online. Just Google “Bottle Caps” and you should find plenty of options for less than $5!  I hope you will give these a try for your Transformer fan!  You could also branch out and turn these into fun charms for a number of occasions. Replace the Transformer images with your favorite characters, names, or symbols. You could use your guest’s names and hang them on seats for assigned seating or a drape them around a wine glass stem to keep track of glasses. As always, the possibilities are endless!

One other thing you might enjoy for a Transformer themed party is a quick game!

My son, Caleb, cut out a bunch of Decepticon (the bad guys) logos for me.

We taped them up all over our little house.  They were on walls, lights, beds, and even people.  Thank you Sam for being an incredible sport with your Decepticon label!  I then gave out all our Nerf guns and told them to run through the house and shoot all the Decepticons.  The boys, and a few other party members, had a blast!  It was so fun!

See everyone wearing their necklaces?!  They were all such great sports in honoring my little boy.  He felt so loved and had the best day!  I can’t believe he’s four!!  I hope you enjoyed these Transformer fun DIY party ideas.  I’d love to know if you give them a try!  Do you have a Transformer lover in your family too??

Check back tomorrow for more pictures from this party and from Thanksgiving!

Linked up at:  Uncommon Designs, DIY Showoff, Setting for Four, Red Head Can Decorate, Song Bird Blog, Miss Information

Share this:

  • Click to email a link to a friend (Opens in new window)
  • Click to share on Facebook (Opens in new window)
  • Click to share on Twitter (Opens in new window)
  • Click to share on Pinterest (Opens in new window)
  • Email
  • Facebook
  • Instagram
  • Pinterest
  • YouTube
YouTube-Channel
Erica Deuel

Subscribe for Weekly Updates!


Most Popular Posts

Painting Flower Pot Party Tips
DIY {easy} Burlap Wreath
DIY Outdoor Checker Board
DIY Burlap Flowers
Chiffon Flower Tutorial
DIY Paper Butterflies- Spring decor for cheap
DIY Outdoor Table
DIY King Size Rag Quilt {Repost}
Cheap lamp to Industrial Beauty
Engraved Wood Sign Tutorial (and Dremel Micro)

Categories

  • All About the Kids
  • art journal
  • Blogging
  • Christmas
  • Craft Projects
  • Dancing Zebras
  • DIY
  • Eddy's postcards
  • Embroidery Journal
  • Family
  • Featured
  • Fireside Chat
  • Foster Care
  • Giveaways
  • Guest Posts
  • Home
  • Homeschooling
  • Kid Activities
  • Kid Craft
  • My Heart
  • Our Outings
  • Project Spotlight
  • Send Out Love
  • Shop
  • Sponsored Posts
  • Spoonful Lab
  • Spoonful Tribe
  • Tips + Tricks
  • Traveling
  • Uncategorized
  • Vlog

Favorite Categories

Subscribe for Weekly Updates!

Favorite Categories

© 2023 Spoonful of Imagination, Inc.