 What little girl doesn’t love fairies?
The idea of colorful, beautiful little dressed girls is easy for their imaginations.
It’s the perfect time of year to run with their imaginations and make a day of it by hosting a fairy party.
In this post, I want to share a lot of my fairy party details with you, so you too can host a party for your little girl. I started with making an invitation. I wanted to let my guests know what we would be doing, but I used some of the elements from our activities in the picture rather than giving an example. I was hesitant to stop their imaginations or element of surprise for when they showed up.
 Next, come up with your activities and crafts. This was my schedule.
2:00pm-2:30pm Welcome guests, start them on a fairy wand craft while others arrive.
2:20pm-2:30pm Talk about fairies, what movies they are in, etc.
2:30pm-3:00 Paint fairies/fairy houses
3:00pm-3:30pm Snack/fairy games
3:30pm-4:00pm Create fairy gardens
It turns out I had a lot packed into my party, but we got it all in. I just had to watch the clock. Now, don’t hold too strictly to timing because you are working with little kids. Fun always takes precedent over getting everything in.
Now, if you are thinking of hosting a fairy party, you must definitely have a little girl or love one that you know a lot. Let them help you! We shopped for supplies together and then I let my kids help set up! They placed glitter/sequins in their containers for the fairy wand craft, decorated the concrete with chalk, organized things for me, carried things outside for me, hung fairy wings, and a lot more.


 I painted my guests each a little wooden butterfly name tag. They were pretty cute and would make great bookmarks after our event.


 As my guests arrived, we started creating our fairy wands. I had attached a painted wood heart to a dowel rod prior to the event and placed them around the table, so every guest could find a seat and have a wand ready to go. It was so fun to watch the kids personalities come out in how they decorated their wand. Some made patterns with the different colors and others tried to get as many sparkly things on it as they could.


 Once we had finished with the wands, we talked about fairies. How beautiful they are…how small they are…how colorful they are…what movies they are in, etc. They girls were really animated and excited. It was so fun. We then painted their fairy houses (small craft bird houses) and fairies that they would later use for their fairy gardens.

 While we waited for the paint to dry, we had a snack and played some fairy games. We created an obstacle course that the girls had to run through to “earn” their own fairy wings. We also squeezed in a few rounds of fairy-fairy-fly (which was simply a remake of duck-duck-goose). They were excited to run around, and it was fun to see them cheer one another on.
 Finally, I showed them an example of a fairy garden creation that my Caleb had made for the party. We talked about how the rocks could be used to create paths, the moss to create a forest, and so on. They were all so eager to start. I then showed them all the materials I had out and they went at it.


 Each girl was so proud of her garden. It was so fun to watch them carry them around and keep adding to them but also proudly show them off. I loved watching their imaginations come alive. One little girl thought to sprinkle glitter over her rocks like fairy dust. Another girl made a pool of blue sequins for water. How creative is that!? I have so much to learn from these girls.


 Each of their creations was so beautiful and fun. These girls had a blast, and I had a blast helping them have a fun afternoon. At one point I asked my Reagan if she was in her happy place and she smiled proudly and said yes. There is something truly special about creating and hanging with friends.
 While the girls waited for their parents to pick them up, the played with their gardens and it made my heart want to explode. I mean seriously. How cute is this!?
 You too can host a fairy party and make some girls’ days. The feedback from this event has been so fun.
One little girl wore her wings the whole next day, including into a pool…
One little girl was more excited about the fairy party than a sleep over that night…
One little girl said it was more fun than going swimming (which is a lot to say on these hot days)…
and two little girls currently have their fairy gardens in their house to keep them safe.
These are the moments and memories these girls will remember and look back on about their childhood. What an honor to help create such lasting moments and build into them as they continue to develop a love for creating.
If you want even more ideas for a fairy party. Check out my post on fairy gardens and see some pictures from a friend’s fairy birthday party for her daughter.


 I planned a craft that I could get the supplies for. Since it is summer, I thought painting flower pots would be fun and is a seasonal decor item that everyone can use. Even if you aren’t super crafty, you can paint a pot and wouldn’t feel bad putting it in your yard. I think planning a craft that is useful is key!
 The next step was getting guests! I ended up just posting a Facebook status asking if anyone else was interested in crafting and chatting. I was amazed at the responses I got! That led me to pricing out what my costs would probably be. I bought all the supplies, tablecloths, and drinks. I ended up asking everyone to bring a side to share. This gave away the part that stresses me out, kept the cost down, and kept me planning the part I most enjoy – the craft! I learned from hosting


 I used brown painting paper to place on the tables and had extra for my guests to take a piece in the car home with them to keep their pot from getting the floor dirty. You will see why below on how the cars could get dirty.
 I gave instructions on how I painted a few pots that I had on my patio. One of the tips that was the biggest hit was to spray paint the pot a solid color first and then embellish. Please note: I sprayed all the pots with a waterproof sealant 48 hours before.
 A few facts that I either did or learned:
 I loved having a little surprise for my guests. All the flowers that were used as centerpieces on the tables were for them to fill their pots. How much more fun is it to take home a flower-pot with dirt and flowers in it than an empty one that might just sit in the garage!?
 As guests arrived, we did a little mingling. We then ate as we talked. I gave a brief explanation on how to paint flower pots and told my guests they could make some greeting cards as they sit and wait for paint to dry as well. From there, it was just a fun night. I wanted it to feel more casual than an official event or class, so I didn’t talk for long. They just crafted away. I decided I’d mingle and talk and be available to help anyone. This helped since I didn’t give lots of step by step instructions. It was so much fun! I think I was giddy all night long.
 Now, when I smile at the girls at church I feel like we both know each other a little better. Sometimes the first step to a friendship is just saying hello, but sometimes we need to branch out a bit more and share parts of our lives, talents, homes in serving or hosting or something. I am so glad I branched out.
 To all the beautiful girls that came, THANK YOU! I had a blast with you!
 Do you like crafting and chatting too!? I love deep talks, but sometimes a coffee date can intimidate me on getting to know someone without something in my hands. Crafting is my favorite way to talk with others. A fierce game of kickball with my kids and their friends is fun too. I plan to do that this weekend.
 I have been on the hunt for lockers to put in our home for years. Seriously! It’s not like they are super hard to find. The problem is that the folks who sell them are often pretty proud of these old rusty boxes that used to hold sweaty gym shorts. Finally, I found these beauties that met my criteria for price and size and I quickly scooped them up.
 My amazing kiddos jumped in right away, when I asked for their help to scrub those old sweat boxes down with some soapy water. I mean seriously, these did come out of an old locker room. Yuck!
 I went ahead and placed the lockers where I wanted them to go. The contemplation game was on. What would be the perfect color to help tie my new lockers into the room?
 I pulled out my tarps. Covered the locker face plates with some masking tape. Then I applied my five colors.
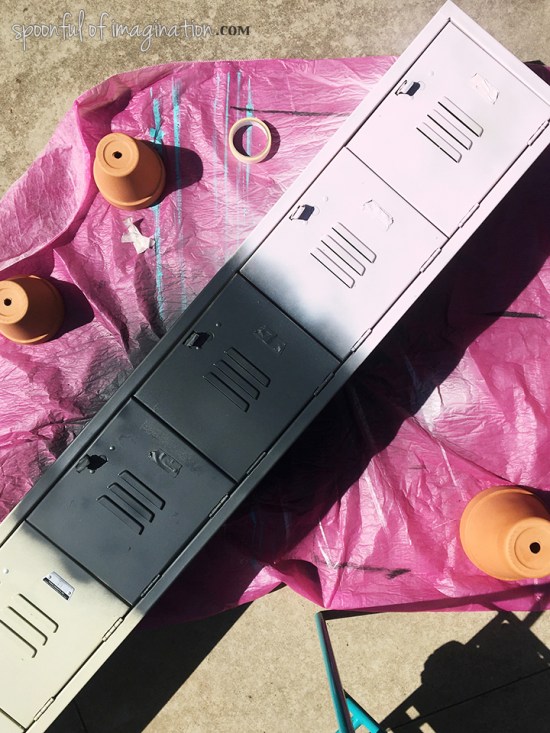 Below is the finished test color results. Once I saw the lockers in place, I had a feeling I knew which color I wanted to use.
 Please ignore all my laundry and look through the doorway to the right. You can see the beginnings of a project I will share with you soon. The colors were all coming together making me want to lean in a lighter direction with the lockers. But, like I said, I turned to Instagram to see what my followers had to say. My followers know I love color, lots and lots of color. They all rallied for me to keep the test colors as-is and go with the multi-colored box of crayon approach to my lockers. I just couldn’t do it. My OCD overruled my Instagram friends. (Sorry!)
  I landed on the light pink and after letting it settle in for a few weeks, it’s official, I love it! This room already has a lot of busyness with my rug and new wall art happening to the right. The solid color ties it in well while it still has a nice soft pop.
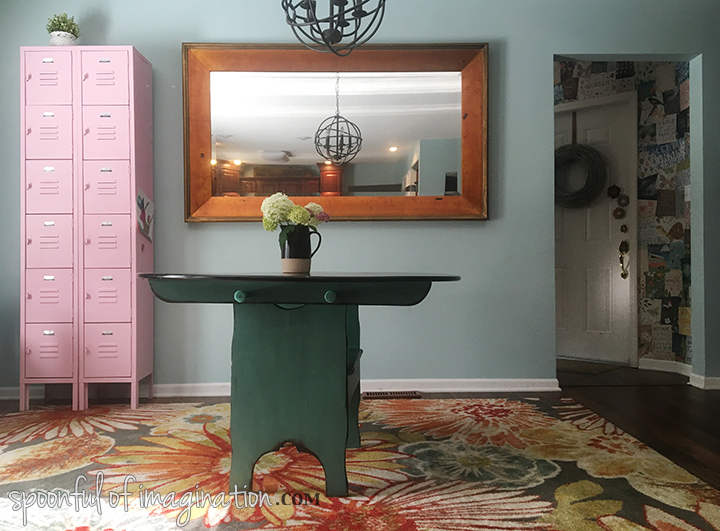 Reagan fell in love when I showed her how she could use magnets to now hang her artwork to the lockers. Which by the way is the primary use for the lockers – art supplies. This little corner is my kids crafting corner. The have all their own supplies and are free to dive into projects whenever they want. Now the locker gives us a little more storage and a fun place to put their work on display.
 I’m not a very patient person but some things end up being worth the wait. I love love love my new lockers even though they took years to find. I also love the color after weeks of deliberation and lots of back and forth.
 Have you shopped for wallpaper recently?
 The small window does not let in a lot of natural light, so I painted this room a very, very faint blue to try and brighten up the space as much as possible. You can see the before wall color and other half of the room
  The first step was to pick out my colors. One reason I think my first floral wall took so long was I used cheap paint. I decided I needed to use nicer than the the least expensive acrylic paint bottles at the craft store. I ended up opting for paint samples mostly of the HGTV paint line at Lowes, and they were perfect.


 Each flower needed two coats. The only one that needed more was my fushia flower. The color has some red in it…which is always a hard color to paint. Red will always needs lots of coats. After each flower was covered in coats, I started adding more detailed layers to the flowers. I ended up leaving the limey green leaves in one coat. I liked the painted look it created.
 These pictures aren’t the best but are what I sent to my sisters and a few friends as I painted. I was obsessed and excited as the floral wall took shape. It was addicting and really only took a few days working off and on! I made a decision to enjoy it and not let it stress me out. I painted each flower like I would on a sign. I didn’t worry about the edges being “perfect”, but left them to have a slight brushed look. The simple imperfection and not correctly centered flower centers make all the little artsy elements come together to create a really fun/funky yet pretty look that I love.
 I really love how it came out! The flowers are simple yet beauitful. The pops of colors play together well and create a really warm, fun feel. That light blue wall was the perfect base to embellish on.
 This floral wall allowed that room to be a little more fun, yet it didn’t add a huge amount of color that would make a small, poorly lit room feel even smaller or dark.
  What do you think? Would you try to paint your own “wallpaper”? The thing with this design is I can just paint over it when we tire of it. For now, we love hanging out in this room.