Spoonful of Imagination

Add it to a Family for Something Beautiful

  • Home
  • Our Family
    • Our Home
  • Courses
  • Shop
  • Contact

The Unbreakable Egg

March 25, 2013 By Erica Deuel Leave a Comment

The Unbreakable egg craft

Last week, we did a little craft that I want to share with you all today.  It is so quick and easy.  I think it’s also the perfect way to get rid of some of those plastic Easter eggs you pick up from Easter egg hunts.  I called it the unbreakable egg because my plastic eggs now feel like hard rocks.  Here’s how you can make some eggs your toddler can toss and wont break.

Materials:

  • Plastic Eggs
  • Tissue Paper
  • Glue
  • Mod podge

easter craft supplies

The first thing you do is to cut your tissue paper up into small squares.  I tried to only do soft spring colors, but I have boys and they insisted on the dark blue tissue paper as well.  🙂

bowl of tissue paper

The next step is to put a dab of glue on a plastic egg and stick a small piece of tissue paper on top of it.  I told my boys to try to cover up as much of the egg as they could.  They weren’t perfectly covered, but the eggs were all pretty colors.  Having some of the eggs show through was ok.

plastic easter egg craft

After the eggs are all glued up with tissue paper, let them dry.  This can be a messy process as tissue paper and glue are sticky together.  My boys loved the mess, and it was fun to give them a project where it was allowed to get messy.

mod podge easter egg craft

Once the tissue paper on the eggs is dry, cover them with a good coat of mod podge.  Note:  You will probably have to paint one side, let it dry, and then paint the other side.  The mod podge step is very important because it binds all the unglued edges of the tissues paper tight around the egg while also giving the egg a nice shine.

mod podge easter eggs

Once the eggs have dried, you are done!  Display them wherever you want!  I stuck my eggs in a flower-pot with a little straw.

plastic easter eggs

This was such an easy project for my boys and even my little toddler had fun while we were crafting.  She sorted and played with the eggs all afternoon!

learning with plastic easter eggs

Easter Egg Craft

Thank you so much for stopping by!  I hope you all had an amazing weekend!  We are slowly getting over our crazy virus around here!  I hope to have an update post on our moving/house situation this week!  Thank you for all the encouraging words and follow-up questions I have had from so many of you!  You are the best readers!

signature

Share this:

  • Click to email a link to a friend (Opens in new window)
  • Click to share on Facebook (Opens in new window)
  • Click to share on Twitter (Opens in new window)
  • Click to share on Pinterest (Opens in new window)

Craft Supplies

March 15, 2013 By Erica Deuel 4 Comments

20 top DIY craft suppliesIf you aren’t a DIY crafter, it can be really overwhelming to walk into a craft store like Hobby Lobby, Jo Annes, or Michaels.  There are so many different products and all classified in aisles with similar type items.  I assume you stand there looking at it all and wonder which do you choose and where do you start.

Today, I want to give you a list of my favorite craft items.  These items (other than the ones that don’t need replacing like scissors and ruler) I am regularly buying, even if I don’t have a project in mind.  They are the items that I use ALL the time for a wide range of projects.  I feel like if you have these items you can jump start DIY projects and decorating your home for much less.  Below I have listed 20 items and given examples of ways/projects I use these craft items.

Read the list, print it out, and go shopping!

1. Clear Sewing Ruler

My favorite ruler is 3″ x 18″. I use it to measure everything-not just sewing projects! I love to use it on paper crafts as well because you can align patterns better with the see through style. Example of use: making cards and centering applique items on fabric

clear sewing ruler

2. Mod podge

I think Mod Podge can make any project look more “finished” and “professional.” There are lots of different finishes, but the gloss and matte are my two favorites. Example of use: finishing off any ceramic paint job, collages, or appliqueing pictures/papers to other objects

modpodge

3. Sharpies

I use sharpies everyday. There are lots of different sizes and colors. Having a multi pack is a great thing to have on hand. Example of use: making cards, organization, banners, decorating jars/signs

sharpies

4. Exacto Knife

Having an exacto knife on hand is so helpful. It can be used to cut all those small or intricate things that scissors can’t do really good. Example of use: create your own stencil

SONY DSC

5. Burlap/Burlap Ribbon

Burlap is so fun and cheap! You can buy it by the yard, or (in the flower section at Hobby Lobby) they sell it in a variety of different ribbons to make it more manageable to create with. I have both on hand and use them all the time. Example of use: create a table runner, decorate jars, make a banner, wreaths, and embellish pillows

burlap_ribbon

6. Brown packaging paper by the roll

I buy mine for a $1.00 at the Dollar Tree in the office supply section. It makes great wrapping paper, but I end up using it a lot on other projects as well. Example of use: table runners, banners, stuffing for filler items, cards, wall art, or a drop clothe for other projects

brown-wrapping-paper-8-meter-roll

7. Paint brushes

Having paint brushes in a variety of different sizes is so helpful! I also like to have a variety of types as well. I have a Dollar Tree ones that I use on quick, one time projects like staining a sign. I also have nicer fine brushes that help me paint small things like letters. Example of use: painting signs, using mod podge, or decorating anything

775paintbrushes

8. Acrylic paint

I have a whole basket of different colors of small acrylic paint bottles for like $0.49 each. I like the Americana brand at Hobby Lobby. Example of use: creating a sign, painting seasonal items, embellishing items, or organization

art-deco-paint

9. Scrapbook paper

I buy the brown paper package at Hobby Lobby and use it for everything! I also love to have lots of fun sheets and patterns on hand. I use to scrapbook, but now I use all my scrapbook paper for different projects! Example of use: cards, background for frames/wall art, banners, and embellishing

scrapbook paper

10. Packages of fun/vintage buttons

There are so many fun uses for buttons and you can never have too many! Example of use: hair bows, wreaths, pillows, wall art, necklaces, and embellishing

buttons

11. Cute glass jars to store craft supplies in

I love to store my beads and other small craft stuff in pretty jars, so I can easily see my supplies and also enjoy their fun bright colors. Example of use: storage, organization, vases, gift to give flowers

glass-jars-with-lids

12. Sheets of felt

They sell pieces of felt for $0.25 each at Hobby Lobby. I use felt on a lot of different projects. Example of use: hair bows, embroider hoops, sewing projects, wreaths, and embellishing

sheets of felt

13. Embroidery floss with needles

They are like $.19 each and I always use it for something! Example of use: wall art, embroider hoops, hair bows, monogramming, sewing projects, and embellishing

embroidery floss

14. Jute rope

Jute Rope is a staple. I use it on everything from wrapping presents to making banners & tags. Example of use: decorate jars, banners, gift tags, cards, wreaths, and wall art

jute rope

15. Small sewing scissors

Good scissors are so important, but also there are so many projects (even paper ones) where I need a small point to cut something out and need a small sharp needle. Small thread scissors can be perfect for this OR in the BEAUTY section at Target the eyebrow trimmer scissors are really good too. Example of use: creating stencils, cards, hair bows, paper wall art, and sewing projects

eyebrow scissor

16. Stencils

Stencils are great to have on hand. If you don’t want to buy one, you can make one like I showed you on a personalized sign I made for my sister. I think having a nice font with all the letters of the alphabet is a great place to start. Example of use: signs, cards, organization, and embellishing

stencil-alphabet

17. Fun tape or ribbon

I recently bought some fun patterned duct tape in the Target dollar section at the front of the store, and I know I will be using it on something other than a normal duct tape use. Example of use: wall art, wreaths, hair bows, embellishing

ribbonspools

18. Little Things

I love little things like knobs, scrap book pieces, feathers. I use them all the time in random projects. Example of use: signs, hair bows, wreaths, and signs

craft feathers

19.  Hot glue gun

A hot glue gun is a staple in the craft room. I have two guns. I have a fine tip hot glue gun that I use to make hair bows, but I also have one that has a wider end that is helpful to use on bigger projects. Example of use: ANYTHING!  I just used it to make a rug 🙂

Hot-Glue-Gun

20.  Natural elements

Here is where I might sound weird. I have zip locks of natural elements that I love to use in decorating or other craft projects. Examples:  acorns, pine cones, bark, hay, and rocks. Example of use: filler to lanterns/jars, mantle decor, banners, signs, and wreaths

pinecones

Spring is such a wonderful time to de clutter and get motivated to start new things.  I hope this craft list can help encourage you to try a DIY project if you don’t already craft. If you are ALREADY a crafter, did any of these items surprise you from me?  I think the BEAUTY supply item (eyebrow trimmer scissors) is such a valuable tool!  What is your favorite craft item?

signature

Share this:

  • Click to email a link to a friend (Opens in new window)
  • Click to share on Facebook (Opens in new window)
  • Click to share on Twitter (Opens in new window)
  • Click to share on Pinterest (Opens in new window)

8 Easy DIY Kid Ornaments

December 12, 2012 By Erica Deuel 5 Comments

Today, I have 8 easy DIY kid ornaments to share! They are all really cheap and would make presents for grandparents or proud aunts and uncles! I bet you already have the supplies in your house to make a few of these with your kids.

1.  Wood Block Ornament

I have gotten some sweet comments on these wood blocks on Facebook, so I thought I would share how to make them.  I started with a small piece of wood.  It’s cut roughly about 2.5″ x 2.5″.  I sanded it down, so the edges and corners were smooth.  I then let my boys paint their ornament any color they wanted.  My sweet girl was only 10 months at the time of this craft, so I painted hers a solid purple.  I sized the pictures down on my computer, so they would print a size that would fit on the ornaments.  I cut them, rounded their edges, glued them on, and gave the whole block a good coat of Mod Podge.  I then screwed a little hook in the top and added ribbon and string, and they were done!  We gave ornaments like these to their grandparents last year for Christmas, and I think they were a hit!  Other ways to use the ornaments are to capture a first year marriage (with wedding pic) or a baby’s first Christmas (with a baby picture).  These are both gifts I have given.  I love to add a personal touch to gifts.  There are so many ways this ornament could be given as a wonderful present!  I can’t wait to make new ones for our tree for this year!

2. Paper Hand-print Ornament with Bells

You might remember from my Thanksgiving Turkey post that I am obsessed with hand prints.  For this ornament, I simply stamped their hand onto a sturdy card stock, cut it out, and glued it to a coordinating color card-stock.  I then punched a hole in the top and added some ribbon and bells.  I love that it’s simple, but it captures the “year” of your little ones size hand.  Make sure to date the back!

3.  Painted Plastic Balls

You can get a big tube of plastic ornaments anywhere.  I had a package of plastic balls that I no longer liked to hang on the tree.  I let my kids paint them, and I all of a sudden liked them again.  🙂  We switched out the hooks for pipe cleaners, and they make great ornaments on my boys’ tree in their room.

4.  Paint Pre-made Wood Ornaments

There are a lot of simple but cute wood ornaments you can find on sale at your craft store.  I love to let my kids paint one every year.  It is fun to see their growth in their painting skills to look back at previous years.  I also like to maximize the use of a tacky, kid ornament going on my tree.  I stamp their hand or glue a picture to the back side of these ornaments, if there is room for it.  It is kind of like having an easy scrapbook to pull out every year by having ornaments that contain their art, picture, or hand prints.  I love it.

5.  Paint Pre-made Pottery Ornaments

Right by the pre-made wood ornaments there are usually unfinished clay/pottery ornaments that you can buy.  I also love to do these every year.  After we paint them and let them dry, we go back and give them a good coat of mod podge and they look just like any DIY pottery ornament that you could paint at an art studio for probably about 1/4 the price.  We did this same technique with our pumpkins this past fall.  In that post, I gave you tips on how to paint with little kids.  Yet, you can see from these pictures even with lots of painting practice, it is still tricky.  I had to stop my four-year-old from eating paint after taking one of these pictures.

6. Popsicle Ornaments


I love all the possibilities with popsicle sticks for ornaments.  We have done a Christmas tree and a star so far this year.  I actually love their stars probably more than my star.  I still want to make a popsicle snow flake this Christmas season.  After the glue dried holding the popsicle sticks together, they painted their trees green and their stars yellow.  They then went back and glued buttons on their trees for ornaments and sprinkled glitter on their stars so they would sparkle.  We simply added some pretty rope, and they were done! I then picked a few pictures to cut and paste to the back allowing the popsicle sticks to act as a frame.

7.  Puzzle Piece Ornament

This puzzle piece ornament is another one we did last year.  We got a dollar store puzzle and painted all the pieces red and green.  After they were dried, I let them glue the pieces around a the construction paper “frame” that I had already cut out.  Once that was dry, I glued a picture to the back and hot glued some rope on.  I love the contrast of a black and white photo with the colored puzzle pieces.

8.  Tomato Sauce Lid Ornaments

We go through a lot of salsa and tomato sauce around here, and I have started saving the jars’ lids.  I knew I would come up with a reason to use them, and I did.  I used the same technique I created for my bottle cap necklaces.  I spray painted the backs white, nailed a hole in the top, added string, cut pictures to fit, glued them in, and mod podged over them.  These are still drying, but I plan on writing a quote my kids have said this Christmas season on the back of their lid. I think it would also be cute to write something they “wished” for this Christmas, so you capture what they were asking from Santa.  Another idea instead of inserting their picture is to allow them to draw a picture of their family and glue that inside.  I might have to spray paint some more lids and create a few more of these. 🙂

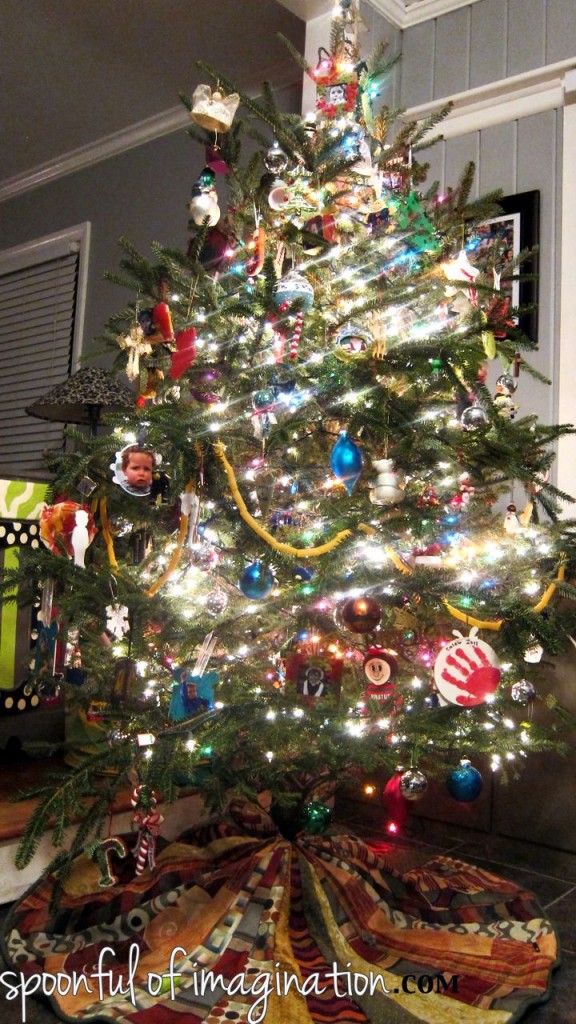
As you can imagine, my Christmas tree’s theme is “kid created.” I think someday I will probably have a more fashionably decorated tree, but I will probably have to have another tree with all my kids’ ornaments too!  I’m sure this one will remain my favorite.

What is the theme of your Christmas tree?  Do you make ornaments with your kids?

I’d love to check out your tree.  If you leave your link in the comments, I will be sure to check it out!  Thank you so much for stopping by!


Linked up at:  Shaken Together, Setting for Four, DIY Showoff, Honey were Home

Share this:

  • Click to email a link to a friend (Opens in new window)
  • Click to share on Facebook (Opens in new window)
  • Click to share on Twitter (Opens in new window)
  • Click to share on Pinterest (Opens in new window)

Painting: Tips for letting young kids paint!

September 23, 2012 By Erica Deuel 9 Comments

This week we did LOTS of fun things.  We got to have two play dates, a park outing with their grandma, and even a zoo visit with friends.  We only had one day this week where we didn’t have anything on the calendar, and it just so happened to be the “rainy” day.  We loved it!

In our school days, we have been talking about fall and the changes that come with this season.  Having a rainy day at home, was the perfect time to paint our ceramic pumpkins!

They did an awesome job, and I absolutely adore them!!  I know they will be a decor item I save and use for years and years!

I got these little ceramic pumpkins at Hobby Lobby last week and they were on sale for 40% off.  I think the small pumpkins ended up costing about $1.70 and the large one was about $2.80.  They cost SO much less than going to a paint your own pottery place, but I think the effects and look is the same!  Thanks to one little tip at the end that I will share with you!

We talked about fall colors and which colors they would like to use on their pumpkin.  I said they could use any “fall” color.  They said they wanted to use only orange and brown.

I let my little girl paint!  She’s about 20 months old and loves to paint!  She kept squealing with delight, smiling, doing a bouncy dance in her seat, and laughing.  While I watched her with so much joy, I had the thought that many people might not try this with a child her age.

It can be a little scary and hard, but it is worth all the work.  We are building memories!

I came up with ten tips to help make painting with young kids less intimidating and easier to do.  I hope you find them helpful!

1.  Strip your kids down.  🙂  They can wear an old shirt or paint smock.  We have both, but I usually just have my boys take off their shirts.  It’s so much easier and then you aren’t pulling wet paint over their heads, when they want to remove that shirt afterwards.  For my little girl, I had her wear an apron to stay “modest” for these pictures. 🙂

2.  Use a big tarp or old table clothe to cover your table/painting area.  I tend to use big sheets of paper or old newspaper because I can just bawl it up and throw it away afterwards.  It helps keep it simpler if you don’t have to wait for the table cloth to “dry” and worry about where to store them, so you find them next time.

3.  Use paper plates as your paint pallets!  Although those cute plastic pallets that are sold in art stores are cute with the divided out areas for different colors, they are just one more thing to clean. I stopped using them because they always had dried paint on them and were a pain to scrub clean.  We just squirt some paint on to paper plates and throw them away afterwards.

4.  Paint in steps!  If your child tends to “quit” quickly, you can let them paint till they want to be done.  If you want them to “cover” more of their area say “you can let that dry and come back later and work on it”.  It’s ok, if it isn’t completed in the first sitting.  Hardly any of our projects are, right!?

5.  Go with their creativity!  This is so important!  Let them dream and design it as they want!  I fight the urge in me to at times want to “touch up” their work.  You want THEIR work not YOURS, so let them create it as they want.

6.  Do not have a “time” crunch or crazy busy schedule where you are trying to “squeeze” this activity into a tight window frame.  The best projects are when they are the only “to do” and you aren’t rushing to just get it done, so you can go to the next project.  Any easy tip along these lines is to have a cup of water for the older kids to clean their brushes (before changing colors) on hand.  When we are done painting, I throw all the brushes into the cup, so I can walk away and help the kids get cleaned up.  I can come back and clean up the mess later, without worrying about the brushes having dried out.  Also, use a plastic/throw away cup here!

7.  Let them explore!  It might end up the little one starts painting her belly.  I go with it.  She is exploring and learning so many things (cause & effect, sensory elements, and fine motor skills are just a few).

8.  I always plan for a bath to be needed afterwards, so it’s a nice surprise when that is not needed.  After our pumpkins were painted, the rain started pouring!  I let them run and splash, so they were gonna need a bath anyways.

9.  Let them admire and show off their artwork.  They will be so proud of it, if you encourage and praise them and their work!  They will want to touch it and show it to others!  Let them.

10.  Have fun with it, and have the mindset you are making memories!

That is it!  There are ten tips to help you paint with your little ones!  I hope it helps and doesn’t make painting with “babies” so intimidating!  Our last step for this project was to give our pumpkins a thick coat of Mod Podge.  This created a shine finish to the pumpkins that makes them look like they are fresh from a ‘do it yourself pottery place’.

An easy way to incorporate step 9 being “letting your kids show off their art work” is to display it around the house.  I put my kids’ pumpkins on my mantel, and they are so proud of them.  My three-year old goes over to look at his pumpkin several times a day and says proudly “look!  It’s dry now mom!  I can touch it.” as he scoots a chair over. 🙂

I hope this post helps you tackle a painting project with your kids and gives you some tips on how to do it, and it to be a cheap and fun memory!

Later in the week, I will be sharing more with you about this pretty fall wreath!

Thank you so much for checking in and reading this little blog of mine!  I hope you all had a relaxing weekend!

Linked up at: At Home Take 2, Centsational Girl, The Inspired Room, and Hip Homeschool Moms

Share this:

  • Click to email a link to a friend (Opens in new window)
  • Click to share on Facebook (Opens in new window)
  • Click to share on Twitter (Opens in new window)
  • Click to share on Pinterest (Opens in new window)
Next Page »
  • Email
  • Facebook
  • Instagram
  • Pinterest
  • YouTube
YouTube-Channel
Erica Deuel

Subscribe for Weekly Updates!


Most Popular Posts

Painting Flower Pot Party Tips
DIY Outdoor Checker Board
DIY {easy} Burlap Wreath
Cheap lamp to Industrial Beauty
School Desk Makeover
DIY King Size Rag Quilt {Repost}
DIY Paper Butterflies- Spring decor for cheap
Chiffon Flower Tutorial
DIY Outdoor Table
DIY Bookends (what you can make for being a hoarder)

Categories

  • All About the Kids
  • art journal
  • Blogging
  • Christmas
  • Craft Projects
  • Dancing Zebras
  • DIY
  • Eddy's postcards
  • Embroidery Journal
  • Family
  • Featured
  • Fireside Chat
  • Foster Care
  • Giveaways
  • Guest Posts
  • Home
  • Homeschooling
  • Kid Activities
  • Kid Craft
  • My Heart
  • Our Outings
  • Project Spotlight
  • Send Out Love
  • Shop
  • Sponsored Posts
  • Spoonful Lab
  • Spoonful Tribe
  • Tips + Tricks
  • Traveling
  • Uncategorized
  • Vlog

Favorite Categories

Subscribe for Weekly Updates!

Favorite Categories

© 2023 Spoonful of Imagination, Inc.