Spoonful of Imagination

Add it to a Family for Something Beautiful

  • Home
  • Our Family
    • Our Home
  • Courses
  • Shop
  • Contact

Little Girl’s Bedroom

June 13, 2013 By Erica Deuel 9 Comments

Bedroom makeover

Reagan’s Bedroom is one of my favorite makeovers I have ever done. I think because for half of the creating and planning for it, we were not even in our new house yet. I learned a lot about trying to create for a space that you don’t get to walk by and stand in everyday to imagine and “see” your project come to life. I was stretched and now have made something I am proud of as a result.  If it was my choice, we would play in there all day everyday.

Although she may only be two, it is something Reagan is proud of as well. If you were to walk into my house right now, she would ask you to come upstairs and see her room…even if you have already seen it. It makes my heart so happy. Some work might have been required, but what an easy way for me to show love to my daughter by being able to create something she loves.

Since before we moved, I have been showing tutorials and DIY projects that I have been creating to incorporate in her room. I thought it would be helpful to put all those in one place, so there is a little summary of how create this room. Please feel free to bookmark it, pin it, or share it. It is my hope all these hours of creating can inspire others to create as well.

DIY little girl's bedroom

Minnie Mouse Silhouette

DIY Fabric Bunting

Burlap Lampshade

Refinishing Ikea Furniture

Painted Stool

Stick Heart Wall Art

Teal Rustic Dresser

DIY Painted Striped Wall

It’s so nice to have all these links in one place! Many of these projects are some of my favorites, and I am so glad I can give you this summary. A few other items that I have incorporated into this room are shown below.

Elements for a girls bedroom

Wood Log End Table

You are My Sunshine Rustic Sign

Hair Bows and Headbands

Thank you so much for checking out my little girl’s bedroom summary! I hope these links and posts can help inspire you. Please feel free to contact me, if you have any questions about how to do any of these tutorials!


signature


Share this:

  • Click to email a link to a friend (Opens in new window)
  • Click to share on Facebook (Opens in new window)
  • Click to share on Twitter (Opens in new window)
  • Click to share on Pinterest (Opens in new window)

Minnie Mouse Bedroom Reveal

May 9, 2013 By Erica Deuel 20 Comments

Disclaimer: Compensation and products for review were provided by Glidden via MomTrends. The opinions expressed herein are those of the author and are not indicative of the opinions of Glidden.

DCIM100GOPRO

I can’t believe I can finally show you Reagan’s room! I have been planning and dreaming about this room for weeks and weeks! Now that it is complete, I am just giddy. I love it. It came out better than I was even hoping.

Bedroom makeover

Just to give you a quick recap…

  • I bought the Disney Paint weeks ago at my local Wal-Mart.
  • I fell in love with it as I painted my great grandmas’ old dresser and created a DIY Minnie silhouette with it.
  • I started painting Reagan’s room last week and showed you how to do a stripe accent wall.

I am not a good painter, but I was able to paint this entire room in two days. Although I am really messy, I love to paint and I have learned a lot through the years. I want to give you a few tips that I have learned along the way.

  1. Use painter’s tape: I use painter’s tape to tape off any area (trim, ceilings, knobs, etc) that I don’t want to get my paint on. I have learned to press the tape down well to make sure it is sealed and to pull it up as soon as my project is dry to the touch.
  2. Get extra lighting: I always pull in extra lights to help me see well while I paint. This will help point out missed spots and can be especially helpful if you are painting at night.
  3. Have baby wipes close by: Although I use painter’s tape, sometimes I still get paint on the ceiling or somewhere else I didn’t want it. I told you I was messy. Baby wipes help remove the paint while it is still wet and can usually make it look like it was never there. I use a lot of them when I paint.
  4. Use drop clothes: I used old sheets and tablecloths as my drop cloths on this project, but the main idea is to cover up all the carpet/flooring to help prevent any accidents. I also used a collapsed cardboard box (since I have a few on hand :)) to sit my paint can on just for that extra added sense of barrier from my new carpet.
  5. Have company: I like to paint with someone to talk too. It makes the work more fun and the time to pass by more quickly. Thanks to my husband for keeping me smiling, taking my picture, and helping me through this project.

painting tips

painting a chalkboard wall (black and white)

After her room was painted, I started playing around with where I wanted things to go. I had fun staging and designing. For a little bit there, I forgot I was just a stay at home mom. I felt like I was on some design show. I had a blast. The actual set up of furniture placement and decor took about five days, which was good cause the speciality Disney finish I used was the Great Slate paint. It needed a week to cure, before it could be written on.

Great Slate Wall in kids room

As I set up, I realized other little things I wanted to add. For example, I wanted her to have a stool beside her chalkboard wall. So, I painted her one with my left over Disney Paint.

girl bedroom decor

I love that the Great Slate wall allows her to draw and be creative, while it is also in her reading nook. This little area in her room makes me so happy as it is a learning/dreaming set up to create! Another thing I realized this week was I needed a tad longer piece of bunting to cover the electrical cords, so I made some more.

fabric bunting

I love how the room turned out, and so does Reagan. On the day of her little room reveal party with some of her best friends we set up a lot of her favorite foods with fun Minnie Mouse decor paper items and waited for our guests.

food for a play date

She was so in love with her room, I didn’t think she was going to get off her bed at first. She just sat there for the longest time and took it all in. That was the moment I knew all the work was worth it!

Minnie Mouse fan

Once our friends arrived, we played, colored, and showed the room off. It was so fun to visit and relax after working hard and completing something I am proud of creating.

little girl coloring

eating at playdate

We had a lot of kids over and couldn’t get them all in the picture on Reagan’s bed at once. We had a blast!

Playdate party with friends

Playdate partyEveryone was so sweet about Reagan’s room! I am still picturing some of their faces and hearing their sweet comments in my head. The kids all flipped out about Minnie Mouse. I mean what little child does not love Mickey and Minnie?!

Minnie Mouse Room

Some of the sweet words the adults said were so encouraging.

what they are saying about disney paint

At the very end of the party, we had our giveaway! I made a little You Are My Sunshine sign and then I had a $50 gift-card to Wal-Mart to giveaway. I drew the names, and was so excited to give away the sign and gift-card to people I love.

drawing a giftcard winner

We had a lot of fun at the party, and I think it wore Reagan out! This room makeover was Reagan’s transition from a crib to a toddler bed. I truly believe the fun room and big deal we made over it helped make this transition easy. She has not gotten out of her bed (without me coming in for her) and took a good nap for the first time in her bed-right after the party! The beautiful Minnie Mouse comforter might be part of her love for her bed-thank you Disney!!

party girl tired

We are having a lot of fun in Reagan’s room already! I think it is my favorite room in the house. My friends laughed at me when I did a big speech while we ate at the reveal party cause I must have sounded like the biggest commercial, but I am a huge fan of Disney paint. I have painted a lot of rooms and furniture over the years, and Disney Paint is so smooth and thick. I only did one coat of the Cool Marine (teal color) on Reagan’s walls. It didn’t need another coat! I have never done that. I would totally recommend Disney Paint, and I will be using them again.

I have a lot of DIY posts coming with the how to’s of how I created some of the decor for Reagan’s room, but until then here are some pretty shots of her room.

minnie mouse bed

art wall

colorful girls bedroom

signature


Disclaimer: Compensation and products for review were provided by Glidden via MomTrends. The opinions expressed herein are those of the author and are not indicative of the opinions of Glidden.

Share this:

  • Click to email a link to a friend (Opens in new window)
  • Click to share on Facebook (Opens in new window)
  • Click to share on Twitter (Opens in new window)
  • Click to share on Pinterest (Opens in new window)

DIY Minnie Mouse Silhouette

April 26, 2013 By Erica Deuel 6 Comments

It’s crazy we are finally at the weekend where everything is happening! We will be closing on both houses and moving in the next few days. It is so exciting!

I want to give you a quick DIY project you could do over the weekend.

DIY minnie mouse silhouette

In my post about Reagan’s dresser makeover with Disney paint, I showed a few decor items I have made to help decorate her room. One of those decor items was this simple Minnie Mouse Silhouette. It was such a quick and easy project that you could knock out quickly! Here are the series of steps to do, so you too can create one of these subtle but fun Minnie Mouse vintage signs.

1. Find an old piece of wood.

piece of scrap wood

2. Sand the wood really good on the sides and top. This will lessen the cause of splinters and make it look more finished.

sanding a piece of scrap wood

3. Find bowls that look proportional to the size of Minnie’s head and ears.

drawing minnie mouse4. Trace the bowls.

drawing minnie mouse silloutte5. Paint inside all the circles to create a solid Minnie Mouse silhouette.

painting mickey mouse6. Draw a bow on a piece of paper and cut it out. Lay it where you want it to go.

minnie mouse bow7. Trace around the bow, so you have it stenciled on to your sign.

minnie mouse bow stencil8. Paint in the bow. I used Disney Paints’ Fashionista paint color to color in my bow.

painting minnie mouse bow9. Once the paint is dry, give it a nice coat of stain. This creates a more vintage, subtle, yet stunning design.

vintage minnie mouse10. Once the stain is dry, your sign is complete! Style it where ever you want! I think it makes a great decor item to a little girl’s bedroom, but it would also be an awesome gift to any age Disney fan!

how to make a minnie mouse signWhen I showed my little Reagan her sign, she squealed with delight. She was so excited and kept saying “my Minnie Mouse!” as she tried to hug the wood sign. 🙂

little girl love for minnie mouseI can’t wait to pull Reagan’s room together this next week! Be sure to follow me on twitter and instagram to get pics and updates of the whole moving process and sneak peeks of Reagan’s room getting pulled together. I hope you have a great weekend, and I will try to post again soon!

minnie mouse room decor

signature

Share this:

  • Click to email a link to a friend (Opens in new window)
  • Click to share on Facebook (Opens in new window)
  • Click to share on Twitter (Opens in new window)
  • Click to share on Pinterest (Opens in new window)

Disney Bedroom Inspiration

April 19, 2013 By Erica Deuel 9 Comments

Disclaimer: Compensation and products for review were provided by Glidden via MomTrends. The opinions expressed herein are those of the author and are not indicative of the opinions of Glidden.

One week from today we will be closing on our current house. Two days later we will be closing on our new house, and I am ecstatic to get there and start making this new house our home.

Today, I am excited to share with you some of what I have been working on and the plans I have for Reagan’s room. If you missed the first post of this series, click over to learn more about paint that captures the magic and inspiration of Disney with before shots of Reagan’s new room.

I knew I wanted to give Reagan a Minnie Mouse themed room. She is obsessed, and it is one of the cutest things. She was giddy when she opened up her Minnie Mouse comforter. Thank you Disney!

minnie mouse with beddding

Seeing her joy pumped me up even more to make this room so fun for her. It has been so exciting and also frustrating designing and planning a room that I am not currently in (to be able to figure out what would look the best). One thing that has helped me a ton is browsing DisneyPaint.com. I have used the virtual room painter to preview my paint colors and even watched how to videos.

How to paint videos

I didn’t know that the Great Slate paint only had to be painted with two coats until I watched this awesome short video! I highly recommend watching the how-to videos. While you are on DisneyPaint.com I recommend browsing the room ideas. There are several different room layouts per a character that I know can inspire you. They even set you up with a printable paint plan that can include your paint colors, finishes, templates you used, other supplies you’ll need, plus step-by-step instructions on how to use it all!

minnie mouse room

minnie mouse room ideas

After all this browsing and reading about paint, I just couldn’t wait until we moved into our new house to try out my Disney Paint. I busted them open and created this beautiful dresser makeover with two stunning Disney Paint colors.

before and after pictures of painted dresser

I started with an old dresser that was my great grandma’s. It had a rough coat of a basic gray on it from a few years ago that was dull and boring. I thought, what better way to save a special piece of heritage than to give it a makeover with my new paint!?

I started with painting it Disney Paint’s Pluto’s Paws. How amazing of a color name is that?!

yellow dresserI have painted a lot and I was amazed with how easy this paint went on and how thick of a coat it created! I fell in love with it immediately. After Pluto’s Paws dried, I broke out my new favorite color, Cool Marine.

disney paint It is a beautiful soft teal. I am going to paint most of Reagan’s room in this color. I adore it! Because of the small reading nook I showed in Reagan’s room, she has the possibilities of seven walls to paint. All of them will be this color except for one wall of bold stripes with the Fashionista color, and one wall trying out Disney’s specialty finish Great Slate to give her a chalkboard like wall.

painting a two tone dresser

thick coat painting I was really amazed with how easy the Cool Marine covered Pluto’s Paws. One coat of paint could have been enough to cover the dresser like I wanted on this piece, but I have never painted just one coat on a piece of furniture. It is a great paint. I loved it so much, I ended up painting the back of my dresser just to be able to keep painting with it. I love it.

teal dresser makeover

Once Cool Marine dried, I got to try out the idea I had in my head! I loved the two colors (Pluto’s Paws and Cool Marine). I was hoping to get both to show up on this piece. I lightly sanded the Cool Marine on the legs and edges and Pluto’s Paws slowly started to show through!

sanding a dresser

the difference in sanding

disney painted dresser

I love the way it came out! I can see both beautiful colors! It is going to look so good in Reagan’s room! I was so excited with my paint and seeing Reagan’s room coming together in my mind, I went ahead and created some fun accessories with the Fashionista paint color as well.

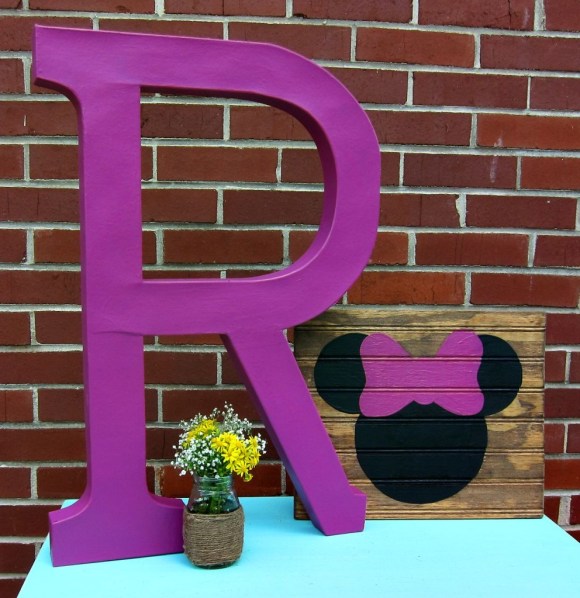
minnie mouse room decorI painted over a huge paper mache “R” and created the Minnie Mouse silhouette (that I will show you soon how to make step-by-step). After I added some fun knobs to the dresser, it was done!

vintage dresser

disney paint at wal-mart makeover

I am so excited about Reagan’s room. It will have a fun magical vibe. We bought Minnie Mouse hooks to hold her curtains up. Reagan wanted to take the box of them to bed the other day for her nap. She is so excited. We have gotten her a Minnie Mouse doll as a welcome to her new room present. I also have huge ideas with lights and lots of fun fabrics that I can’t wait to show you more of once I pull it off!

Thank you for checking in on Part 2 of Reagan’s room makeover with Disney Paint! I will be back in just over two weeks with the FULL room reveal and showing you what a few of her friends thought when they come see if for a little “room reveal” party.

signature

Disclaimer: Compensation and products for review were provided by Glidden via MomTrends. The opinions expressed herein are those of the author and are not indicative of the opinions of Glidden.

Share this:

  • Click to email a link to a friend (Opens in new window)
  • Click to share on Facebook (Opens in new window)
  • Click to share on Twitter (Opens in new window)
  • Click to share on Pinterest (Opens in new window)
  • Email
  • Facebook
  • Instagram
  • Pinterest
  • YouTube
YouTube-Channel
Erica Deuel

Subscribe for Weekly Updates!


Most Popular Posts

Painting Flower Pot Party Tips
DIY {easy} Burlap Wreath
DIY Paper Butterflies- Spring decor for cheap
DIY Outdoor Checker Board
Chiffon Flower Tutorial
Cheap lamp to Industrial Beauty
DIY Outdoor Table
Repurpose Old Kitchen Chairs
Paint That Captures the Magic and Inspiration of Disney
The Way I Thrift

Categories

  • All About the Kids
  • art journal
  • Blogging
  • Christmas
  • Craft Projects
  • Dancing Zebras
  • DIY
  • Eddy's postcards
  • Embroidery Journal
  • Family
  • Featured
  • Fireside Chat
  • Foster Care
  • Giveaways
  • Guest Posts
  • Home
  • Homeschooling
  • Kid Activities
  • Kid Craft
  • My Heart
  • Our Outings
  • Project Spotlight
  • Send Out Love
  • Shop
  • Sponsored Posts
  • Spoonful Lab
  • Spoonful Tribe
  • Tips + Tricks
  • Traveling
  • Uncategorized
  • Vlog

Favorite Categories

Subscribe for Weekly Updates!

Favorite Categories

© 2023 Spoonful of Imagination, Inc.