Spoonful of Imagination

Add it to a Family for Something Beautiful

  • Home
  • Our Family
    • Our Home
  • Courses
  • Shop
  • Contact

Spring Mantel Decor with Crafts

February 20, 2019 By Erica Deuel Leave a Comment

Who is ready for winter to be over!?

(All the hands went up and the hearts said yes). Especially the ones in the northern mid-west of the United States. We got more ice and snow last night in Indiana, so it felt like the perfect time to show you what I did at our art studio yesterday.

I set up spring.

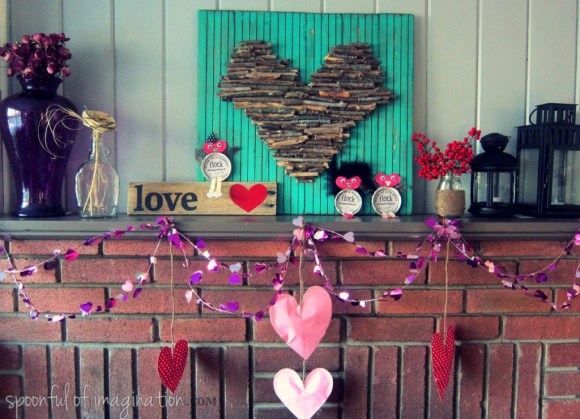
It was time to take down the winter-Valentines decor…

I went straight to warm colors, softer textures, and crafty bits for spring. It was inspired by these two baskets I found thrifting last weekend.

I wanted to use the baskets as little shelves to hold a vase of flowers in our new mantel display. Although I had this idea, I knew the vases needed to be light since the baskets are thin.

Since this mantel is at our art studio I constantly am trying to think of how to keep it easy, cheap, creative, crafty, yet not tacky. I want it to inspire others that pretty doesn’t have to be expensive and that you can mix some easy crafty bits into decor to look pretty and feel personal at the same time.

I decided for the light flower vases I would use old soup cans. To soften their metal look and give another texture, I simply wrapped some thick yarn around it a couple of times and knotted it off.

I stuck some fake flowers in the can, and my light vase to go in my basket was complete. I wrapped some wire around my new vase and stuck it through the basket and twisted the wire behind the basket to get my vase to stay in place.

I ended up putting the vases in the middle of the baskets, so the baskets look more like a frame than a shelf. It looked better to scale this way. If I had bigger “vases” I might have kept with the shelf idea. I like this process of creating where an idea might start as one thing, but as you create, you take it somewhere else.

It’s part of the fun of creating. We aren’t tied to our original ideas we see in our brain.

I strung up a clearance banner I found at Target for $0.50, put some Dollar Tree succulents in some wood pots we sell at the studio for people to paint, and hung up two umbrellas (for that spring rain) that I found at Hobby Lobby for $7.00 each and my spring mantel was complete.

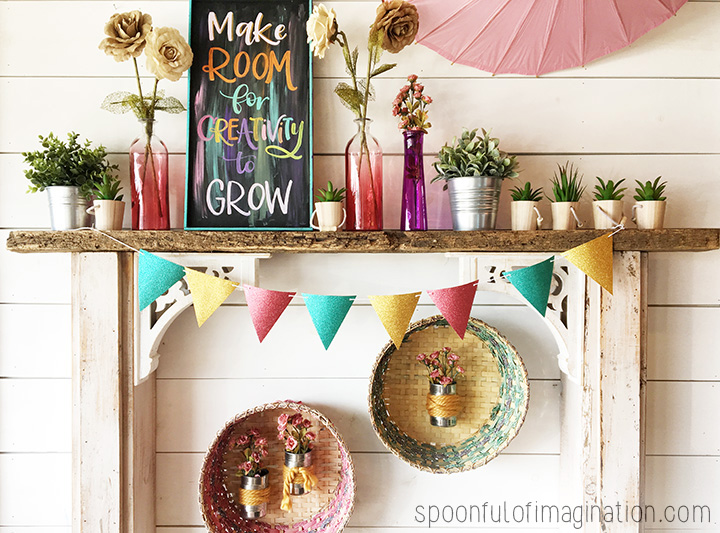
Do you ever find one item that inspires a look? I had a bunch of random ideas in my head for this new mantel, but once I found the baskets- it all came together!

Do you remember what last spring’s mantel was with the butterflies!? Take a look here and let me know which one is more YOU!

Happy day friends! Spring will come, but until then we can make the most of each day for the gift that it is!


Share this:

  • Click to email a link to a friend (Opens in new window)
  • Click to share on Facebook (Opens in new window)
  • Click to share on Twitter (Opens in new window)
  • Click to share on Pinterest (Opens in new window)

XO Cheap Wall Art

January 16, 2014 By Erica Deuel 2 Comments

Valentine's_day_artValentine’s Day is right around the corner! Although we aren’t huge fan’s of the holiday, we still have little kids that enjoy decorating and getting into it-so we do. I like to add a little touch of decor to our mantel without it feeling like you are blasted with red and pink and walking through some store aisles. Yesterday, I showed you how to make my simple felt pennant flag. Today, I want to show you how to make some inexpensive frame wall art.

I made the simple XO Art with a thrift store frame and items from the dollar section at Target. I started with some left over Christmas wrapping paper. The red was perfect for this craft. If you have some, you can do the same. I had some red and white chevron as well, but I opted for the solid red. Scrapbook paper would also work great. I used the back of my frame as a template for how big to cut my paper.

DIY_print_suppliesMy frame actually had a matte that came with it (for a $1.51 can you believe it!?), so I placed that on top of my cut wrapping paper and figured out where I liked my cardboard chip letters in it. I got a package of these silver letters in the dollar section at Target. The package had one letter of every letter in the alphabet! They would have been cute to place out in a bigger frame as an alphabet art piece for a kid’s bedroom, playroom, or school room. I opted to use my XO for this Valentine’s Day piece.

DIY_cheap_wall_artI used a little glue to hold my letters in place, and then I taped the wrapping paper to my matte frame to hold it in place tightly. I then placed the new art and matte back in my frame, and my simple art was complete!

DIY_wall_printIt was so easy and quick. The best part was it was cheap. I can use the frame again and again, and the art I can simply throw away in a few weeks (when Valentine’s Day is over) and not think twice about it.

X0_Valentine's_Day_art
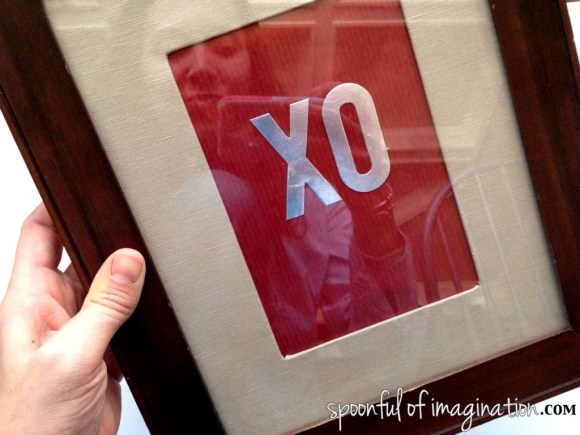
I love the pop of color it adds to some of the neutrals I have on my mantel. I hung a little gold heart I made on the frame and I love the way the two look together. NOTE: If you like that little gold heart, you can get your own (with the tutorial video) to create in my next Spoonful Tribe craft kit. It is one of three crafts that will be ready to ship together next Wednesday! Registration opens on Tuesday, January 21. So mark your calendars the tribe is coming!

Valentine's_Day_CraftDo you like to decorate for the holidays as well? You can check out my Valentine’s Day mantel from last year here, for more inspiration. That post also is full of more links to Valentine’s Day creations and crafts.

Thank you so much for stopping by! I hope you are having a beautiful week and are inspired by the things and people around you!

signature

Share this:

  • Click to email a link to a friend (Opens in new window)
  • Click to share on Facebook (Opens in new window)
  • Click to share on Twitter (Opens in new window)
  • Click to share on Pinterest (Opens in new window)

Fall Mantel {with tips and tricks}

September 11, 2013 By Erica Deuel 3 Comments

fall_mantel_tips_and_tricksI decorated our mantel last weekend for fall! I already loved how it was decorated, so it was a little hard at first to start messing with it at first. Now, I love it again! For someone who doesn’t like change, I can quickly adapt to holiday decor.

I wanted to share a few tips that helped me brainstorm this creation. These are tips and tricks that I used and thought through to help create this look. I hope they can help you too! After the tips, I will break down where I got each item or link to the tutorial.

1. Don’t be afraid to try something new! I had never stuck a huge piece of bark on my mantel to act as a vase.

2. Mix the different textiles. I used rustic natural elements (bark, pine cones, hay, acorns), shine (mirror, pumpkins), pottery (clay vase), burlap (handmade flowers), glass and metal (frame, lantern), wood and words (art in frame). Tip: Since I was decorating for fall, using outdoor elements naturally gave it a fall-ish feel.

3. Try to balance your colors. I was going with a more muted and fall pallet, but I made sure there was one pumpkin on the left and two on the right. That way there was a pop of color at both ends.

4. Try to use height. I like the mirror and the bark vase that added height to my mantel. It grabs your eyes a little and adds dimension rather than everything being the same height as if they were sitting on a boring book shelf. Although the picture frame is not the same height as the bark vase, it was needed to balance out the other side. The vase of burlap flowers alone was too short on that side alone. It looked neglected. Which brings me to my next point.

5. Layer and Layer your items! I have items overlapping each other other (like the hay is even hanging over the edge). My pumpkins are in front of the mirror and the frame is behind the vase. The frame almost looks like an after thought, but it was placed on purpose to add height and an added material that I had not used yet.

fall_mantel

fall_decorI love how it all came together. I especially love that little pine cone bunting hanging down on the front. Our fireplace is so white, so the pine cones and added decor really liven it up. I got so into decorating it, I dressed up the little side table next to it as well. You can see I added a fun little owl, fresh flowers, and my rustic cake stand. There is the mix of layering, using lots of different textiles and materials.

fall_decorated_mantel

fall_decorationsSince I already had almost everything the set-up only cost me $1.35 for the wood frame at a thrift store over the weekend. You probably have similar type things that you can reuse as well. Here’s the list of everything I used, where it came from, and a handful of links to DIY tutorials to a few of my items.

Wood Bark Vase: Gift from my dad that he found in his yard

Fake yellow flowers: Recycled from a center piece from my in-laws

Huge Mirror: Years ago at Walmart

Black Lantern: Ikea

Pottery vase: Gift from my sister-in-law

Burlap Flowers

Painted Pumpkins

My collection of afghans

Gray Pillow

Acorns: Gathered at our old house & saved

Silver Owl & Tall brown vase with elements: Hobby Lobby

Rustic Cake Stand

Tall lamp & Wood frame: Thrift store

Glass frame: Wedding present

Fall Subway Art free printable from the talented Erin at How to Nest For Less

fall_livingroom_decorationsI hope my little fall makeover can help inspire you to decorate and reuse a lot of the items you already have in doing so! A spoonful of imagination can go a long way in decorating! Who would have thought a piece of bark could act as vase!? Think of the possibilities and have fun!

signature

Share this:

  • Click to email a link to a friend (Opens in new window)
  • Click to share on Facebook (Opens in new window)
  • Click to share on Twitter (Opens in new window)
  • Click to share on Pinterest (Opens in new window)

Valentines Day Mantel {& a quick DIY}

February 1, 2013 By Erica Deuel 4 Comments

DIY Valentines day mantel

Valentines Day is what my husband and I like to refer to as the Hallmark Holiday.  We are not huge celebrate-ors of flowers being priced twice as high as their normal cost and all the high pressure to show the one you love that you care.  We come from the belief that should happen ALL the time, all 365 days of the year.  Random flowers bought, special notes left, and taking out the trash mean more to me when it is not forced upon.  Can you relate or is Valentines Day something special to you?

Although we are not HUGE Valentines Day people, we do have small kids who love holidays and get really excited about new decorations going up.  So, as a mom and DIY/homeschool blogger I feel to let the holiday go by without doing some special crafts and mentioning them would be a no-no.

This week, I decorated our fireplace mantel from different things we had around our house or cheaply bought/made.  I am going to break it down for you, show you a quick DIY, and I have a SWEET tease at the end.

You might remember my Stick Heart Wall Art, in which I showed you how to make the focal point of my mantel.

wood stick heart

Since I posted the original pictures of this wall art, I have been gathering more sticks and filling in all the gaped holes.  I like it so much better than what it use to be.  Although, it is not quite done.

Next, I left my Ikea lanterns in place and started adding other thing to it.  I grabbed the huge purple vase out of Reagan’s room with dried roses.  I added this old maple syrup bottle in which I stuck in my straw flower I picked up on my Savannah’s girl trip last year.  I wrapped twine around a honey jar I bought (and ate) at the Country Living Fair last fall and stuck some red berries in it that I cut off a bush in my backyard.

valentines day decor

I still love my little Bird’s of a Feather Valentines I made for my kids from old spaghetti jar lids, so of course they had to be up there.  The little love wood sign is not quite complete either, but it is on loan for my mantel.  Once I finish it, it will be a part of a fun group giveaway (that I will be sure to let you all know about).

Lastly, I draped some fun heart garland that I bought at the Dollar Tree and made some fun 3d paper hearts that I hung from it.  I originally was going to sew some felt hearts and stuff them with Poly Fil, but I decided that I didn’t want to spend the time to make such a temporary decor item.  This was my substitute creation.

3d diy paper hearts

Materials:

  • scrapbook paper
  • hot glue gun with sticks (no burning was involved like on my last hot glue gun craft)
  • scissors
  • jute twine
  • pom-pom balls

materials for vday craft

Fold your paper in half (I used 12″ x 12″ sheets) and then fold it in half again.  By doing this “double fold” you will be able to cut out two hearts the same size.

how to cut a paper heart

paper hearts

Cut as many double hearts out you want.  I created four 3D hearts, so I had eight paper hearts cut out.  Once you have cut out your hearts, start gluing them together, but leave a gap open at the top.

glueing craft heart

heart envelope

It will feel like you have a heart envelope.  Stuff a few pom-poms (the size of your pom-pom & hearts will depict how many pom-poms you stuff) inside.

craft heart stuffing

Add a little hot glue, and stick the jute twine (cut the desired length for you) on it and glue your heart shut.

glueing heart

vday heart

valentines day craft

craft hearts

Just complete that process till all your hearts are done!  I think they came out really cute!  They were so much quicker than sewing felt hearts.  When Valentines Day is over I’m going to let my boys rip them open and take out the pom-poms.  They will love it!

3d paper hearts

So, what do you think?  Do you decorate for Valentines Day?  How will you celebrate the day?

valentines day mantel

Now for my little tease!  There was a whole scene and plan my kids were scheming up behind my mantel photo shoot that I can not wait to show you with lots of pictures and a VIDEO-coming this weekend!  Stay tuned!

signature

Share this:

  • Click to email a link to a friend (Opens in new window)
  • Click to share on Facebook (Opens in new window)
  • Click to share on Twitter (Opens in new window)
  • Click to share on Pinterest (Opens in new window)
  • Email
  • Facebook
  • Instagram
  • Pinterest
  • YouTube
YouTube-Channel
Erica Deuel

Subscribe for Weekly Updates!


Most Popular Posts

Painting Flower Pot Party Tips
DIY Paper Butterflies- Spring decor for cheap
DIY {easy} Burlap Wreath
The Encanto, Madrigal's House Craft For Kids
Repurpose Old Kitchen Chairs
Cheap lamp to Industrial Beauty
School Desk Makeover
Engraved Wood Sign Tutorial (and Dremel Micro)
DIY King Size Rag Quilt {Repost}
Paint That Captures the Magic and Inspiration of Disney

Categories

  • All About the Kids
  • art journal
  • Blogging
  • Christmas
  • Craft Projects
  • Dancing Zebras
  • DIY
  • Eddy's postcards
  • Embroidery Journal
  • Family
  • Featured
  • Fireside Chat
  • Foster Care
  • Giveaways
  • Guest Posts
  • Home
  • Homeschooling
  • Kid Activities
  • Kid Craft
  • My Heart
  • Our Outings
  • Project Spotlight
  • Send Out Love
  • Shop
  • Sponsored Posts
  • Spoonful Lab
  • Spoonful Tribe
  • Tips + Tricks
  • Traveling
  • Uncategorized
  • Vlog

Favorite Categories

Subscribe for Weekly Updates!

Favorite Categories

© 2023 Spoonful of Imagination, Inc.