Do you love to celebrate the seasons with your artists by creating? Letting your artists help “decorate” is such an empowering, confidence building gift to invest in your child!
It is also such a fun way to talk about the upcoming season, by creating together. We designed this project to be all about the process! So, you can have fun being together, as you do all that!
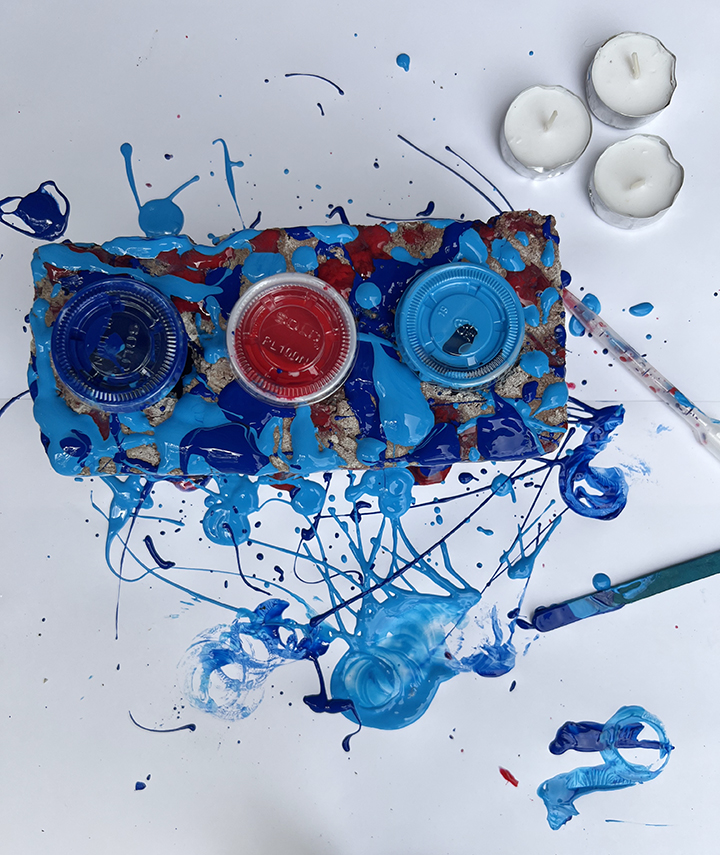
 Splatter, drizzle, squeeze, and pour paint to create your one of a kind Fourth of July centerpiece. Use it to hold candles or stick silverware in it for a utensil holder in the buffet line. There’s so many possibilities, when we use our imaginations!
What started as a phone call from Matt saying, “hey, do you want any of these old bricks?” led to such a fun process art paint project! I hope you enjoy it as much as I did.
If you don’t have any old bricks on hand, I know you can get some at a hardware store for less than $1.00 each. Here are some basic supplies to get you started. Please feel free to use what you have, or if you are local, you can pick this kit up in our shop as well.
Supplies:
brick (with holes)
paints
paper cup
stirrer (like a popsicle stick)
pipette
tea light candles (optional)
 Once you have all your supplies out, you are almost ready to have some fun! You might be able to tell that I laid some paper down before I started painting. This project can get a little messy, so protect your surface. I also used washable Tempera paints. That means this centerpiece can’t stay outside for forever. The rain will wash our beauitful colors off, but it also means if paint splatters somewhere unwanted, it will come off too. Once you are set up, you are ready!
1. Splatter
Every kid loves to splatter paint. Use the popsicle stick or any stick you might have to scoop a little paint up and flick it onto the brick. It creates fun splatters of globs and some strains of stringing paint. I love the mix of amounts that get placed and that you can’t really control the outcome. It’s freeing!

2. Drizzle
This is a little bit slower of a technique then the splatter painting. As you scoop up the paint with the stick, you let it slowly fall off the stick, so it creates like a drizzle effect as you move your hand around. This has a bit more control as you can determine how much paint falls in a particular area before you move your hand -thus, moving the paint! I tired to aim for the areas that the dark blue paint didn’t get splattered.

3. Squeeze
Pipette’s are such a fun little tool to paint with! You can also use a small syringe, baby nasal aspirator, or pool toy that does the same technique of sucking up liquid! I used a small paper cup with a little water in it to pour some of my paint in on top. I then used the pipette to stir the water + paint mixture to create a more runny, liquefied paint. The pipette then sucked up that newly created paint and I got to spray it wherever I wanted.
Again, this can be a more controlled painting step then the splatter paint. It depends on how high in the air you squeeze the paint. Play around with squeezing it low to the brick verse about 2 feet high. Talk about aim and the different effects the height had.

4. Pour
How often do you just get to pour paint!? It’s not something that happens a lot as it can be considered “wasting”. I would argue that it is also a freeing step that gives a different look and teaches things like spacing, managing, and control. Pour a little paint and watch it drip down the sides of the brick! it can be mesmerizing!

5. Dry
This might be the hardest step! After layers and layers of paint, the newly created decoration is going to take some time to dry. It might test your young artist’s patience. That’s another valuable skill to invest in! Try to not touch the brick, while this important step happens. It helps if the brick sits in that hot June/July sun to dry more quickly!
6. Decorate and enjoy
Once your newly created centerpiece is dry, you are ready to enjoy it! Place tea light candles it for a fun decoration or use it as a utensil holder in the buffet line!


We know your artist will get so excited explaining how he/she made it to all your Fourth of July visitors!
Have fun and embrace the process! The best part is this was hopefully a really fun memory with your artist. The second best was it was also really cheap. Throw the brick out after the holiday and create a new one next year! There is no need to store it.
Just get creating memories and fun!


 Has Encanto been on repeat at your house too!? My Reagan has easily seen the movie over a dozen times. If we are honest though, I love it too.
 If you treat this project like the movie’s theme, “the miracle is not some magic that you’ve got, the miracle is you”, than you will have a blast. Gather some supplies and have fun!
 It’s no secret that I love to use what supplies we have on hand. The creative process should not be expensive. So gather some basic supplies that are close to what is pictured or listed below and then we will tap into that imagination!
 Our house is a little more narrow then the Madrigal house in the movie, but it is the type of board we had on hand. If your house is wider, than you may be even able to add more windows and details in this next step than we were able to add.

 The final step is in all the details! Add as many layers of paper you want to make your magical house pop! We added trees, windows, flowers, and then drew in a magical candle.
 We were inspired by the Madrigal house, but now you are making your own magic house. There is no right or wrong. This is your moment to take an inspiration and play with the process!
 We had so much fun creating and playing with color!
 We’ve been enjoying a winter storm here in Indiana. The kids are going on day three of school moving from in person to e-learning for the amount of snow we have had. They estimate we have had more than a foot of snow in 48 hours.

 Although we love the outdoor play, we have had more indoor play as well. It got us thinking that others might be looking for some indoor fun too. We thought we would share this fun and multiple step snowman project with you to encourage some creative fun in your home this winter. Gather a few supplies from around your home and join us to build a snowman!
 Once you have the supplies and are ready to create, the first thing you do is draw a snowman! I love how Reagan drew a two circle snowman and Jeremiah drew a three circle snowman that is zoomed in on, as part of his shape is “off” the page.
 After you have used your drawing tools to draw the snowman, then you are ready to paint a winter scene for the snowman to live in! Paint the background surrounding the snowman. You can ask your artist why you should NOT paint in the snowman. Hopefully, they value clean, white snow too.
 The final step is to embellish and add details to that snowman. We used scrap paper to cut hats and scarfs to dress our snowmen. You can also use your drawing tools from step one to add more details to the snowman or background.

 Wasn’t that super easy? This is such a fun project to do with a few students or a whole class! Just as a review the steps are..
 We had so much fun creating some indoor snowman. Jeremiah suggested that real outdoor snowmen are more fun to create. It’s hard to compete with snow, right!? But, if you too need some indoor fun, try this fun project. My artists are in 5th and 7th grade and they still had fun. We are never too old to play with creative tools! The pieces don’t have to be saved for forever. Stick them on your mantel for the season like we did, and then feel free to toss them out. The most important part is to to HAVE FUN!
 It’s the week of hearts.
 I started with a bunch of cardboard boxes. I cut off the box flaps and use those pieces to then cut into heart shapes.
 After I painted my hearts and they were completely dry, I used Elmers glue to attach them to one another. I used blue Elmers Glue, only because it was the first glue I found. Any school glue or hot glue would work!
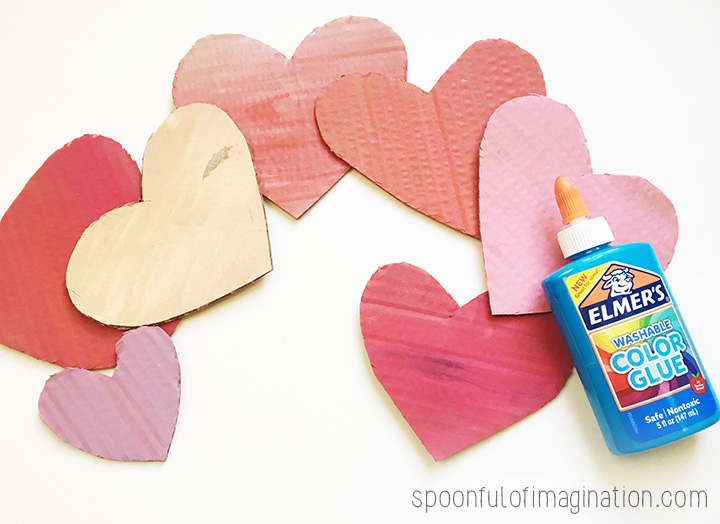

 You can probably tell by the pictures I created a base with the bigger hearts and then the smaller ones on top. It helps create a thicker, 3d shape and gives it some depth.
 After I made my wreath, I thought this could be such a fun quick class party craft.