
Do you have a hard time throwing some things away? There are lots of things I don’t think twice about. Clothes, pillows, dishes are few that I don’t blink an eye at. Maybe one of those are the thing that’s hard for you? For me, I definitely have a hard time throwing wood things away.
Wood seems timeless. It can be painted, stained and built onto and is such a sustainable product. Recently, my Jeremiah was cleaning out his closet and found this wood marble run toy. He didn’t want it anymore, and I kept looking at it thinking there has gotta be something I can create with this old toy!
I looked at the size of wood. They were perfect fun, block size pieces.
I looked at the texture. They were smooth, already sanded, sturdy pieces.
As I stared at the pieces, I realized I could turn them into a recycled candlestick holder.


Recycled Candlesticks Make Fun, Quirky Decor!
I found a wood circle in our garage to be a bigger base and gave that a quick sanding. I then added a little superglue to hold the pieces together and let them dry. I had so much fun moving the pieces around to see what size and angle I wanted them to be. The candlesticks looked really pretty just left as wood, but you know me. I love color, so I added some acrylic paint to jazz them up a bit.

After the recycled candlesticks were dry, I was ready to display them and enjoy! I love mixing homemade decor into our home. These added a fun element to our kitchen table.


I love how they look in my office too, so only time will tell on where they officially end up. How fun are they!? I made something new from something that was almost just trashed or donated away.
My favorite ways to get creative are often to use something that is not expected. I like to use things we wouldn’t find in a craft store.
Being creative is just a process of pairing ideas.


The Creative Process Doesn’t Have to Be Expensive.
We all have things we can repurpose and reuse to make something new.
One way to see things in a new way is to make sure our tanks are full. We can’t be operating on fumes, lack of sleep, deprived of things that bring us joy to have eyes to see things differently. It takes space to have energy or margin to think differently than our auto pilot normal.
That is the most expensive part of the creative process. It requires us to be more whole to think creatively.

I am so excited about my new recycled candlesticks. Now, my mind is going trying to think of other things that would make great candlesticks. Fall is a great time to light some candles to bring some warm and comfort inside as the world is getting colder on the outside.
So, do you have something you can look at with new eyes and make something different out of it? If you need help with this, join us in my 30 Day Imaginative Journey. We are practicing small, quick exercises to get us thinking and practicing growing our creative muscles! Download your free calendar here!
Check out what my Reagan made for her Halloween costume out of trash, which was from one of the imaginative prompts!


 Do you have any emoji fans in your family?
 The first step is to turn one plate over on top of another and staple around the edges to attach the plates to one another.
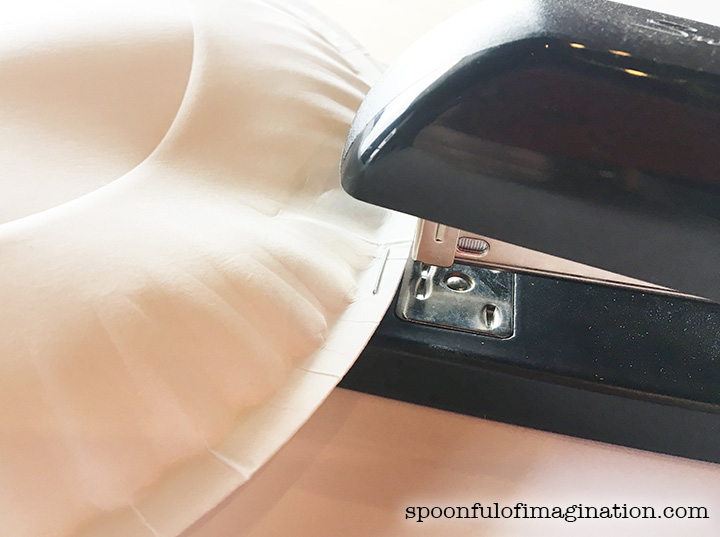
 After you have a face form, I used a little hot glue to attach my craft stick inside the plates. There was enough room between the stapled areas to stick a glob of glue on one of the plates, place a craft stick on top, and hold the sides of the plate together until the glue holds and hardens.
  After you have attached your stick, your emoji is ready to be created. This is where you can use whatever you have on hand! Markers, crayons, colored pencils, and even construction paper would be great tools to use to create your classic emoji face.

 It was so fun to see the artists laugh at one another’s creation as they guessed which face they were making. These were quickly used as puppets or props as kids talked and acted out little skits with them. It’s a magical moment to watch a creation turn into inspiration for more fun!
 This is such a simple project that you can personalize however you want! Maybe you want to paint your face-that’s great too!
 If you paint or have a child that likes to paint, you probably have gone through some paint bottles, right!? For years and years, I have just thrown these little bottles out when they seem to be empty. Now that we have an
 My family uses essential oils, so we have these little
 In the classroom, I stapled on a pipe-cleaner and twisted it up to allow the students to fill it with beads. This added a nice fun texture and hanger to make our wood pieces into hangable signs. You don’t have to do this step to your pieces, but I am a sucker for several textures in my projects.
 This project is all about the process. You can’t totally control what your piece will end up looking like, which takes some of the stress of it being “perfect” away. I encouraged the students I was working with to do small drops at a time. Some of the bottles may be more watered down than others. By starting with small drops you can watch as colors blend together on their own to make new colors.
 Another technique is you can slightly tilt these signs or even stand them up to watch as the paint colors blend and mix to make a stunning abstract piece!
 I don’t think you can ruin this project. Often students thought they were done and then they would add one more color. At this point, it is usually when it became more stunning. As the signs dried, some of the paint colors would shift and sort out a little. So fun!


 We went back and sprayed a
 I love how no matter how many times you do this project, no two signs will ever be the same. Depending on the colors you use and how your paint swirls and mixes together…each piece will be unique. This was such an inexpensive project to implement for a 5th-grade class. They had a blast.
 What do you think? Will you start saving your paint bottles? I think these finished pieces make a great gift for a family member. Christmas is coming. You can create some masterpieces with your kids for all those proud grandparents.
 One of my favorite things to do with my kids is to create with them. In these moments, we can sit and talk and jump from being in our own imaginations to dreaming with one another. It’s so fun. It’s often in these moments that we come up with cool ideas like this pom pom bead.
 We got a big pile of pom poms, and the next step is to just attach these two materials!
 We used our hot glue gun. We simply held the bead by the openings so the side of the bead is open. We placed a small dab of hot glue on the bead and pressed the pom pom on top.
 This is such a quick process! Before you know it, you will have a huge pile of pom pom beads! We love how the beads are cheap and quick, yet they create a whole new dimension and texture to our garland! My girl loved stringing these up with her other pieces! It was such a fun and easy sewing project for her!


 What do you think? Would your little one like to create some pom pom beads to sew with too? You could make a garland with just pom pom beads. Or maybe replace the triangle with fabric strips!? With a little imagination, the possibilities are endless.
 Christmas is coming. Can’t you see a long strand of these wrapped around a small table top tree? How cute!