I’ve got the joy, joy, joy joy, down in my heart
Where?
Down in my heart
Where?
Down in my heart to stay!
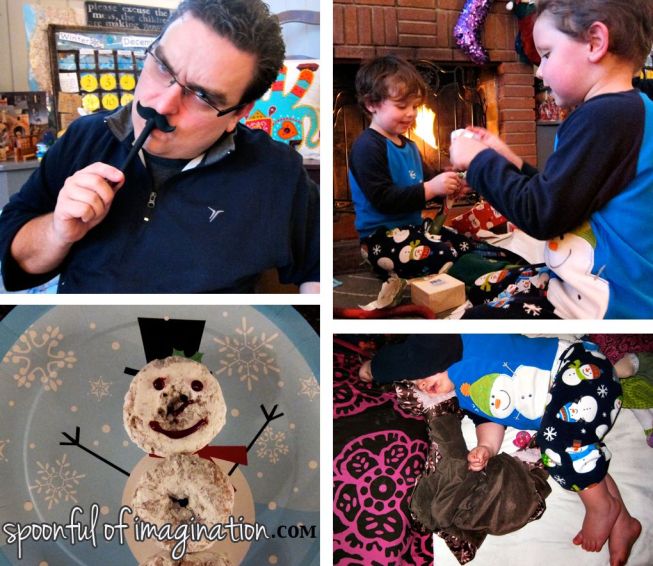
Anyone remember that song? Ok, I will stop singing… for now :). It’s Christmas time…how can our hearts not be full of joy? I know my little family has been sick which makes some days hard, but we are so blessed. We aren’t in our new place yet, but we have been staying with the most wonderful new friends. It’s been a transitioning time, and I am so thankful for the conversations, rest, and fun we have experienced here on the farm. There are lots of things I will miss when we move into our own home next week. One thing on the list will be their barns.

Huge red barns is something I always dream about, and there are some gorgeous ones here. Last week, my kids were playing dress up, and I then took them to work with me out in one of them. You can hardly tell with all their winter gear, but I had Raphael, Darth Vader, and Queen Elsa with me.

 I know there are lots of joy signs out there. I too have been eying them and wanting to create one for myself. I thought while I don’t have a house, I should make the sign. This way when we move into our new house, my sign is ready to decorate our new front door!
I started with a couple of boards. I got two different width boards because I wanted the size contrast and I wood glued them together. You can purchase boards 10″ or 12″ wide if you’d like to eliminate this step.

 Now, this method of attaching is not strong enough to make a shelf or something like a piece of furniture without being reinforced with more wood on the back side. For a sign that will just hang on a wall though, it was ok. I ended up making two signs, so I could give one to our sweet host friends.
Once the glue was dry, I did a dry paint brush technique with a light silver paint. I wanted the boards to have some color, but I also wanted them to look rustic. Doing a dry brush paint job, I was able to get some color on the boards without creating a solid thick paint job. Lightly dip your brush into your paint. Brush long quick strokes so the paint lightly applies and keep working your brush on the wood when you would normally go back for more paint. This will create a nice thin spread. Depending on how rustic or weathered you want your boards to appear, you can decide how much you’d like to cover. If you over cover you can always go back and do some sanding. The key is just to avoid a thick coat.

 I then did a light sand to my paint and used this Minwax stain
. It gave a darker hue to the boards that is just beautiful. I painted the stain on, left it for about 15 minutes (I’m learning the colder temperatures here take paint, glue, and stain a good bit longer to set – In Georgia I would have left the stain about 5-7 minutes) while I did some other parts of my sign. Once the stain set I wiped off the excess with a rag. I spray painted some letters red. You could stencil or paint the letters on your sign, but I wanted mine to have a 3D dimension and stick off the board, so I used some press board letters from JoAnnes. I think these paper mache letters
would look cool too! Next, I stuck some berries in a grapevine wreath
and I was almost complete.


 The final step was attaching my letters and wreath to my sign. I did the letters first, but I placed the wreath in the middle so I could figure out placement. I used wood glue and laid my letters in place. I used wood clamps to hold them tightly to the board while the glue dried. This step is important to make sure you get the strongest bond possible.
For the “J”, my clamps would not reach to the letter, so I laid a spare board across the top of the “J” to help press the letter down tightly. This method of using clamps is a good idea, even just to protect your letter. By clamping this way, you don’t rough up your letters at all with the clamp. The paint does not get messed with and there are no clamp marks dug into the letters.


 Once the glue was good and dry, I removed the clamps and only had attaching the wreaths left to do. I brought in my husband to help me brainstorm. We thought we might use wood glue and then opted to just hammer a few small nails in place and stick the wreath on. By doing it this way, you can easily remove the wreath to store it better at other times of the year.


 I love how it came out! It is a classic piece that reminds us Joy to the world, the Lord has come. I might leave it up all year though, cause there is joy in the everyday. My amazing husband just spoke all about this at church, if you care to listen or watch, you can check it out here.

 I’m pretty excited about how this turned out! Christmas is such a fun time to craft. I made another Christmas joy sign last year, that may inspire you as well.
 Thank you so much for checking out my sign. This is a busy time of year and I hope you can all enjoy it with your families!! As always, thank you for following along with our journey. I love to hear from you! Follow me on Instagram (ericadeuel), as I post there pretty much everyday as my daily blog.
Disclaimer: There are affiliate links used in this post.

 Christmas joy is here! We have been hanging out in front of the fireplace, playing games, and singing songs loud for all to hear. It can be a crazy busy time, but I hope you are able to unplug and enjoy the little things that make this season such a special time.
 Once the spray paint was dry, I peeled up the foam sticker. The light layer of spray paint had created a stencil for me to see my letters. I carefully painted the letters in red. Note: the spray paint barely changed the color of my burlap. It just got a little lighter.
 Once the letters were dried, I cut two slits at the top of each of my burlap pieces to allow for the string to be strung through. I used red and white cloths line from the Dollar Tree to string my joy banner. I liked the color combination of this option, but any ribbon, string, yarn, or rope would work.
 The last step was to string everything alone the clothesline. I bought two packages of red, felt coasters at the Dollar Tree. I opened both packages and simply strung my clothes lines through one of the outer holes of one of the coasters to begin. I strung four coasters, then my letters, and then the remaining four coasters onto the clothesline. I spaced them out evenly and hung it up! My Christmas joy garland was complete!
 This was such an easy DIY and fun way to add a little Christmas joy to our home. If you like the idea of adding Christmas joy by simple “joy” crafts, you would probably like
 Imagine a mom out in the backyard playing with her kids. As she is noticing the change of color in the trees and enjoying the cool breeze, she can’t help but keep gathering sticks and throwing them in a pile. To do what with them she does not know, but she has to save them.
 I then picked one stick up at a time and hot glued a strip of glue along it ad placed it onto my green board. I simply kept doing this method, so my tree grew taller and taller till I had transferred all the sticks.

 Next, I took extra sticks and filled in gaps and holes in my tree. This step created a more dimensional, layered, and full tree.
 I really like the simplicity of this tree. I didn’t want to dress it up much, since it was pretty obvious it was a tree. I simply glued a little yellow, wood star at the top and my tree was done.
 My last step was to add JOY to my Christmas sign. What is Christmas without joy, right!? I picked out the letters from one of my stencils, and I dabbed red paint to paint the letters onto my board. I then decided to paint the letters in solid and outlined them with a thin Sharpie to give the joy a small pop.
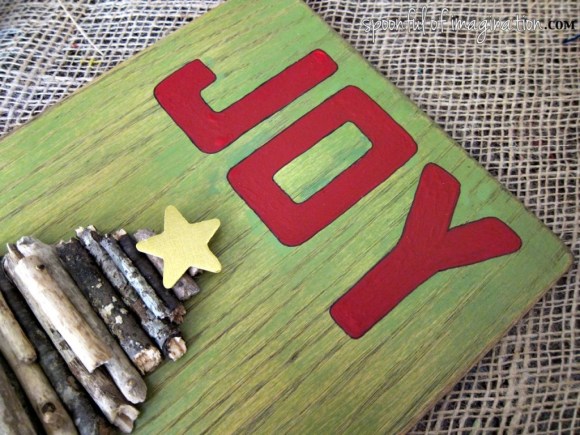 My Christmas sign was then complete! I love how it turned out. It was free to me, since I had all the supplies. I think this simple craft makes a great Christmas decor item.
 Have you started decorating or creating for Christmas yet?