Spoonful of Imagination

Add it to a Family for Something Beautiful

  • Home
  • Our Family
    • Our Home
  • Courses
  • Shop
  • Contact

DIY Inexpensive Fur Stool

August 29, 2015 By Erica Deuel Leave a Comment

repurpose_stepping_stoolWhat do you think about the fur craze?

Do you love it? For me, I like having a few pieces. I don’t want to over do it and look like a hunter’s cabin but a few pieces are fun! I love the neutral color with texture paired with something colorful.

The love of that look gave me an idea a little while ago. I have been searching for the perfect, old, small step stool for a while to use on this project. When I found this little one for $3.oo, I knew I was ready to try my idea.

old_stoolThe first thing I did was use some pliers to pull the little staples out that were holding the cushion in place. I was excited to see the foam was in good condition, so I decided to reuse it. I gave it a Lysol scrubbing to make sure it was clean and set it aside.

old_stool_makeoverI then spray painted thin coats till the stool was covered with a pretty dark teal.

Spray_paint_stoolI bought a couple small faux furs in the craft aisle at Hobby Lobby. If you are a regular there like I am, it is down the felt aisle and costs around $2-$3 a piece. I sewed two pieces together to make one larger sheet of fur.

DIY_fur_stool

craft_fur_project

stool_makeoverI laid the foam back on the stool, figured out where I wanted my seem in the fur to be, and started using my staple gun to attach the fur. After getting one side secure, I stretched the fur across the stool, trimmed some of the excess and then started stapling the rest of the fur in place.

recovering_stepping_stool

craft_fur_stool_project

stepping_stool_makeover
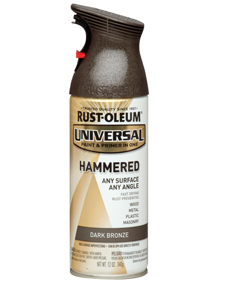
Once the fur was complete, the stool did not give me the “fun” look I was hoping for. I decided to use some paint tape to tape off paint lines to add gold paint to the stool’s legs. That was just what it needed.

painted_gold_legsI love how it turned out! It is such a fun eye catcher. The mix of texture and neutrals with a pop of color is exactly what I had in mind.

DIY_stepping_stoolReusing a tired old piece to create something beautiful is so fun. It’s one of my favorite crafts to do.
step_stool_makeover
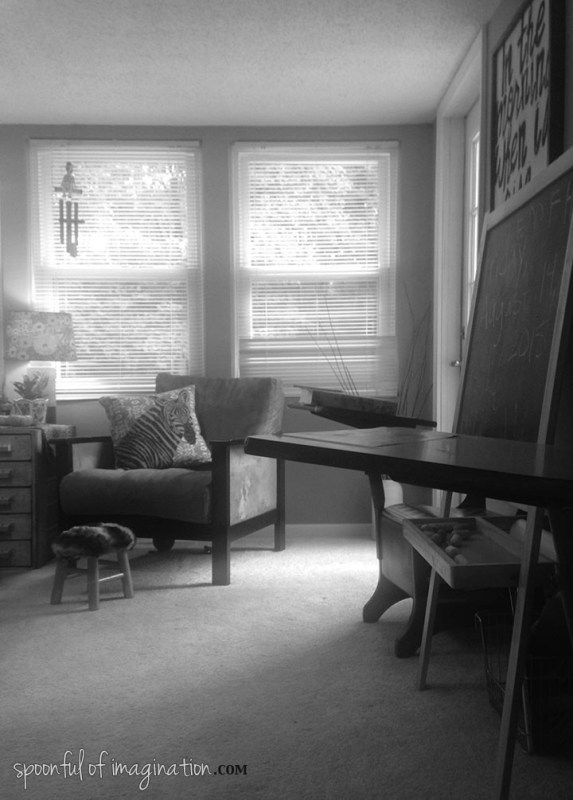
My little Reagan has currently claimed this stool and moves it from room to room. Today, it lived in our sun room where we do most of our school during the week.

bohemian_roomIf you’ve looked into fur pieces, you know that they can be pricey. I think this stool cost me about $7, since I already owned several of the supplies. Creating something can be so much cheaper.

Have you reused something lately to create something new and beautiful? Don’t be scared to give new life to something old…you never know it just might become your new favorite piece!

signature

Share this:

  • Click to email a link to a friend (Opens in new window)
  • Click to share on Facebook (Opens in new window)
  • Click to share on Twitter (Opens in new window)
  • Click to share on Pinterest (Opens in new window)

Repurposed Furniture Ideas

August 8, 2013 By Erica Deuel Leave a Comment

I was recently asked by Hometalk to curate a clipboard (on their site) full of amazing repurposed furniture projects. I love redoing furniture and changing ways pieces can be used up, so I was excited to do this. One of my favorite repurposed pieces I have done is my recycled old dresser.

Check out the clipboard for some inspiration and ideas, which has links to all kinds of awesome projects posted on Hometalk.

repurposed_furniture

Thanks so much for checking in, and I hope you are having a good week!

signature

Share this:

  • Click to email a link to a friend (Opens in new window)
  • Click to share on Facebook (Opens in new window)
  • Click to share on Twitter (Opens in new window)
  • Click to share on Pinterest (Opens in new window)

Repurpose Old Kitchen Chairs

May 31, 2013 By Erica Deuel 56 Comments

repurpose old kitchen chairsAs we were preparing for our move, I was in major purge mode. I was sending things to Goodwill and the dump like it was my job. My old  kitchen chairs were on the “Do Not Move” list. I was determined not to let them make the cut. My husband, Matt, kept shooting this one down. Every time I’d move them to the get-rid-of-area, he’d scoot them back. I’d take them to the carport to haul away and he’d slip them into his office.

One Saturday, I started working on my new craft desk. I look over and I see Matt pulling out the kitchen chairs. My heart lept, “Ah finally he’s getting rid of these things!” Then he started tinkering. I have been asking him to make me a bench for years. When he pulled this thing together I was stunned. Not only did he repurpose our old kitchen chairs but I think he created something really special – the bench I had always wanted.

I wanted to share with you the basics of how he did it, so you can repurpose some chairs of your own!

old chairs

Matt started by removing the cushions from the chairs. As with most of the projects we do, our little helpers wanted to give us a hand.

removing chair cushions
We then lined up the three chairs that were in the best shape. In order to have arm rests on the ends of the bench, we used the two arm chairs that traditionally sit at the end of the table. Matt removed one arm from each chair to “open up” the bench.

armrest
He then squared up the chairs. Our chairs have a nice square front, whereas they have a bit of a funky curve in the back. I know a lot of chairs have more rounded legs and features that could make it difficult for the chairs to sit flush together. This is where you will need to do a little problem solving and get creative. Susan from FrouFruGal created a Chair Bench with her husband. Her tutorial inspired Matt and they have some great steps on squaring up and connecting the chairs. 

wood glue chair legs
Using wood glue and C-Clamps Matt attached the front legs together. Once the legs were glued he then sunk a few deck screws into the legs for more support.

C-Clamp Tip: To get the most out of your C-Clamp connections you want them to be really tight. This however can create some indentations in your wood from the clamps. To avoid scuffing up your projects, use some scrap wood or even slip some thick cardboard in between your clamps and your project.

wood glue with clamps
We decided this bench was going to go in the foyer at our new house. Inside the foyer you see our stair case with the black wrought iron stair spindles. Instead of going with the silver bars on the chairs we wanted them to be black to tie in with the staircase. While the glue was setting on the legs we used painters tape to wrap a portion of the chairs and spray painted the rods.

taping off to spray paint

spray paint bars

We had some Pine 1×4’s laying around from other projects that we used for the bench. Matt measured them to hang over the front edge by one inch and over the side by two inches.

cutting boards for a chair bench
He used deck screws and screwed the boards directly into the chair frame. If you want the screws to disappear from your design, make sure to sink them in a little deeper than the surface of the wood. Depending on the power of your drill and softness of the wood this may be easy. However, if you pre-drill your screw holes with a small drill bit, this helps in sinking the screws deeper.

As you can see, Matt also cut a small notch in one of the boards so that it could fit around the arm rest.

making a wood bench
Because the front legs were square they were easy to attach and secure. As I mentioned, the backs of the chairs and the legs have some curve in their design. We knew the bench boards would provide support for the whole piece by securing the chairs together even more. Regardless,  Matt wasn’t satisfied with the back having no other attached support. (Can you tell he’s a perfectionist?) He created two pieces like the one you see below to add some reinforcement in the gaps. Again, they were secured with deck screws into the frames of the chairs.

reinforcing chair legs
Once all the boards were attached, he went back and filled the screw holes with carpenter’s wood filler.

wood filler
To help age the chairs and bring out the rustic look we love so much, we sanded around the chairs and worked to scuff up the edges.

sanding a wood bench

sanding a bench
Finally, using some of our Disney Cool Marine paint, Matt painted the bench boards to complete the project.

painting a wood bench
As I said, I was stunned with the results. These chairs were on the way out. Matt not only saved them, he earned them a spot right by the front door!

before and after chair makeover

I decorated them with some of my pillows and placed three baskets underneath. This is the “Drop Spot” for the kids as they come and go from the house. It’s been incredibly helpful getting them to have a pair of tennis shoes and sandals in these baskets. Rather than wrestling them to go back upstairs and find shoes, this helps us to get out of the door faster in the mornings.

DIY chairs to bench makeover
I hope you have a wonderful weekend. Thanks for stopping by!

signature


Share this:

  • Click to email a link to a friend (Opens in new window)
  • Click to share on Facebook (Opens in new window)
  • Click to share on Twitter (Opens in new window)
  • Click to share on Pinterest (Opens in new window)

Spray Paint Ikea Furniture

May 22, 2013 By Erica Deuel 1 Comment

spraypaint ikea furniture

Did you know you can spray paint Ikea furniture? I figured you could with the right spray paint, but I never had till Reagan’s bedroom makeover.

As we were planning her room, I knew she needed a toddler bed. I loved J’s old bed, but the blue was not going to go with Reagan’s theme. I wanted a rustic, darker color to help tone down the bright colors in her room. I also wanted it to look metallic as I was adding natural type elements in her room for the decor. I stumbled across my new favorite spray paint in this search.

Hammered spraypaint

This is not a sponsored post. I just really fell in love with this product and wanted to share it with you. I have never used a textured type spray paint. It is so forgiving! Usually when you spray paint and you spray it too “thick” is can dry with a dripped or spotted look. With this product, it just added more of a texture, and I loved it! I will show you more of what I mean further down. I used this exact color and finish on Reagan’s bed, and it was perfect!

The first thing I did for this bed transformation was take the bed apart it give it a good cleaning. I simply wiped it down with Clorox wipes to get rid of the dirt and grime from all the years the boys used it.

ikea toddler bed
After the bed was clean. I started spraying some base light coats. I wanted the bed to have a complete covering of all the blue. As I sprayed, with this hammered texture spray from Rustoleum, I started to notice that the really “wet” spots got the best texture look as you can see below.

spray paint light coats

hammed rustoleum spraypaintDoesn’t that look cool!? I love it and have found my new addiction. I also used this spray paint on a tall lamp in Reagan’s room. It’s such a fun quick thrill to spray something and give it a new look and life. Every item in my house better watch out now.

One thing that was hard for me was to not rush this project. This was a big item to spray paint and there were lots of sides and edges to cover and between each coat of spray, I had to wait till it was fully dry, before I could flip it and spray the other side. Once I thought it was almost done, I was out of spray paint and almost just quit because I was ready to put it back together and move on to the next project, but I was patient. I went and bought another can of spray paint. I think this project took 3 1/2 cans of paint. That cost was much less than buying Reagan a new bed.

be patient when spray paintingOnce it was completely dry and all the coats were complete, we moved the pieces to her room. We put the bed back together in her room to keep it easier to maneuver through the house.

putting a room togetherOnce the bed was put back together, the bed transformation was done! I set it up with her cute comforter and pillows and we all fell in love with it!

enjoy your workThe bed has not chipped at all and it is wearing incredibly well. I am so glad to know you can spray paint Ikea furniture! What a good trick to remember! One of my favorite moments was when J first saw the freshly painted bed. I was so afraid he’d be upset about us “ruining” and giving away his bed. He looked at it and said, “Wow mommy! I like Rea-Rea’s new bed!” It didn’t even register that it was his old bed – transformation success!

What about you? Have you spray painted anything lately? Have you tried using texture spray paints?

signature


Share this:

  • Click to email a link to a friend (Opens in new window)
  • Click to share on Facebook (Opens in new window)
  • Click to share on Twitter (Opens in new window)
  • Click to share on Pinterest (Opens in new window)
Next Page »
  • Email
  • Facebook
  • Instagram
  • Pinterest
  • YouTube
YouTube-Channel
Erica Deuel

Subscribe for Weekly Updates!


Most Popular Posts

Painting Flower Pot Party Tips
DIY {easy} Burlap Wreath
Imagine the Possibilities with me!
Repurpose Old Kitchen Chairs
DIY Outdoor Checker Board
The Encanto, Madrigal's House Craft For Kids
School Desk Makeover
DIY Paper Butterflies- Spring decor for cheap
DIY Yarn Picture Frame
Cheap lamp to Industrial Beauty

Categories

  • All About the Kids
  • art journal
  • Blogging
  • Christmas
  • Craft Projects
  • Dancing Zebras
  • DIY
  • Eddy's postcards
  • Embroidery Journal
  • Family
  • Featured
  • Fireside Chat
  • Foster Care
  • Giveaways
  • Guest Posts
  • Home
  • Homeschooling
  • Kid Activities
  • Kid Craft
  • My Heart
  • Our Outings
  • Project Spotlight
  • Send Out Love
  • Shop
  • Sponsored Posts
  • Spoonful Lab
  • Spoonful Tribe
  • Tips + Tricks
  • Traveling
  • Uncategorized
  • Vlog

Favorite Categories

Subscribe for Weekly Updates!

Favorite Categories

© 2023 Spoonful of Imagination, Inc.