 I love a good mess. There is something that is comfortable about it to me. Paint and little cuts of paper are a pretty normal sight around my house. BUT, every other week or so I do have an OCD melt down where I clean it all. We then create it again. I love crafting in a clean house. So weird.
There are times though, where I want a quick, no mess craft. I have found that having some of these on hand can change-up my day and even help entertain my kids on days where I am needed something. I whipped this little picture frame craft up for my J this week, and he loved it. And I loved that it was a no mess craft, as we were headed out-of-town the afternoon he created it.
Here is what you need:
- Paper mache picture frame (an old cheap frame could work or even cutting your own out of cardboard or paper) You can also buy them in a bulk party pack
for a birthday party, thanksgiving craft, school activity, etc.
- Fall foam leaf stickers
- Picture (for these types of things I just print out the picture at home on normal cardstock paper)
 My J loves stickers, and we are constantly working on building a little more confidence and independence in him. This simple craft was something he could do on his own, have fun, create, and make something he was proud of.
I printed off two pictures (different sizes) to find the best fit for the frame. I cut the one out I liked best and stuck it in the frame for J. He then picked up leaves, pulled the sticker back off, and placed them on the frame. It was that easy. I loved that he mixed up shape and colors of the leaves. So, although it was pretty basic, it still shows his creativity.

 There was no glue or paint to clean up. We simply threw away the sticker backs, and his frame was complete. Side note: Peeling sticker backs off can be a task for a preschooler and really practiced his eye hand coordination! The teacher in me had to say that ;).
 He made something he was proud of, and I hope built that little self-confidence up while having a blast. I love how the natural background looks with the pop of leaf color. You could always paint it, wrap it with string, or create a paper collage on your frame to make it a little more intricate and a step harder. Another idea is to use this idea for a card rather than a picture frame and write a message inside. The possibilities are endless to stretch or use this technique!
 I hope you are having a great weekend and are getting to use your creative juices!


 I browsed my scrapbook collection and found a piece that I wanted to use. One 12″ x 12″ piece was enough paper for all four 4″ x 6″ frames. I used the glass from the frame to cut the paper the right size. Once I had four sheets of paper for my frames, I set them aside and started on the letters.
 I used just plain brown wrapping paper and stenciled my letters on to it. The brown paper was to act as my guide to cut my burlap latter, since it’s hard to write on burlap. See below.
 I picked up my brown paper and placed a small square of burlap behind it. As I cut my letter out, I made sure to cut the burlap layer as well. This gave me a burlap letter without having sharpie markings on it (as sharpie might be the only thing that would have shown a stencil traced on burlap).


 After all the letters were in frames, my new wall art was complete! It was such a simple craft. I love that I can easily switch this art out to use the frames for something else, but for now I have some fun, cheap wall art. I want to try this same idea, but with animal silhouettes instead of letters.


 I laid them out around my poster to measure how much they needed cut. I placed each one carefully to figure out how the bent, warped wood would look best on side and placement. I didn’t want to have to make a cut where nails were, so I took all those things into consideration when I figured out which board would go where.

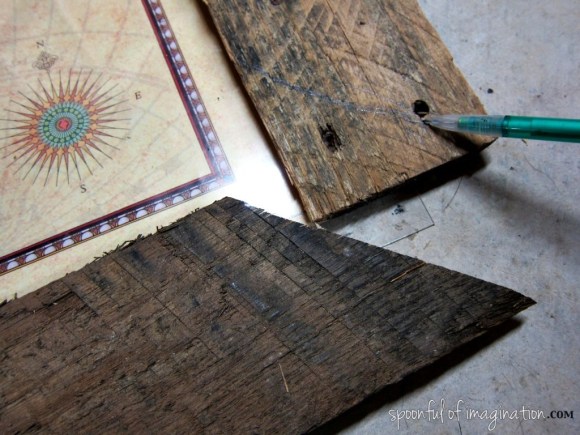 I did one board at a time and went around clockwise till my whole frame was completed.
 I then cut four small 90 degree triangle pieces from other scrap wood we had on hand. These I used to hold the actual frame together as well as hold the plastic protective cover, poster, and backing of another old poster frame in place and create the frame. An important tip at this step is to have big wood clamps that can keep your pallet poster frame in place while you get the other three layers in place.
 I then used wood glue and screws to hold the 90 degree triangles in place.
 I added a little hanging bracket at the top in the center and my new pallet frame was almost done!
 I sanded the edges to get rid of some of the obvious splinters and used wood stain to stain the 90 degree triangles on the back. This way when my new art hangs on the wall, they will not stand out as eye sores. I didn’t end up staining the front pallet wood though because I loved the natural color of the wood. The old nails and knots still are my favorite pieces of this frame. Take note in the picture below how it was important to measure the cuts before I went to cut the boards. I was very close to getting nails.
 Have you ever created anything with pallet wood? It is strong treated wood that makes for great projects!


